Pioneer VSX-917V-S User Manual - Page 62
Other Settings, The Other Setup menu
 |
View all Pioneer VSX-917V-S manuals
Add to My Manuals
Save this manual to your list of manuals |
Page 62 highlights
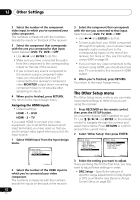
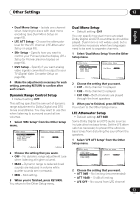
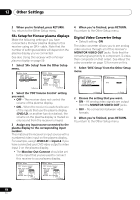
12 Other Settings 2 Select the number of the component video input to which you've connected your video component. The numbers correspond with the numbers beside the inputs on the back of the receiver. 3 Select the component that corresponds with the one you connected to that input. Select between DVD, TV, DVR or OFF. • Use / and ENTER to do this. • Make sure you have connected the audio from the component to the corresponding inputs on the rear of the receiver. • If you connect any source component to the receiver using a component video input, you should also have your TV connected to this receiver's component video MONITOR output (down converting component video is not possible after assigning an input). 4 When you're finished, press RETURN. You return to the Input Assign menu. Assigning the HDMI inputs • Default settings: HDMI - 1 - DVD HDMI - 2 - TV If you used HDMI to connect your video equipment, you must tell the receiver which input terminal(s) you have used, so that you see the proper video signal when you select the input source. 1 Select 'HDMI Input' from the Input Assign menu. 5. Input Assign a.Digital Input b.Component Input c.HDMI Input :Return 2 Select the number of the HDMI input to which you've connected your video component. The numbers correspond with the numbers beside the inputs on the back of the receiver. 62 En 3 Select the component that corresponds with the one you connected to that input. Select between DVD, TV, DVR or OFF. • Use / and ENTER to do this. • To hear audio from your HDMI component (through this system), you must also make separate audio connections to the corresponding inputs on the rear of the receiver. For more on this, see Connecting using HDMI on page 56. • If you connect any video component to the receiver using HDMI, you should also have your TV connected to this receiver's HDMI output. 4 When you're finished, press RETURN. You return to the Input Assign menu. The Other Setup menu The Other Setup menu is where you can make customized settings to reflect how you are using the receiver. 1 Press RECEIVER on the remote control, then press the SETUP button. An on-screen display (OSD) appears on your TV. Use and ENTER on the remote control to navigate through the screens and select menu items. Press RETURN to confirm and exit the current menu. 2 Select 'Other Setup' then press ENTER. System Setup 1.Surr Back System 2.Auto MCACC 3.Manual MCACC 4.Manual SP Setup 5.Input Assign 6.Other Setup 6.Other Setup a.DRC Setup b.Dual Mono Setup c.LFE ATT Setup d.SR+ Setup e.DVC Setup : Exit :Return 3 Select the setting you want to adjust. If you are doing this for the first time, you may want to adjust these settings in order: • DRC Setup - Specify the amount of dynamic range adjustment to Dolby Digital or DTS soundtracks (see Dynamic Range Control Setup on page 63).
-
 1
1 -
2
-
3
-
4
-
5
-
6
-
7
-
8
-
9
-
10
-
11
-
12
-
13
-
14
-
15
-
16
-
17
-
18
-
19
-
20
-
21
-
22
-
23
-
24
-
25
-
26
-
27
-
28
-
29
-
30
-
31
-
32
-
33
-
34
-
35
-
36
-
37
-
38
-
39
-
40
-
41
-
42
-
43
-
44
-
45
-
46
-
47
-
48
-
49
-
50
-
51
-
52
-
53
-
54
-
55
-
56
-
 57
57 -
 58
58 -
 59
59 -
 60
60 -
 61
61 -
 62
62 -
 63
63 -
 64
64 -
 65
65 -
 66
66 -
 67
67 -
68
-
69
-
70
 |
 |
