Pioneer VSX94TXH Owner's Manual - Page 36
The System Setup menu - vsx remote
 |
UPC - 012562865607
View all Pioneer VSX94TXH manuals
Add to My Manuals
Save this manual to your list of manuals |
Page 36 highlights
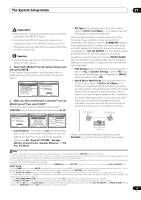
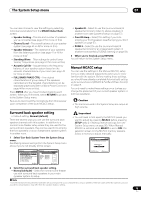
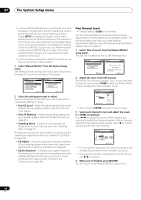
07 The System Setup menu Chapter 7: The System Setup menu Making receiver settings from the System Setup menu The following section shows you how to make detailed settings to specify how you're using the receiver (for example, if you want to set up two speaker systems in separate rooms), and also explains how to fine-tune individual speaker system settings to your liking. RECEIVER INPUT SELECT SYSTEM OFF SOURCE CD DVD DVR2 DVR1 CD-R TV HOME MEDIA GALLERY i Pod XM RADIO ì HDMI BD TV CTRL SIRIUS ì ZONE2/3 TUNER RECEIVER SLEEP DIMMER ANALOG D.ACCESS CLEAR +10 A PARAMETER TOP MENU ì ì TUNE CLASS DISC CH ENTER LEVEL V PARAMETER MENU T.EDIT BAND ST SETUP ENTER ST ìì RETURN PROGRAM TUNE CATEGORY GUIDE TV CONTROL TV VOL INPUT SELECT TV CH VOL ANT REC INFO MUTE 1 Switch on the receiver and your TV. Use the RECEIVER button to switch on.1 • If headphones are connected to the receiver, disconnect them. 2 Press RECEIVER on the remote control, then press the SETUP button.2 An on-screen display (OSD) appears on your TV. Use the buttons and ENTER to navigate through the screens and select menu items. Press RETURN to confirm and exit the current menu. • Press SETUP at any time to exit the System Setup menu. 3 Select the setting you want to adjust. DVD/LD - 55.0dB System Setup MENU 1. Auto MCACC 2. Surr Back System 3. Manual MCACC 4. FULL BAND PHASE CTRL 5. Data Management 6. Manual SP Setup 7. Input Setup 8. Other Setup :Exit • Surr Back System - Specifies how you are using your surround back speakers (see Surround back speaker setting on page 39). • Manual MCACC - Fine-tunes your speaker settings and customize the Acoustic Calibration EQ (see Manual MCACC setup on page 39). • FULL BAND PHASE CTRL - Calibrates and automatically corrects the frequency-phase characteristics of the speakers connected (see Full Band Phase Control on page 44). • Data Management - Checks your MCACC presets and manages them through copying, renaming or deleting (see Data Management on page 45). • Manual SP Setup - Specifies the size, number, distance and overall balance of the speakers you've connected (see Manual speaker setup on page 47). • Input Setup - Specifies what you've connected to the digital, HDMI, component video and S-video inputs (see The Input Setup menu on page 67). • Other Setup - Makes customized settings to reflect how you are using the receiver (see The Other Setup menu on page 68). Automatic MCACC (Expert) If your setup requires more detailed settings than those provided in Automatically setting up for surround sound (MCACC & Full Band Phase Control) on page 8, you can customize your setup options below. You can calibrate your system differently for up to six different MCACC presets3, which are useful if you have different listening positions depending on the type of source (for example, watching movies from a sofa, or playing a video game close to the TV).4 • Auto MCACC - See Automatically setting up for surround sound (MCACC & Full Band Phase Control) on page 8 for a quick and effective automatic surround setup. See Automatic MCACC (Expert) below for a more detailed setup. Note 1 Make sure not to switch off the power when using the System Setup menu. 2 • Note that when editing items in the Manual MCACC menu, you will need to first specify the MCACC preset you want to adjust by pressing MCACC before pressing SETUP. • You can't use the System Setup menu when the iPod, HOME MEDIA GALLERY (VSX-94TXH only), XM or SIRIUS Radio input source is selected (in either the main or sub zone). When you set ZONE 2 or ZONE 3 to ON (page 60), you can't use the System Setup menu. 3 These are stored in memory and referred to as MEMORY1-6 (or M1-6) until you rename them in Data Management on page 45. 4 You may also want to have separate calibration settings for the same listening position, depending on how you're using your system. 36 En
-
 1
1 -
2
-
3
-
4
-
5
-
6
-
7
-
8
-
9
-
10
-
11
-
12
-
13
-
14
-
15
-
16
-
17
-
18
-
19
-
20
-
21
-
22
-
23
-
24
-
25
-
26
-
27
-
28
-
29
-
30
-
 31
31 -
 32
32 -
 33
33 -
 34
34 -
 35
35 -
 36
36 -
 37
37 -
 38
38 -
 39
39 -
 40
40 -
 41
41 -
42
-
43
-
44
-
45
-
46
-
47
-
48
-
49
-
50
-
51
-
52
-
53
-
54
-
55
-
56
-
57
-
58
-
59
-
60
-
61
-
62
-
63
-
64
-
65
-
66
-
67
-
68
-
69
-
70
-
71
-
72
-
73
-
74
-
75
-
76
-
77
-
78
-
79
-
80
-
81
-
82
-
83
-
84
-
85
-
86
-
87
-
88
-
89
-
90
-
91
-
92
-
93
-
94
-
95
-
96
-
97
-
98
-
99
-
100
 |
 |
