Pioneer VSX94TXH Owner's Manual - Page 77
Controlling the rest of your system
 |
UPC - 012562865607
View all Pioneer VSX94TXH manuals
Add to My Manuals
Save this manual to your list of manuals |
Page 77 highlights
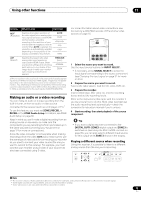
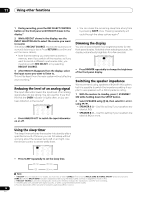
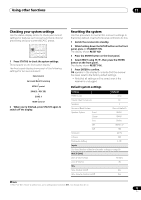
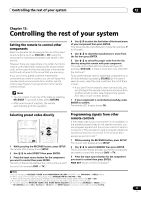
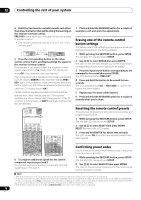
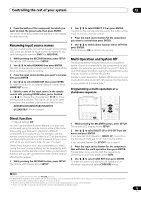
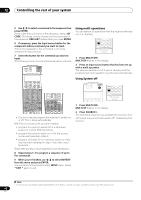
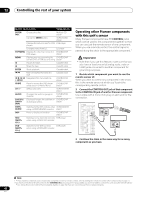
Controlling the rest of your system 12 Chapter 12: Controlling the rest of your system Setting the remote to control other components Most components can be assigned to one of the input source buttons (such as DVD/LD or CD) using the component's manufacturer preset code stored in the remote. However, there are cases where only certain functions may be controllable after assigning the proper preset code, or the codes for the manufacturer in the remote control will not work for the model that you are using. If you can't find a preset code that matches the component you want to control, you can still teach the remote individual commands from another remote control (see Programming signals from other remote controls below). Note • You can cancel or exit any of the steps by pressing RECEIVER. To go back a step, press RETURN. • After one minute of inactivity, the remote automatically exits the operation. 4 Use / to select the first letter of the brand name of your component then press ENTER. This should be the manufacturer's name (for example, P for Pioneer). 5 Use / to select the manufacturer's name from the list then press ENTER. 6 Use / to select the proper code from the list, then try using this remote with your component. The code should start with the component type (for example, DVD 020). If there is more than one, start with the first one.2 To try out the remote control, switch the component on or off (into standby) by pressing SOURCE . If it doesn't seem to work, select the next code from the list (if there is one). • If you can't find or properly enter a preset code, you can still teach the remote individual commands from another remote control (see Programming signals from other remote controls below). 7 If your component is controlled successfully, press ENTER to confirm. The remote LCD display shows OK. Selecting preset codes directly RECEIVER INPUT SELECT SYSTEM OFF SOURCE CD DVD DVR2 DVR1 CD-R TV HOME MEDIA GALLERY i Pod XM RADIO HDMI BD TV CTRL SIRIUS ZONE2/3 TUNER RECEIVER D.ACCESS CLEAR +10 A PARAMETER TOP MENU TUNE CLASS DISC CH ENTER LEVEL V PARAMETER MENU T.EDIT BAND ST SETUP ENTER ST RETURN PROGRAM TUNE CATEGORY GUIDE TV CONTROL TV VOL INPUT SELECT TV CH VOL SLEEP DIMMER ANALOG 1 While pressing the RECEIVER button, press SETUP. The remote LCD display shows SETUP. 2 Use / to select PRESET then press ENTER. 3 Press the input source button for the component you want to control then press ENTER. The LCD on the remote displays the component you want to control (for example DVD or TV).1 Programming signals from other remote controls If the preset code for your component is not available, or the available preset codes do not operate correctly, you can program signals from the remote control of another component. This can also be used to program additional operations (buttons not covered in the presets) after assigning a preset code.3 1 While pressing the RECEIVER button, press SETUP. The remote LCD display shows SETUP. 2 Use / to select LEARNING then press ENTER. The LCD on the remote prompts you for the component you want to control (for example DVD or TV). 3 Press the input source button for the component you want to control then press ENTER. PRES KEY shows in the LCD display.4 Note 1 You can't assign the RECEIVER, TUNER, iPod, HOME MEDIA GALLERY (VSX-94TXH only), XM RADIO or SIRIUS buttons. 2 • When using a Pioneer HDD recorder, please select PIONEER DVR 487, 488, 489 or 493. • When using a Pioneer plasma display released prior to summer 2005, please select preset codes 637 or 660. 3 The remote can store about 200 preset codes (this has been tested with codes of Pioneer format only). 4 • You can't assign the RECEIVER, TUNER, iPod, HOME MEDIA GALLERY (VSX-94TXH only), XM RADIO or SIRIUS buttons. • TV CONTROL buttons (TV, TV VOL +/-, TV CH +/- and INPUT SELECT) can only be learned after selecting TV CTRL. 77 En
-
 1
1 -
2
-
3
-
4
-
5
-
6
-
7
-
8
-
9
-
10
-
11
-
12
-
13
-
14
-
15
-
16
-
17
-
18
-
19
-
20
-
21
-
22
-
23
-
24
-
25
-
26
-
27
-
28
-
29
-
30
-
31
-
32
-
33
-
34
-
35
-
36
-
37
-
38
-
39
-
40
-
41
-
42
-
43
-
44
-
45
-
46
-
47
-
48
-
49
-
50
-
51
-
52
-
53
-
54
-
55
-
56
-
57
-
58
-
59
-
60
-
61
-
62
-
63
-
64
-
65
-
66
-
67
-
68
-
69
-
70
-
71
-
 72
72 -
 73
73 -
 74
74 -
 75
75 -
 76
76 -
 77
77 -
 78
78 -
 79
79 -
 80
80 -
 81
81 -
 82
82 -
83
-
84
-
85
-
86
-
87
-
88
-
89
-
90
-
91
-
92
-
93
-
94
-
95
-
96
-
97
-
98
-
99
-
100
 |
 |