Pioneer VSX94TXH Owner's Manual - Page 73
ZONE Audio Setup
 |
UPC - 012562865607
View all Pioneer VSX94TXH manuals
Add to My Manuals
Save this manual to your list of manuals |
Page 73 highlights
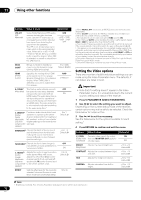
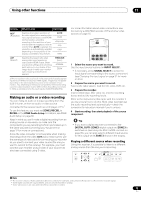
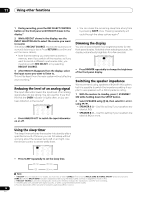
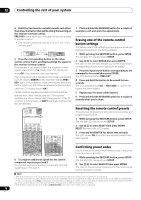
Using other functions 11 Setting What it does Option(s) RESa (Resolution) Specifies the output resolution of the video signal (when analog video input signals are output at the HDMI OUT connector, select this according to the resolution of your monitor and the images you wish to watch). When AUTO is selected, the resolution is automatically selected depending on the capability of the display connected to this receiver. AUTO PURE 480p/576p 720p 1080i 1080p ASP (Aspect) Specifies the aspect ratio when analog video input signals are output at the HDMI output. Make your desired settings while checking each setting on your display (if the image doesn't match your monitor type, cropping or black bands appear). THROUGH (none) NORMAL ZOOM a. When a resolution value is selected in this setting and the analog signals input are converted and output as HDMI signals, images may not appear depending on the video signals being input or the resolution of your monitor. Also, depending on the source component or the monitor being used, the output resolution may be different from this setting. Conversion to 1080p is available only for the input signals of 480i/576i/480p/576p. Making an audio or a video recording You can make an audio or a video recording from the built-in tuner, or from an audio or video source connected to the receiver (such as a CD player or TV).1 To use this feature, you must set ZONE2/RECSEL to RECSEL in the ZONE Audio Setup. For details, see ZONE Audio Setup on page 69. Keep in mind you can't make a digital recording from an analog source or vice-versa, so make sure the components you are recording to/from are hooked up in the same way (see Connecting your equipment on page 12 for more on connections). Since the video converter is not available when making recordings (from the video OUT jacks) make sure to use the same type of video cable for connecting your recorder as you used to connect your video source (the one you want to record) to this receiver. For example, you must connect your recorder using S-video if your source has also been connected using S-video. For more information about video connections, see Connecting a DVD/HDD recorder, VCR and other video sources on page 16. RECEIVER INPUT SELECT SYSTEM OFF SOURCE CD DVD DVR2 DVR1 CD-R TV HOME MEDIA GALLERY i Pod XM RADIO HDMI BD TV CTRL SIRIUS ZONE2/3 TUNER RECEIVER 1 Select the source you want to record. Use the input source buttons (or INPUT SELECT). • If necessary, press SIGNAL SELECT to select the input signal corresponding to the source component (see Choosing the input signal on page 31 for more on this). 2 Prepare the source you want to record. Tune to the radio station, load the CD, video, DVD etc. 3 Prepare the recorder. Insert a blank tape, MD, video etc. into the recording device and set the recording levels. Refer to the instructions that came with the recorder if you are unsure how to do this. Most video recorders set the audio recording level automatically-check the component's instruction manual if you're unsure. 4 Start recording, then start playback of the source component. Tip • If you have a digital recorder connected to the DIGITAL OUT1 (ZONE3) digital output and ZONE 3 is switched on (see Using the MULTI-ZONE controls on page 60), you can also select a different input source for this output while ZONE 3 shows in the display. Playing a different source when recording Using this receiver, it's possible to listen to a different analog source than the one you're recording. SPEAKERS AUDIO PARAMETER VIDEO (TUNE) PHONES (ST) ENTER (ST) TUNER EDIT BAND MULTI - ZONE & SOURCE/REC SEL CONTROL ON/OFF SIGNAL SB ch STEREO/ SELECT PROCESSING F.S.SURR MCACC USB SETUP MIC VIDEO/GAME 2 INPUT SETUP (TUNE) RETURN DIGITAL IN S-VIDEO VIDEO L AUDIO R Note 1 • The receiver's volume, Audio parameters (the tone controls, for example), and surround effects have no effect on the recorded signal. • Some digital sources are copy-protected, and can only be recorded in analog. • Some video sources are copy-protected. These cannot be recorded. 73 En
-
 1
1 -
2
-
3
-
4
-
5
-
6
-
7
-
8
-
9
-
10
-
11
-
12
-
13
-
14
-
15
-
16
-
17
-
18
-
19
-
20
-
21
-
22
-
23
-
24
-
25
-
26
-
27
-
28
-
29
-
30
-
31
-
32
-
33
-
34
-
35
-
36
-
37
-
38
-
39
-
40
-
41
-
42
-
43
-
44
-
45
-
46
-
47
-
48
-
49
-
50
-
51
-
52
-
53
-
54
-
55
-
56
-
57
-
58
-
59
-
60
-
61
-
62
-
63
-
64
-
65
-
66
-
67
-
 68
68 -
 69
69 -
 70
70 -
 71
71 -
 72
72 -
 73
73 -
 74
74 -
 75
75 -
 76
76 -
 77
77 -
 78
78 -
79
-
80
-
81
-
82
-
83
-
84
-
85
-
86
-
87
-
88
-
89
-
90
-
91
-
92
-
93
-
94
-
95
-
96
-
97
-
98
-
99
-
100
 |
 |
