Pioneer VSX94TXH Owner's Manual - Page 63
Other connections, Using the SR+ mode with a Pioneer, plasma display, Connecting a PC for Advanced - vsx cannot access menu
 |
UPC - 012562865607
View all Pioneer VSX94TXH manuals
Add to My Manuals
Save this manual to your list of manuals |
Page 63 highlights
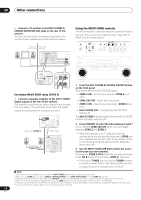
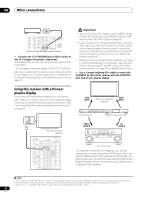
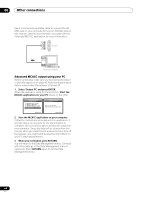
Other connections 08 Using the SR+ mode with a Pioneer plasma display When connected using an SR+ cable, a number of features become available to make using this receiver with your Pioneer plasma display even easier. These features include: • On-screen displays when making receiver settings, such as speaker setup, MCACC setup, and so on. • On-screen volume display. • On-screen display of listening mode. • Automatic video input switching on the plasma display. • Automatic volume muting on the plasma display. See also SR+ Setup for Pioneer plasma displays on page 69 for more on setting up the receiver. Important • The SR+ features do not work when any of the iPod, HOME MEDIA GALLERY (VSX-94TXH only), XM, or SIRIUS Radio function is selected. RECEIVER INPUT SELECT SYSTEM OFF SOURCE SLEEP SR+ DIMMER GENRE ANALOG ATT CD DVD DVR2 DVR1 CD-R TV HOME MEDIA GALLERY i Pod XM RADIO HDMI BD TV CTRL SIRIUS ZONE2/3 TUNER RECEIVER D.ACCESS CLEAR +10 A PARAMETER TOP MENU TUNE CLASS DISC CH ENTER LEVEL V PARAMETER MENU T.EDIT BAND ST SETUP ENTER ST RETURN PROGRAM TUNE CATEGORY GUIDE 1 Make sure that the plasma display and this receiver are switched on and that they are connected with the SR+ cable. See Using this receiver with a Pioneer plasma display above for more on connecting these components. • Make sure you have also selected the display input to which you've connected the receiver in The Input Setup menu on page 67. 2 To switch SR+ mode on/off, press RECEIVER, then the SR+ button. The front panel display shows SR+ ON or SR+ OFF. • The automatic video input switching and the automatic volume muting features are enabled separately; see SR+ Setup for Pioneer plasma displays on page 69. Connecting a PC for Advanced MCACC output When using the Acoustic Calibration EQ Professional (see page 42) to calibrate the reverb characteristics of your listening room, you can graphically check the results on your computer connected to this receiver. Also, when the Full Band Phase Control function is activated, you can visually check the calibrated characteristics of group delay of the speakers and the corrected characteristics of group delay processed by the exclusive correction filter by installing the corresponding PC application on your computer. Use a commercially-available RS-232C cable to connect the RS-232C jack on your computer to the 9-pin RS-232C jack on the back panel of this receiver (the cable must be cross type, female-female). The software to output the results is available from the support area of the Pioneer website (http:// www.pioneerelectronics.com/pna/ci/codes/ 0,,2076_262707270,00.html). Instructions for using the software are also available here. If you have any questions regarding, please contact the Customer Support Division of Pioneer. Please make sure your system meets the following requirements: • Operating system must be Windows® Vista, Windows® XP, Windows® 2000, Windows® Millennium Edition, Windows® 98 Second Edition, or Windows® NT 4.0 (Service pack 6). • CPU must be at least Pentium 3 / 300 MHz or AMD K6 / 300 MHz (or equivalent) with at least 128 MB of memory, and your monitor must be able to display a minimum resolution of 800x600. • An RS-232C port connector is necessary for graphical output. Refer to the operating instructions and/or the PC manufacturer for more information on making the proper port settings. • System must have internet access. • Connect your computer to the RS-232C jack on the rear panel of the receiver. Make sure that the receiver and all connected components are switched off and disconnected from the power outlet when you do this.1 Note 1 Make sure that you do this before continuing to the Reverb Measurement option in Using Acoustic Calibration EQ Professional on page 43 (measurement data is cleared if you switch off the power). 63 En
-
 1
1 -
2
-
3
-
4
-
5
-
6
-
7
-
8
-
9
-
10
-
11
-
12
-
13
-
14
-
15
-
16
-
17
-
18
-
19
-
20
-
21
-
22
-
23
-
24
-
25
-
26
-
27
-
28
-
29
-
30
-
31
-
32
-
33
-
34
-
35
-
36
-
37
-
38
-
39
-
40
-
41
-
42
-
43
-
44
-
45
-
46
-
47
-
48
-
49
-
50
-
51
-
52
-
53
-
54
-
55
-
56
-
57
-
 58
58 -
 59
59 -
 60
60 -
 61
61 -
 62
62 -
 63
63 -
 64
64 -
 65
65 -
 66
66 -
 67
67 -
 68
68 -
69
-
70
-
71
-
72
-
73
-
74
-
75
-
76
-
77
-
78
-
79
-
80
-
81
-
82
-
83
-
84
-
85
-
86
-
87
-
88
-
89
-
90
-
91
-
92
-
93
-
94
-
95
-
96
-
97
-
98
-
99
-
100
 |
 |
