Pioneer X-HM10-K Operating Instructions - Page 41
Connecting to the front panel video terminal, Video camera, etc., Connecting an iPod/iPhone, iPod
 |
View all Pioneer X-HM10-K manuals
Add to My Manuals
Save this manual to your list of manuals |
Page 41 highlights
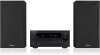
English Français Deutsch Italiano Español Nederlands Connecting up 02 Connecting to the front panel video terminal Front video connections are accessed via the front panel using the VIDEO button on the remote control.1 There are standard audio/ video jacks. Hook them up the same way you made the rear panel connections. • Remove the panel cover when making connections to the front panel. VIDEO INPUT USB 5 V 0.5 A iPod iPhone VIDEO L AUDIO R Connecting an iPod/iPhone This system has a dedicated iPod/iPhone terminal that will allow you to control playback of audio content from your iPod/iPhone using the controls of this system. • Switch the system into standby then use the supplied iPod cable to connect your iPod to the iPod/iPhone terminal on the front panel of this system. • Remove the panel cover when making connections to the front panel. • For the cable connection, refer to also the operating instructions for iPod. • For instructions on playing the iPod, see Playing an iPod on page 55. VIDEO INPUT iPod iPhone USB 5 V 0.5 A VIDEO L AUDIO R Video camera, etc. VIDEO AUDIO OUTPUT iPod cable (supplied) MENU iPod Note 1 If you connected the video components and there is still no sound, press to select A (ANALOG). then press SIGNAL SEL repeatedly 41 En
-
 1
1 -
2
-
3
-
4
-
5
-
6
-
7
-
8
-
9
-
10
-
11
-
12
-
13
-
14
-
15
-
16
-
17
-
18
-
19
-
20
-
21
-
22
-
23
-
24
-
25
-
26
-
27
-
28
-
29
-
30
-
31
-
32
-
33
-
34
-
35
-
 36
36 -
 37
37 -
 38
38 -
 39
39 -
 40
40 -
 41
41 -
 42
42 -
 43
43 -
 44
44 -
 45
45 -
 46
46 -
47
-
48
-
49
-
50
-
51
-
52
-
53
-
54
-
55
-
56
-
57
-
58
-
59
-
60
-
61
-
62
-
63
-
64
-
65
-
66
-
67
-
68
-
69
-
70
-
71
-
72
-
73
-
74
-
75
-
76
-
77
-
78
-
79
-
80
-
81
-
82
-
83
-
84
-
85
-
86
-
87
-
88
-
89
-
90
-
91
-
92
-
93
-
94
-
95
-
96
-
97
-
98
-
99
-
100
-
101
-
102
-
103
-
104
-
105
-
106
-
107
-
108
-
109
-
110
-
111
-
112
-
113
-
114
-
115
-
116
-
117
-
118
-
119
-
120
-
121
-
122
-
123
-
124
-
125
-
126
-
127
-
128
-
129
-
130
-
131
-
132
-
133
-
134
-
135
-
136
-
137
-
138
-
139
-
140
-
141
-
142
-
143
-
144
-
145
-
146
-
147
-
148
-
149
-
150
-
151
-
152
-
153
-
154
-
155
-
156
-
157
-
158
-
159
-
160
-
161
-
162
-
163
-
164
-
165
-
166
-
167
-
168
-
169
-
170
-
171
-
172
-
173
-
174
-
175
-
176
-
177
-
178
-
179
-
180
-
181
-
182
-
183
-
184
-
185
-
186
-
187
-
188
-
189
-
190
-
191
-
192
-
193
-
194
-
195
-
196
-
197
-
198
-
199
-
200
-
201
-
202
-
203
-
204
-
205
-
206
-
207
-
208
-
209
-
210
-
211
-
212
-
213
-
214
-
215
-
216
-
217
-
218
-
219
-
220
-
221
-
222
-
223
-
224
-
225
-
226
-
227
-
228
-
229
-
230
-
231
-
232
-
233
-
234
-
235
-
236
-
237
-
238
-
239
-
240
-
241
-
242
-
243
-
244
-
245
-
246
-
247
-
248
-
249
-
250
-
251
-
252
-
253
-
254
-
255
-
256
-
257
-
258
-
259
-
260
-
261
-
262
-
263
-
264
-
265
-
266
-
267
-
268
-
269
-
270
-
271
-
272
 |
 |
