Ricoh Aficio SP C811DN Hardware Guide - Page 166
number useing the operation panel. The currently set correction value is printed in red.
 |
View all Ricoh Aficio SP C811DN manuals
Add to My Manuals
Save this manual to your list of manuals |
Page 166 highlights
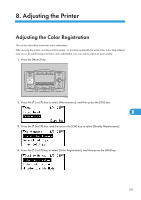
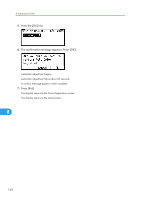
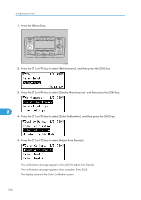
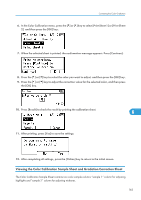
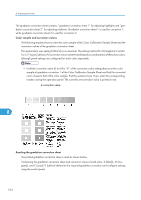
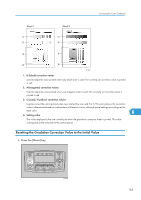
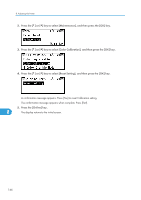
8. Adjusting the Printer The gradation correction sheet contains: "gradation correction sheet 1" for adjusting highlights and "gradation correction sheet 2" for adjusting midtones. Gradation correction sheet 1 is used for correction 1, while gradation correction sheet 2 is used for correction 2. Color sample and correction values The following explains how to view the color sample of the Color Calibration Sample Sheet and the correction values of the gradation correction sheet. This explanation uses setting K (black) as an example. The setting method for M (magenta) is similar. For C/Y (cyan/yellow), the correction value is determined based on combinations of these two colors, although panel settings are configured for each color separately. • Hold the correction value (0 to 6) for "K" of the correction value setting sheet over the color sample of gradation correction 1 of the Color Calibration Sample Sheet and find the corrected color closest to that of the color sample. End this sentence here. Then, enter the corresponding number useing the operation panel. The currently set correction value is printed in red. 8 Reading the gradation correction sheet The printed gradation correction sheet is read as shown below. Comparing the gradation correction sheet and correction value of each color, K (black), M (magenta), and C (cyan)/Y (yellow) determine the required gradation correction and configure settings using the control panel. 164
-
 1
1 -
2
-
3
-
4
-
5
-
6
-
7
-
8
-
9
-
10
-
11
-
12
-
13
-
14
-
15
-
16
-
17
-
18
-
19
-
20
-
21
-
22
-
23
-
24
-
25
-
26
-
27
-
28
-
29
-
30
-
31
-
32
-
33
-
34
-
35
-
36
-
37
-
38
-
39
-
40
-
41
-
42
-
43
-
44
-
45
-
46
-
47
-
48
-
49
-
50
-
51
-
52
-
53
-
54
-
55
-
56
-
57
-
58
-
59
-
60
-
61
-
62
-
63
-
64
-
65
-
66
-
67
-
68
-
69
-
70
-
71
-
72
-
73
-
74
-
75
-
76
-
77
-
78
-
79
-
80
-
81
-
82
-
83
-
84
-
85
-
86
-
87
-
88
-
89
-
90
-
91
-
92
-
93
-
94
-
95
-
96
-
97
-
98
-
99
-
100
-
101
-
102
-
103
-
104
-
105
-
106
-
107
-
108
-
109
-
110
-
111
-
112
-
113
-
114
-
115
-
116
-
117
-
118
-
119
-
120
-
121
-
122
-
123
-
124
-
125
-
126
-
127
-
128
-
129
-
130
-
131
-
132
-
133
-
134
-
135
-
136
-
137
-
138
-
139
-
140
-
141
-
142
-
143
-
144
-
145
-
146
-
147
-
148
-
149
-
150
-
151
-
152
-
153
-
154
-
155
-
156
-
157
-
158
-
159
-
160
-
 161
161 -
 162
162 -
 163
163 -
 164
164 -
 165
165 -
 166
166 -
 167
167 -
 168
168 -
 169
169 -
 170
170 -
 171
171 -
172
-
173
-
174
-
175
-
176
-
177
-
178
-
179
-
180
-
181
-
182
-
183
-
184
-
185
-
186
-
187
-
188
-
189
-
190
-
191
-
192
-
193
-
194
-
195
-
196
-
197
-
198
-
199
-
200
-
201
-
202
-
203
-
204
-
205
-
206
-
207
-
208
-
209
-
210
-
211
-
212
-
213
-
214
-
215
-
216
-
217
-
218
-
219
-
220
-
221
-
222
-
223
-
224
-
225
-
226
-
227
-
228
-
229
-
230
-
231
-
232
-
233
-
234
-
235
-
236
-
237
-
238
-
239
-
240
-
241
-
242
-
243
-
244
-
245
-
246
-
247
-
248
-
249
-
250
-
251
-
252
 |
 |
