Ricoh Aficio SP C811DN Hardware Guide - Page 39
Fit the controller board into the printer, and push it carefully in until it stops.
 |
View all Ricoh Aficio SP C811DN manuals
Add to My Manuals
Save this manual to your list of manuals |
Page 39 highlights
6. Press the SDRAM module down until it clicks into place. Attaching the SDRAM Module 2 ATU008S 7. When also installing the user account enhance unit, install it before returning the controller board to the printer. 8. Fit the controller board into the printer, and push it carefully in until it stops. ATU009S Push it firmly into the printer using the handle. The printer may malfunction if the controller board is not properly installed. 9. Fasten the controller board to the printer using the five screws. ATU010S • Confirm that the SDRAM module was correctly installed by printing the configuration page. Check that the total memory value is shown in "Device Connection" on the configuration page. 37
-
 1
1 -
2
-
3
-
4
-
5
-
6
-
7
-
8
-
9
-
10
-
11
-
12
-
13
-
14
-
15
-
16
-
17
-
18
-
19
-
20
-
21
-
22
-
23
-
24
-
25
-
26
-
27
-
28
-
29
-
30
-
31
-
32
-
33
-
 34
34 -
 35
35 -
 36
36 -
 37
37 -
 38
38 -
 39
39 -
 40
40 -
 41
41 -
 42
42 -
 43
43 -
 44
44 -
45
-
46
-
47
-
48
-
49
-
50
-
51
-
52
-
53
-
54
-
55
-
56
-
57
-
58
-
59
-
60
-
61
-
62
-
63
-
64
-
65
-
66
-
67
-
68
-
69
-
70
-
71
-
72
-
73
-
74
-
75
-
76
-
77
-
78
-
79
-
80
-
81
-
82
-
83
-
84
-
85
-
86
-
87
-
88
-
89
-
90
-
91
-
92
-
93
-
94
-
95
-
96
-
97
-
98
-
99
-
100
-
101
-
102
-
103
-
104
-
105
-
106
-
107
-
108
-
109
-
110
-
111
-
112
-
113
-
114
-
115
-
116
-
117
-
118
-
119
-
120
-
121
-
122
-
123
-
124
-
125
-
126
-
127
-
128
-
129
-
130
-
131
-
132
-
133
-
134
-
135
-
136
-
137
-
138
-
139
-
140
-
141
-
142
-
143
-
144
-
145
-
146
-
147
-
148
-
149
-
150
-
151
-
152
-
153
-
154
-
155
-
156
-
157
-
158
-
159
-
160
-
161
-
162
-
163
-
164
-
165
-
166
-
167
-
168
-
169
-
170
-
171
-
172
-
173
-
174
-
175
-
176
-
177
-
178
-
179
-
180
-
181
-
182
-
183
-
184
-
185
-
186
-
187
-
188
-
189
-
190
-
191
-
192
-
193
-
194
-
195
-
196
-
197
-
198
-
199
-
200
-
201
-
202
-
203
-
204
-
205
-
206
-
207
-
208
-
209
-
210
-
211
-
212
-
213
-
214
-
215
-
216
-
217
-
218
-
219
-
220
-
221
-
222
-
223
-
224
-
225
-
226
-
227
-
228
-
229
-
230
-
231
-
232
-
233
-
234
-
235
-
236
-
237
-
238
-
239
-
240
-
241
-
242
-
243
-
244
-
245
-
246
-
247
-
248
-
249
-
250
-
251
-
252
 |
 |

6.
Press the SDRAM module down until it clicks into place.
ATU008S
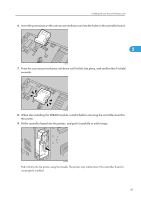
7.
When also installing the user account enhance unit, install it before returning the controller
board to the printer.
8.
Fit the controller board into the printer, and push it carefully in until it stops.
ATU009S
Push it firmly into the printer using the handle. The printer may malfunction if the controller board is
not properly installed.
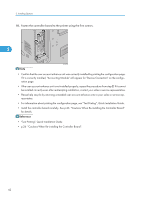
9.
Fasten the controller board to the printer using the five screws.
ATU010S
•
Confirm that the SDRAM module was correctly installed by printing the configuration page. Check
that the total memory value is shown in “Device Connection” on the configuration page.
Attaching the SDRAM Module
37
2