Ricoh Aficio SP C811DN Hardware Guide - Page 96
Envelope Setting], Default: [Envelope 1]
 |
View all Ricoh Aficio SP C811DN manuals
Add to My Manuals
Save this manual to your list of manuals |
Page 96 highlights
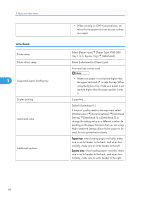
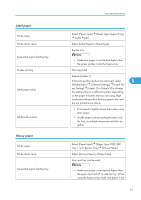
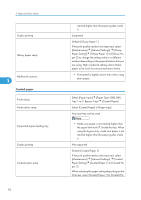
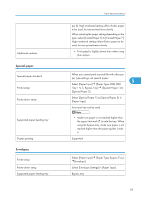
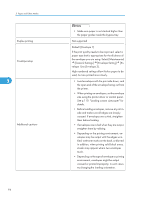
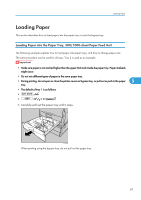
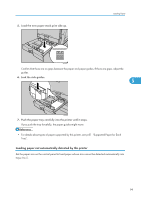
5. Paper and Other Media Duplex printing Envelope setup 5 Additional cautions 94 • Make sure paper is not stacked higher than the paper guides inside the bypass tray. Not supported Default: [Envelope 1] If the print quality needs to be improved, select a paper type that is appropriate for the thickness of the envelope you are using. Select [Maintenance] [General Settings] [Envelope Setting] [Envelope 1] to [Envelope 3]. High numbered settings allow thicker paper to be used, but are printed more slowly. • Load envelopes with the print side down, and the open end of the envelope facing out from the printer. • When printing on envelopes, set the envelope size using the printer driver or control panel. See p.110 "Loading custom size paper" for details. • Before loading envelopes, remove any air inside and make sure all edges are sharply creased. If envelopes are curled, straighten them before loading. • If envelopes are curled when they are output, straighten them by rubbing. • Depending on the printing environment, envelopes may be output with the edges wrinkled, with toner marks on the back, or blurred. In addition, when printing solid black areas, streaks may appear where two envelopes touch. • Depending on the type of envelope or printing environment, envelopes might be output creased or printed improperly. In such cases, try changing the loading orientation.
-
 1
1 -
2
-
3
-
4
-
5
-
6
-
7
-
8
-
9
-
10
-
11
-
12
-
13
-
14
-
15
-
16
-
17
-
18
-
19
-
20
-
21
-
22
-
23
-
24
-
25
-
26
-
27
-
28
-
29
-
30
-
31
-
32
-
33
-
34
-
35
-
36
-
37
-
38
-
39
-
40
-
41
-
42
-
43
-
44
-
45
-
46
-
47
-
48
-
49
-
50
-
51
-
52
-
53
-
54
-
55
-
56
-
57
-
58
-
59
-
60
-
61
-
62
-
63
-
64
-
65
-
66
-
67
-
68
-
69
-
70
-
71
-
72
-
73
-
74
-
75
-
76
-
77
-
78
-
79
-
80
-
81
-
82
-
83
-
84
-
85
-
86
-
87
-
88
-
89
-
90
-
 91
91 -
 92
92 -
 93
93 -
 94
94 -
 95
95 -
 96
96 -
 97
97 -
 98
98 -
 99
99 -
 100
100 -
 101
101 -
102
-
103
-
104
-
105
-
106
-
107
-
108
-
109
-
110
-
111
-
112
-
113
-
114
-
115
-
116
-
117
-
118
-
119
-
120
-
121
-
122
-
123
-
124
-
125
-
126
-
127
-
128
-
129
-
130
-
131
-
132
-
133
-
134
-
135
-
136
-
137
-
138
-
139
-
140
-
141
-
142
-
143
-
144
-
145
-
146
-
147
-
148
-
149
-
150
-
151
-
152
-
153
-
154
-
155
-
156
-
157
-
158
-
159
-
160
-
161
-
162
-
163
-
164
-
165
-
166
-
167
-
168
-
169
-
170
-
171
-
172
-
173
-
174
-
175
-
176
-
177
-
178
-
179
-
180
-
181
-
182
-
183
-
184
-
185
-
186
-
187
-
188
-
189
-
190
-
191
-
192
-
193
-
194
-
195
-
196
-
197
-
198
-
199
-
200
-
201
-
202
-
203
-
204
-
205
-
206
-
207
-
208
-
209
-
210
-
211
-
212
-
213
-
214
-
215
-
216
-
217
-
218
-
219
-
220
-
221
-
222
-
223
-
224
-
225
-
226
-
227
-
228
-
229
-
230
-
231
-
232
-
233
-
234
-
235
-
236
-
237
-
238
-
239
-
240
-
241
-
242
-
243
-
244
-
245
-
246
-
247
-
248
-
249
-
250
-
251
-
252
 |
 |
