Ridgid R4510 Operation Manual - Page 16
Mounting The Leg Stand On The Table, Saw Base, Warning - switch
 |
View all Ridgid R4510 manuals
Add to My Manuals
Save this manual to your list of manuals |
Page 16 highlights
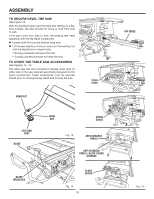
ASSEMBLY MOUNTING THE LEG STAND ON THE TABLE SAW BASE See Figure 9. WARNING: Do not lift the saw without help. The saw base weighs approximately 75 lbs. Hold it close to your body. Keep your knees bent and lift with your legs, not your back. Ignoring these precautions can result in back injury. Open leg stand as described on page 17. Place saw base on the leg stand. Align the holes in the table with the holes in the end braces. Insert a bolt through the hole in the table saw and into the hole in the stand. Add a lock washer, flat washer, ring terminal (from switch box), and a hex nut. Hand tighten. See Figure 9. For the three remaining holes, insert the bolts through the hole in the saw base and into the hole in the stand, then secure to the stand using a hex nut. Tighten all hardware with a wrench. You may find it helpful to use one wrench to hold the head of the bolt and one to tighten the hex nut. Move the leg set to desired location. Adjust the leveling foot with a wrench, then tighten the top hex nut. BOLT SAW BASE LOCK WASHER RING TERMINAL HEX NUT FLAT WASHER Fig. 9 16
-
 1
1 -
2
-
3
-
4
-
5
-
6
-
7
-
8
-
9
-
10
-
 11
11 -
 12
12 -
 13
13 -
 14
14 -
 15
15 -
 16
16 -
 17
17 -
 18
18 -
 19
19 -
 20
20 -
 21
21 -
22
-
23
-
24
-
25
-
26
-
27
-
28
-
29
-
30
-
31
-
32
-
33
-
34
-
35
-
36
-
37
-
38
-
39
-
40
-
41
-
42
-
43
-
44
-
45
-
46
-
47
-
48
 |
 |
