Ridgid R4510 Operation Manual - Page 20
To Remove/replace/align The Throat, Plate, Warning, To Change Riving Knife Positions
 |
View all Ridgid R4510 manuals
Add to My Manuals
Save this manual to your list of manuals |
Page 20 highlights
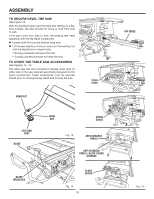
ASSEMBLY TO REMOVE/REPLACE/ALIGN THE THROAT PLATE See Figure 20. WARNING: The throat plate must be level with the saw table. If the throat plate is too high or too low, the workpiece can catch on the uneven edges resulting in binding or kickback which could result in serious personal injury. Lower the blade by: 1)Unlocking the blade height lock knob (turn counterclockwise). 2) Turn the height adjusting knob counterclockwise to lower the blade. Using a hex key, adjust the four set screws until the throat plate is level with the saw table. Another set screw that may require adjustment is under the throat plate on the tool housing. To remove the throat plate: place your index finger in the hole and lift the front end pulling the throat plate out toward the front of the saw. Adjust the set screw at the back of the housing until the back of the throat plate is level with the saw table. To reinstall the throat plate: first slip the tab into the slot at the back of the saw then push down to secure in place. TO CHANGE RIVING KNIFE POSITIONS See Figure 21. This saw is shipped with a riving knife that should be placed in the "down" position for non-through cutting and must be placed in the "up" position for all other cutting operations. Unplug the saw. To place in the "up" position for all through cutting: Remove the throat plate. Raise the saw blade by turning the height adjusting knob clockwise. Unlock the release lever by pulling it up. Grasp the riving knife and pull it towards the right side of the saw to release the riving knife from the spring-loaded riving clamp. Pull the riving knife up until the internal pins are engaged and the riving knife is above the saw blade. Lock the release lever by pushing the lever down. Reinstall the throat plate. To place in riving knife down position for all non-through cutting: Remove the throat plate. Raise the saw blade by turning the height adjusting knob clockwise. Unlock the release lever by pulling it up. SET SCREWS Fig. 20 RELEASE LEVER (UNLOCKED) IN UP POSITION FOR THROUGH CUTTING RELEASE LEVER (LOCKED) IN DOWN POSITION FOR NON-THROUGH CUTTING Fig. 21 Push the riving knife down until it is below the saw blade. Lock the release lever by pushing the lever down. Reinstall the throat plate. 20
-
 1
1 -
2
-
3
-
4
-
5
-
6
-
7
-
8
-
9
-
10
-
11
-
12
-
13
-
14
-
 15
15 -
 16
16 -
 17
17 -
 18
18 -
 19
19 -
 20
20 -
 21
21 -
 22
22 -
 23
23 -
 24
24 -
 25
25 -
26
-
27
-
28
-
29
-
30
-
31
-
32
-
33
-
34
-
35
-
36
-
37
-
38
-
39
-
40
-
41
-
42
-
43
-
44
-
45
-
46
-
47
-
48
 |
 |
