Ridgid R4510 Operation Manual - Page 37
Making A Dado Cut, Warning - table saw accessories
 |
View all Ridgid R4510 manuals
Add to My Manuals
Save this manual to your list of manuals |
Page 37 highlights
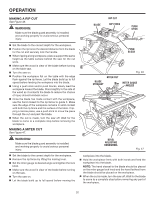
OPERATION MAKING A DADO CUT See Figure 54. An optional dado throat plate is required for this procedure (refer to the Accessories section later in this manual and check with the retailer where the table saw was purchased). All blades and dado sets must not be rated less than the speed of this tool. This saw is designed for use with a 6 in. stack dado (up to width of 3/4 in.). Do not use an adjustable dado on this saw. NOTE: This saw cannot be used to make a bevel dado cut. Unplug your saw. Remove the blade guard, anti-kickback pawls, and throat plate. Next, remove the blade nut, blade washer, and saw blade. WARNING: Always store the blade washer and throat plate in secure location when changing back to saw blade. Failure to do so may result in possible injury and damage to the tool. DADO CUT Fig. 54 Remove the riving knife. Mount the dado blade, according to manufacturer instructions, using the blade and chippers appropriate for the desired width of cut. Reinstall the blade nut. NOTE: The blade washer may be used provided the arbor shaft extends slightly beyond the arbor nut. Make sure the blade nut is fully engaged and the arbor extends past a securely tightened blade nut. Place release lever in locked position. Install the dado throat plate and rotate the blade by hand to make sure it turns freely then lower the blade. Depending on the shape and size of the wood, use either the rip fence or miter gauge. Turn the saw on. NOTE: Make sure the wood does not touch the blade before you turn on the saw. Let the blade build up to full speed before feeding the workpiece into the blade. Position the workpiece flat on the table with the edge flush against the rip fence or miter gauge and hold firmly against the saw table. Use a push block or push stick to move the wood through the cut past the blade. Never push a small piece of wood into the blade with your hand, always use a push stick. The use of push blocks, push sticks, and featherboards are necessary when making non-through cuts. When the cut is made, turn the saw off. Wait for the blade to come to a complete stop before removing the workpiece. Once all dado cuts are completed: Unplug your saw. Reinstall the riving knife in the "up" position then install blade guard and anti-kickback pawls. WARNING: Always use push blocks, push sticks, or featherboards when making dado cuts to avoid the risk of serious injury. WARNING: Do not use blades rated less than the speed of this tool. Failure to heed this warning could result in personal injury. 37
-
 1
1 -
2
-
3
-
4
-
5
-
6
-
7
-
8
-
9
-
10
-
11
-
12
-
13
-
14
-
15
-
16
-
17
-
18
-
19
-
20
-
21
-
22
-
23
-
24
-
25
-
26
-
27
-
28
-
29
-
30
-
31
-
 32
32 -
 33
33 -
 34
34 -
 35
35 -
 36
36 -
 37
37 -
 38
38 -
 39
39 -
 40
40 -
 41
41 -
 42
42 -
43
-
44
-
45
-
46
-
47
-
48
 |
 |
