Ridgid R4510 Operation Manual - Page 19
To Close The Leg Stand And Move - accessories
 |
View all Ridgid R4510 manuals
Add to My Manuals
Save this manual to your list of manuals |
Page 19 highlights
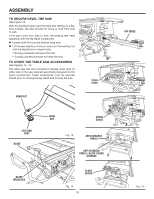
ASSEMBLY TO CLOSE THE LEG STAND AND MOVE THE SAW See Figures 16 - 19. Remove any workpieces from the tool. Remove and securely store any tools or accessories such as rip fence, miter gauge, clamps, blade guard, etc. Lower the saw blade. To close the leg stand: At the same time, step on the release lever, grasp the grips, and lift the handles up and away from the body. Push the table saw until the release lever clicks and locks into place. To move the leg stand: Holding the grips firmly, pull the handles toward you until the leg stand and saw are balanced on the wheels. Push the saw to the desired location then either open the leg stand for saw operation or store the saw in a dry environment. RELEASE LEVER Fig. 16 19 Fig. 17 Fig. 18 Fig. 19
-
 1
1 -
2
-
3
-
4
-
5
-
6
-
7
-
8
-
9
-
10
-
11
-
12
-
13
-
 14
14 -
 15
15 -
 16
16 -
 17
17 -
 18
18 -
 19
19 -
 20
20 -
 21
21 -
 22
22 -
 23
23 -
 24
24 -
25
-
26
-
27
-
28
-
29
-
30
-
31
-
32
-
33
-
34
-
35
-
36
-
37
-
38
-
39
-
40
-
41
-
42
-
43
-
44
-
45
-
46
-
47
-
48
 |
 |
