Ridgid R4510 Operation Manual - Page 18
To Secure/level The Saw, To Store The Table Saw Accessories
 |
View all Ridgid R4510 manuals
Add to My Manuals
Save this manual to your list of manuals |
Page 18 highlights
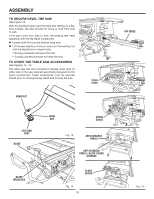
ASSEMBLY TO SECURE/LEVEL THE SAW See Figure 13. With the leg stand open and the table saw resting on a flat, level surface, the saw should not move or rock from side to side. If the saw rocks from side to side, the leveling feet need adjusting until the leg stand is balanced. Loosen both the top and bottom wing nuts. Lift the saw slightly so that you may turn the leveling foot until the leg stand no longer rocks. • Turning clockwise will lower the foot • Turning counterclockwise will raise the foot TO STORE THE TABLE SAW ACCESSORIES See Figures 14 - 15. The table saw has two convenient storage areas (one on either side of the saw cabinet) specifically designed for the saw's accessories. These accessories must be securely stored prior to closing the leg stand and moving the saw. WING NUT PUSH STICK LEVELING FOOT BLADE BLADE WRENCHES WING NUT MITER GAUGE Fig. 13 ANTI-KICKBACK PAWLS ANTI-KICKBACK PAWLS / BLADE GUARD STORAGE BLADE GUARD Fig. 14 18 RIP FENCE Fig. 15
-
 1
1 -
2
-
3
-
4
-
5
-
6
-
7
-
8
-
9
-
10
-
11
-
12
-
 13
13 -
 14
14 -
 15
15 -
 16
16 -
 17
17 -
 18
18 -
 19
19 -
 20
20 -
 21
21 -
 22
22 -
 23
23 -
24
-
25
-
26
-
27
-
28
-
29
-
30
-
31
-
32
-
33
-
34
-
35
-
36
-
37
-
38
-
39
-
40
-
41
-
42
-
43
-
44
-
45
-
46
-
47
-
48
 |
 |
