Samsung CLX-3185 User Manual (user Manual) (ver.2.00) (English) - Page 117
Clearing original document jams (CLX-3185FN/CLX-3185FW only), Clearing paper jams, Message - clx 3185fw paper jam
 |
View all Samsung CLX-3185 manuals
Add to My Manuals
Save this manual to your list of manuals |
Page 117 highlights
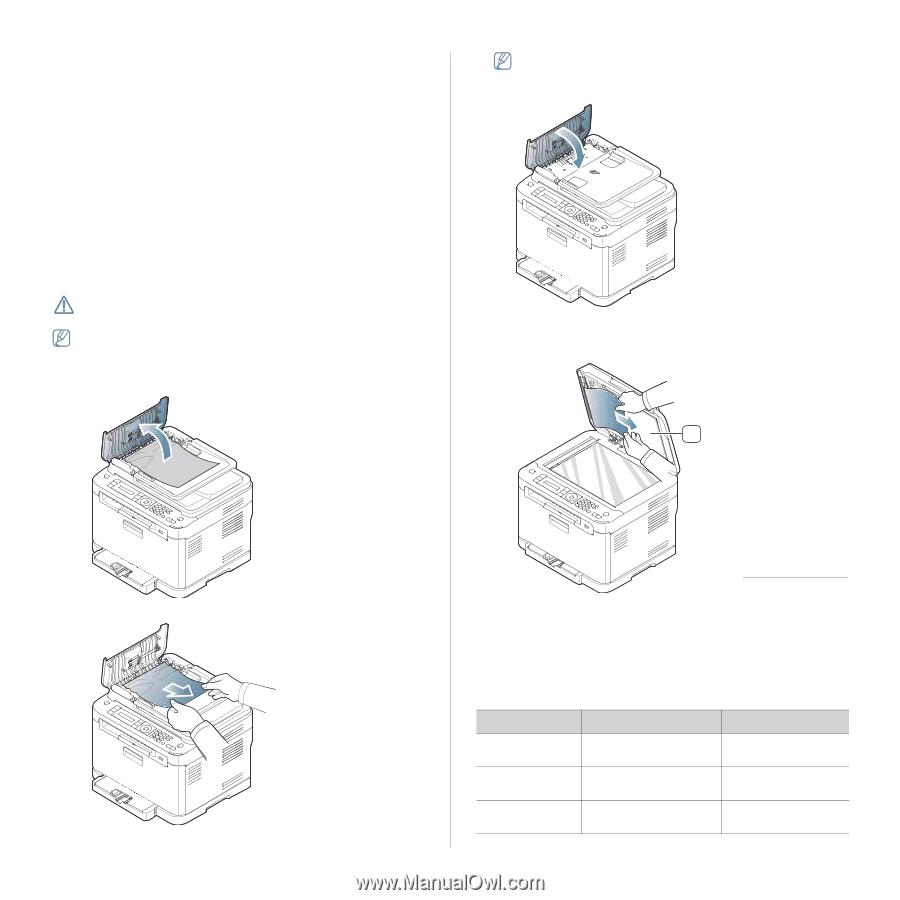
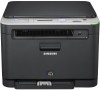
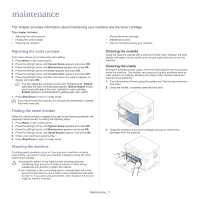
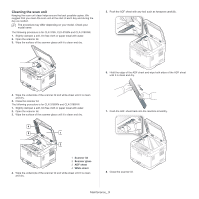
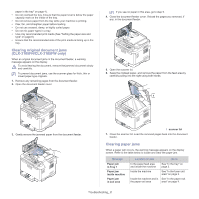
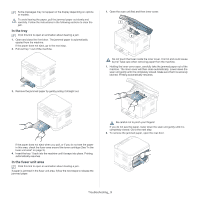
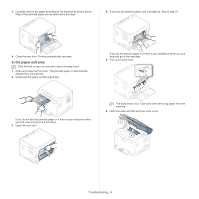
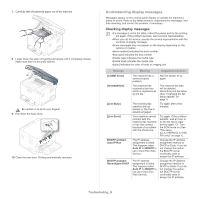
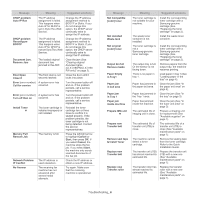
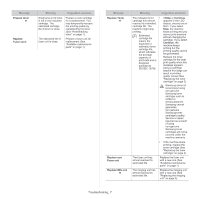
paper in the tray" on page 4). • Do not overload the tray. Ensure that the paper level is below the paper capacity mark on the inside of the tray. • Do not remove paper from the tray while your machine is printing. • Flex, fan, and straighten paper before loading. • Do not use creased, damp, or highly curled paper. • Do not mix paper types in a tray. • Use only recommended print media (See "Setting the paper size and type" on page 6). • Ensure that the recommended side of the print media is facing up in the tray. Clearing original document jams (CLX-3185FN/CLX-3185FW only) When an original document jams in the document feeder, a warning message appears on the display. To avoid tearing the document, remove the jammed document slowly and carefully. To prevent document jams, use the scanner glass for thick, thin or mixed paper-type originals. 1. Remove any remaining pages from the document feeder. 2. Open the document feeder cover. If you see no paper in this area, go to step 5. 4. Close the document feeder cover. Reload the pages you removed, if any, in the document feeder. 5. Open the scanner lid. 6. Seize the misfeed paper, and remove the paper from the feed area by carefully pulling it to the right using both hands. 1 3. Gently remove the jammed paper from the document feeder. 1 scanner lid 7. Close the scanner lid. Load the removed pages back into the document feeder. Clearing paper jams When a paper jam occurs, the warning message appears on the display screen. Refer to the table below to locate and clear the paper jam. Message Paper jam in Tray 1 Paper jam inside machine Paper jam in exit area Location of Jam Go to In the paper feed area and inside the machine See "In the tray" on page 3. Inside the machine See "In the fuser unit area" on page 3. Inside the machine and in See "In the paper exit the paper exit area area" on page 4. Troubleshooting_ 2
-
 1
1 -
2
-
3
-
4
-
5
-
6
-
7
-
8
-
9
-
10
-
11
-
12
-
13
-
14
-
15
-
16
-
17
-
18
-
19
-
20
-
21
-
22
-
23
-
24
-
25
-
26
-
27
-
28
-
29
-
30
-
31
-
32
-
33
-
34
-
35
-
36
-
37
-
38
-
39
-
40
-
41
-
42
-
43
-
44
-
45
-
46
-
47
-
48
-
49
-
50
-
51
-
52
-
53
-
54
-
55
-
56
-
57
-
58
-
59
-
60
-
61
-
62
-
63
-
64
-
65
-
66
-
67
-
68
-
69
-
70
-
71
-
72
-
73
-
74
-
75
-
76
-
77
-
78
-
79
-
80
-
81
-
82
-
83
-
84
-
85
-
86
-
87
-
88
-
89
-
90
-
91
-
92
-
93
-
94
-
95
-
96
-
97
-
98
-
99
-
100
-
101
-
102
-
103
-
104
-
105
-
106
-
107
-
108
-
109
-
110
-
111
-
 112
112 -
 113
113 -
 114
114 -
 115
115 -
 116
116 -
 117
117 -
 118
118 -
 119
119 -
 120
120 -
 121
121 -
 122
122 -
123
-
124
-
125
-
126
-
127
-
128
-
129
-
130
-
131
-
132
-
133
-
134
-
135
-
136
-
137
-
138
-
139
-
140
-
141
-
142
-
143
-
144
-
145
-
146
-
147
-
148
-
149
-
150
-
151
 |
 |