Samsung DVD-R160 Quick Guide (easy Manual) (ver.1.0) (English) - Page 31
Clock Set, Language Setting, Menu on Device
 |
View all Samsung DVD-R160 manuals
Add to My Manuals
Save this manual to your list of manuals |
Page 31 highlights
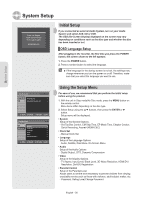
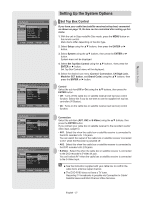
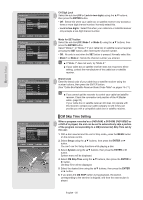
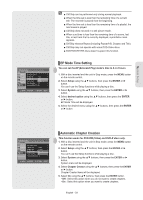
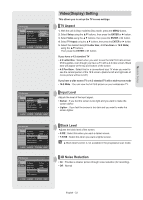
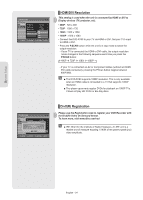
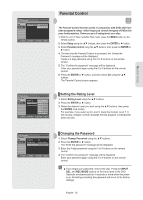
DVDR View TV Selet Device Z Record Z Menu on Device Z Device Operation Z Receiver : Off Z Setup Z Move Ok Exit TV Menu DVD-Recorder No Disc Timer Rec. Setup Month Day ▲ 01 01 ▼ MON Manual Clock Set Year Hour Minute AM/PM 2007 12 00 AM MOVE ENTER RETURN EXIT DVD-VRecoDrder- LangVuidageoe NNoo DDiisscc TTiimmeerrRReecc.. TAVudAiospect : OOr:ir1gi6gi:ni9naWlalide √► SSeettuupp ISnupbuttitLleevel : AEu:ntDogmalirsakhteicr √► Français BDliasckMLeenvuel : En: g7l.i5shIRE √► Deutsch 3ODnN-SoicsreeRenedMucetnioun : EEn:sgOplifasfñhol √► HDMI/DVI Resolution 4I8:t0a4Pli8a0nPo √ DivX(R) Registration 7N20ePderlands √ 1K08o0riean MMOOVVEE EENNTTEERR RETURN EXIT • You can operate the DVD Recorder by using TV remote control. (TV buttons that can be used to control the DVD Recorder : , , , , and buttons, ~ button) • When you press Anynet+ button on the TV's remote control, the OSD to the left will appear. - Select Device : Use this option to select device. - Record : DVD-R160 doesn't support this function. - Device Operation : Same as ANYKEY button ( ) on the DVD Recorder remote control. - Menu on Device : Same as MENU button ( ) on the DVD Recorder remote control. ■ By pressing the PLAY button of the recorder while watching TV, the TV screen will change to the play screen. ■ If you play a DVD when the TV power is off, the TV will power On. ■ If you turn the TV off, the DVD Recorder will power off automatically. (When the DVD recorder is recording, it can't be powered off.) ■ If you change from HDMI to other sources (Composite, Component, RF... etc) on your TV while playing a DVD disc, the DVD Recorder will stop playing. The DVD Recorder may keep playing certain discs based on their content. ■ The DVD-R160's Record function does not work with Anynet+ as the unit does not have a TV tuner. Clock Set This menu is used to set the current time. You must set the time first to use timer recording. 1. With the unit in Stop mode/No Disc mode, press the MENU button on the remote control. 2. Select Setup using the ▲▼ buttons, then press the ENTER or ► button. 3. Select Clock set using the ▲▼ buttons, then press the ENTER or ► button. Clock set menu will be displayed. Select the current date and time (Month, Day, Year, Hour, Minute and AM/ PM) using the or number buttons and then press the ENTER button. When the current time is stored in memory and the set is powered off, the current time will appear in the front panel display. ▲▼ : Sets the value You can set the value using the number (0~9) buttons. ◄ ►: Moves to items ■ The Menus are slightly different depending on whether a disc is inserted or not. The menus described on the next few pages are with no disc in the unit. ■ The menus are not available during playback or recording. Language Setting If you set the language options in advance, they will come up automatically every time you watch a movie. 1. With the unit in Stop mode/No Disc mode, press the MENU button on the remote control. 2. Select Setup using the ▲▼ buttons, then press the ENTER or ► button. 3. Select Language using the ▲▼ buttons, then press the ENTER or ►button. The language setup menu will be displayed. 4. Select the sub menu(Audio, Subtitle, Disc Menu, On-Screen Menu) and press the ENTER or ► button using the ▲▼ buttons. • Audio : For the disc audio language. • Subtitle : For the disc subtitles. • Disc Menu : For the disc menu contained on the disc. • On-Screen Menu : For the unit menu of your DVD recorder. 5. Select the desired language using the ▲▼ buttons, then press the ENTER or ► button. ■ If the selected language is not recorded on the disc, the original pre-recorded language is selected. ■ The selected language will only appear if it is supported on the disc. English - 31 System Setup
-
 1
1 -
2
-
3
-
4
-
5
-
6
-
7
-
8
-
9
-
10
-
11
-
12
-
13
-
14
-
15
-
16
-
17
-
18
-
19
-
20
-
21
-
22
-
23
-
24
-
25
-
 26
26 -
 27
27 -
 28
28 -
 29
29 -
 30
30 -
 31
31 -
 32
32 -
 33
33 -
 34
34 -
 35
35 -
 36
36 -
37
-
38
-
39
-
40
-
41
-
42
-
43
-
44
-
45
-
46
-
47
-
48
-
49
-
50
-
51
-
52
-
53
-
54
-
55
-
56
-
57
-
58
-
59
-
60
-
61
-
62
-
63
-
64
-
65
-
66
-
67
-
68
-
69
-
70
-
71
-
72
-
73
-
74
-
75
-
76
-
77
-
78
-
79
-
80
-
81
-
82
-
83
 |
 |