Samsung DVD-R160 Quick Guide (easy Manual) (ver.1.0) (English) - Page 67
ENTER, Modify, Change, Follow steps 1 to 3 of Editing a Scene for the Playlist
 |
View all Samsung DVD-R160 manuals
Add to My Manuals
Save this manual to your list of manuals |
Page 67 highlights
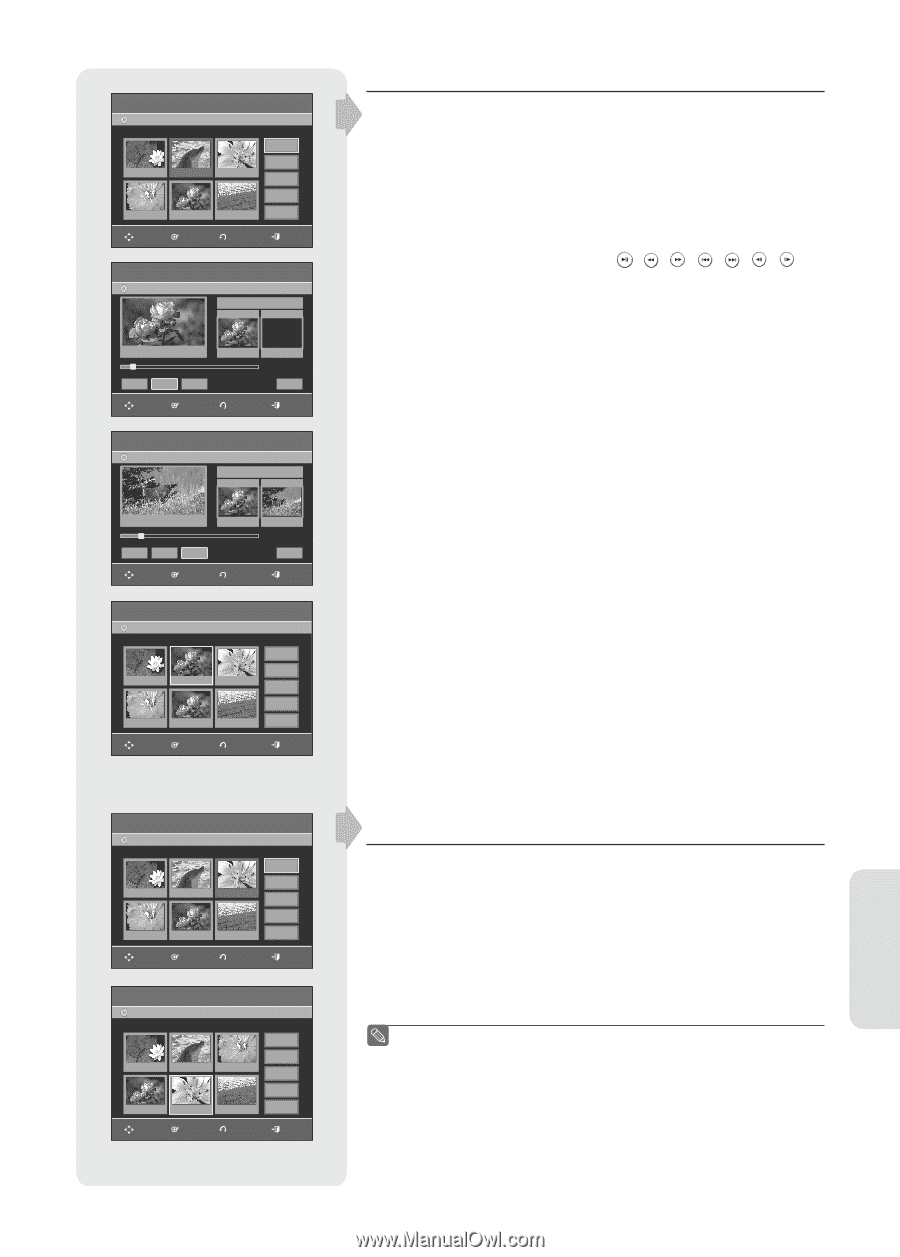
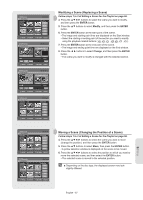
DVD-Recorder DVD-RW(VR) Scene No. 2 / 7 Edit Scene Playlist No. 3 Play 01 00:00:26 02 00:00:07 03 00:00:04 Modify Move Add 04 00:00:03 05 00:00:11 06 00:00:04 Delete MOVE ENTER RETURN EXIT DVD-Recorder DVD-RW(VR) Modify Scene Scene No. 002 Start End Title List : 5/6 ► Start End Change MOVE ENTER 00:00:25 00:00:00 00:00:25 Cancel RETURN EXIT DVD-Recorder DVD-RW(VR) Modify Scene Scene No. 002 Start End Title List : 5/6 II Start End Change MOVE ENTER 00:00:25 00:00:30 00:00:30 Cancel RETURN EXIT DVD-Recorder DVD-RW(VR) Scene No. 2 / 7 Edit Scene Playlist No. 3 Play 01 00:00:26 02 00:00:07 03 00:00:04 Modify Move Add 04 00:00:03 05 00:00:11 06 00:00:04 Delete MOVE ENTER RETURN EXIT Modifying a Scene (Replacing a Scene) Follow steps 1 to 3 of Editing a Scene for the Playlist on page 66. 4. Press the buttons to select the scene you want to modify, and then press the ENTER button. 5. Press the ▲▼ buttons to select Modify, and then press the ENTER button. 6. Press the ENTER button at the start point of the scene. • The image and starting point time are displayed on the Start window. • Select the starting or ending point of the section you want to modify using the playback related buttons 7. Press the ENTER button at the end point of the scene. • The image and ending point time are displayed on the End window. 8. Press the ◄ ► buttons to select Change, and then press the ENTER button. • The scene you want to modify is changed with the selected section. Editing DVD-Recorder DVD-RW(VR) Scene No. 3/7 Edit Scene Playlist No. 3 Play 01 00:00:26 02 00:00:07 03 00:00:04 Modify Move Add 04 00:00:03 05 00:00:11 06 00:00:04 Delete MOVE ENTER RETURN EXIT DVD-Recorder DVD-RW(VR) Scene No. 5/7 Edit Scene Playlist No. 3 Play 01 00:00:26 02 00:00:04 03 00:00:03 Modify Move Add 04 00:00:11 05 00:00:04 06 00:00:04 Delete MOVE ENTER RETURN EXIT Moving a Scene (Changing the Position of a Scene) Follow steps 1 to 3 of Editing a Scene for the Playlist on page 66. 4. Press the buttons to select the scene you want to move (change the position), and then press the ENTER button. 5. Press the ▲▼ buttons to select Move, then press the ENTER button. • A yellow selection window is displayed on the scene to be moved. 6. Press the buttons to select the position to which you want to move the selected scene, and then select the ENTER button. • The selected scene is moved to the selected position. ■ Depending on the disc type, the displayed screen may look slightly different. English - 67
-
 1
1 -
2
-
3
-
4
-
5
-
6
-
7
-
8
-
9
-
10
-
11
-
12
-
13
-
14
-
15
-
16
-
17
-
18
-
19
-
20
-
21
-
22
-
23
-
24
-
25
-
26
-
27
-
28
-
29
-
30
-
31
-
32
-
33
-
34
-
35
-
36
-
37
-
38
-
39
-
40
-
41
-
42
-
43
-
44
-
45
-
46
-
47
-
48
-
49
-
50
-
51
-
52
-
53
-
54
-
55
-
56
-
57
-
58
-
59
-
60
-
61
-
 62
62 -
 63
63 -
 64
64 -
 65
65 -
 66
66 -
 67
67 -
 68
68 -
 69
69 -
 70
70 -
 71
71 -
 72
72 -
73
-
74
-
75
-
76
-
77
-
78
-
79
-
80
-
81
-
82
-
83
 |
 |