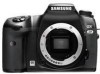
Samsung GX-20 User Manual (ENGLISH) - Page 4
Contents - lens
 |
UPC - 044701008736
View all Samsung GX-20 manuals
Add to My Manuals
Save this manual to your list of manuals |
Page 4 highlights
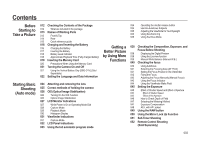
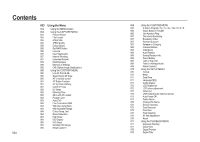
Contents Before Starting to Take a Picture Starting Basic Shooting (Auto mode) 012 Checking the Contents of the Package 012 What are included in the package 013 Names of Working Parts 013 Front & Top 014 Rear 015 Quick reference guide 016 Charging and Inserting the Battery 016 Charging the Battery 017 Inserting the Battery 018 Battery Level Indicator 018 Approximate Playback Time (Fully charged battery) 019 Inserting the Memory Card 020 Precautions When Using the Memory Card 021 Turning the Camera On and Off 021 Using the Vertical Battery Grip (SBG-D1V) (Sold Separately) 022 Setting the Language and Date Information Getting a Better Picture by Using More Functions 024 Attaching and removing the lens 025 Correct methods of holding the camera 026 OIS (Optical Image Stabilization) 026 Turning On the OIS Function 026 Optical Image Stabilization 027 LCD Monitor Indications 027 While Power is On or Operating Mode Dial 028 Capture Mode 029 Playback Mode 030 Histogram Display 031 Viewfinder Indications 031 Capture Mode 032 LCD Panel Indications 033 Using the full automatic program mode 034 Operating the shutter release button 034 Hard-to-Autofocus Subjects 035 Adjusting the Viewfinder to Your Eyesight 035 Using the Zoom ring 036 Using the Drive Mode 038 Checking the Composition, Exposure, and Focus Before Shooting 038 Displaying the Digital Preview 038 Using the Liveview function 039 Manual White Balance (Manual W.B.) 040 Checking the focus 040 Using Autofocus 041 Selecting the Focusing Area (AF Point) 041 Setting the Focus Position in the Viewfinder 042 Fixing the Focus 043 Adjusting the Focus Manually (Manual Focus) 043 Using the Focus Indicator 044 Using the Viewfinder Matte Field 045 Setting the Exposure 045 Effect of Shutter Speed and Effect of Aperture 045 Effect of Shutter Speed 045 Effect of the Aperture 046 How to Check Depth of Field 047 Selecting the Metering Method 047 Exposure Compensation 048 AE-L with AF Locked 049 Using the RAW button 050 Using the Mirror Lock Up Function 051 Self-Timer Shooting 052 Remote Control Shooting (Sold Separately) 003
-
 1
1 -
 2
2 -
 3
3 -
 4
4 -
 5
5 -
 6
6 -
 7
7 -
 8
8 -
 9
9 -
 10
10 -
11
-
12
-
13
-
14
-
15
-
16
-
17
-
18
-
19
-
20
-
21
-
22
-
23
-
24
-
25
-
26
-
27
-
28
-
29
-
30
-
31
-
32
-
33
-
34
-
35
-
36
-
37
-
38
-
39
-
40
-
41
-
42
-
43
-
44
-
45
-
46
-
47
-
48
-
49
-
50
-
51
-
52
-
53
-
54
-
55
-
56
-
57
-
58
-
59
-
60
-
61
-
62
-
63
-
64
-
65
-
66
-
67
-
68
-
69
-
70
-
71
-
72
-
73
-
74
-
75
-
76
-
77
-
78
-
79
-
80
-
81
-
82
-
83
-
84
-
85
-
86
-
87
-
88
-
89
-
90
-
91
-
92
-
93
-
94
-
95
-
96
-
97
-
98
-
99
-
100
-
101
-
102
-
103
-
104
-
105
-
106
-
107
-
108
-
109
-
110
-
111
-
112
-
113
-
114
-
115
-
116
-
117
-
118
-
119
-
120
-
121
-
122
-
123
-
124
-
125
-
126
-
127
-
128
-
129
-
130
-
131
-
132
-
133
-
134
-
135
-
136
-
137
-
138
-
139
-
140
-
141
-
142
-
143
-
144
-
145
-
146
-
147
-
148
-
149
-
150
-
151
-
152
-
153
-
154
-
155
-
156
-
157
-
158
-
159
-
160
-
161
-
162
-
163
 |
 |
