Samsung ML 2851ND User Manual (ENGLISH) - Page 33
Troubleshooting, Clearing paper jams, In the paper feed area
 |
UPC - 635753623222
View all Samsung ML 2851ND manuals
Add to My Manuals
Save this manual to your list of manuals |
Page 33 highlights
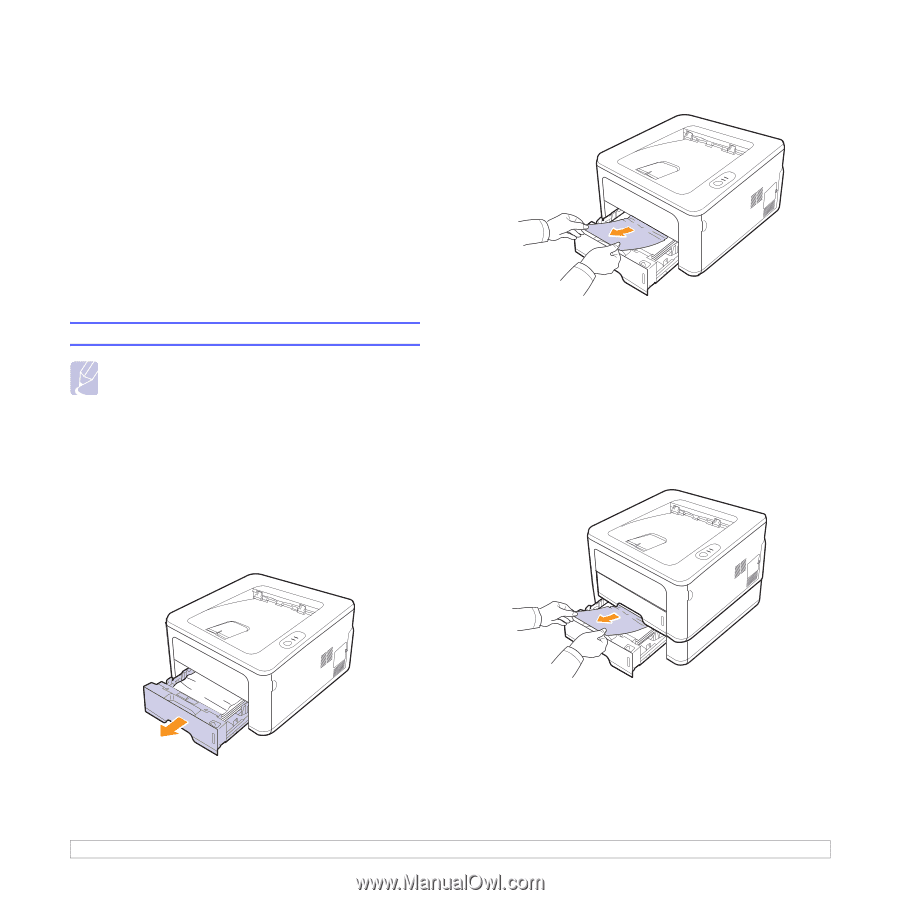
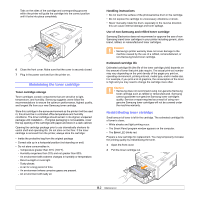
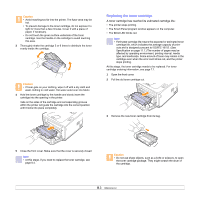
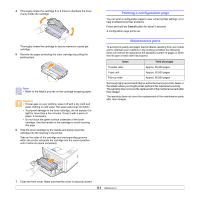
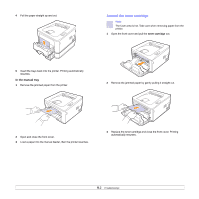
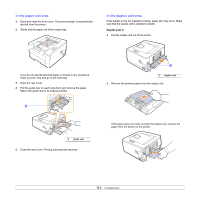
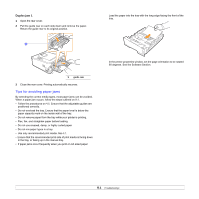
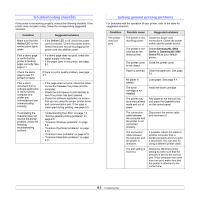
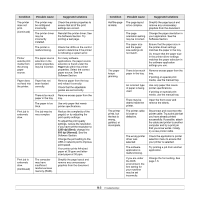
9 Troubleshooting This chapter provides helpful information for what to do if you encounter an error while using your printer. This chapter includes: • Clearing paper jams • Troubleshooting checklist • Solving general printing problems • Solving print quality problems • Common Windows problems • Common PostScript problems • Common Linux problems • Common Macintosh problems Clearing paper jams Note • When removing paper that is jammed in the printer, if possible always pull the paper in the direction that it normally moves so as not to damage internal components. Always pull firmly and evenly; do not jerk the paper. If the paper tears, ensure that all fragments of paper are removed; otherwise a jam will occur again. When a paper jam occurs, the Error LED lights orange. Open and close the front cover. The jammed paper automatically exits the printer. In the paper feed area In the tray 1 1 Pull the tray 1 open. 2 Remove the jammed paper by gently pulling it straight out. Make sure that all of the paper is properly aligned in the tray 1. If the paper does not move when you pull, or if you do not see the paper in this area, check the fuser area around the toner cartridge. See page 9.2. 3 Insert the tray 1 into the printer until it snaps into place. Printing automatically resumes. In the optional tray 2 1 Pull the optional tray 2 open. 2 Remove the jammed paper from the printer. If the paper does not move when you pull, or if you do not see the paper in this area, stop and go to step 3. 3 Pull the tray 1 half. 9.1
-
 1
1 -
2
-
3
-
4
-
5
-
6
-
7
-
8
-
9
-
10
-
11
-
12
-
13
-
14
-
15
-
16
-
17
-
18
-
19
-
20
-
21
-
22
-
23
-
24
-
25
-
26
-
27
-
 28
28 -
 29
29 -
 30
30 -
 31
31 -
 32
32 -
 33
33 -
 34
34 -
 35
35 -
 36
36 -
 37
37 -
 38
38 -
39
-
40
-
41
-
42
-
43
-
44
-
45
-
46
-
47
-
48
-
49
-
50
-
51
-
52
-
53
-
54
-
55
-
56
-
57
-
58
-
59
-
60
-
61
-
62
-
63
-
64
-
65
-
66
-
67
-
68
-
69
-
70
-
71
-
72
-
73
-
74
-
75
-
76
-
77
-
78
-
79
-
80
-
81
-
82
-
83
-
84
-
85
-
86
-
87
 |
 |