Samsung NE58K9560WS/AA User Manual - Page 52
Removing and re-installing the warming drawer, Changing the oven light, CAUTION
 |
View all Samsung NE58K9560WS/AA manuals
Add to My Manuals
Save this manual to your list of manuals |
Page 52 highlights
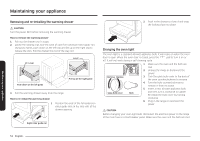
Maintaining your appliance Removing and re-installing the warming drawer CAUTION Turn the power OFF before removing the warming drawer. How to remove the warming drawer 1. Pull out the drawer until it stops. 2. Locate the locking clips near the back of each full-extension roller guide rail. Using two hands, push down on the left clip and lift up on the right clip to release the clips. Pull the drawer the rest of the way out. Lever Lever Push down on the left guide Pull up on the right guide 3. Pull the warming drawer away from the range. How to re-install the warming drawer 1. Position the ends of the full-extension roller guide rails in the side rails of the drawer opening. Right roller guide rail 2. Push in the drawer to close it and snap the locking clips into place. Changing the oven light The oven light is a standard 40-watt appliance bulb. It will come on when the oven door is open. When the oven door is closed, press the pad to turn it on or off. It will not work during a self-cleaning cycle. Remove Replace Glass bulb cover Bulb 1. Make sure the oven and the bulb are cool. 2. Unplug the range or disconnect the power. 3. Turn the glass bulb cover in the back of the oven counterclockwise to remove. 4. Turn the bulb counterclockwise to remove it from its socket. 5. Insert a new 40 watt appliance bulb, and then turn it clockwise to tighten. Re-install the bulb cover by turning clockwise. 6. Plug in the range or reconnect the power. CAUTION Before changing your oven light bulb, disconnect the electrical power to the range at the main fuse or circuit breaker panel. Make sure the oven and the bulb are cool. Maintaining your appliance 52 English
-
 1
1 -
2
-
3
-
4
-
5
-
6
-
7
-
8
-
9
-
10
-
11
-
12
-
13
-
14
-
15
-
16
-
17
-
18
-
19
-
20
-
21
-
22
-
23
-
24
-
25
-
26
-
27
-
28
-
29
-
30
-
31
-
32
-
33
-
34
-
35
-
36
-
37
-
38
-
39
-
40
-
41
-
42
-
43
-
44
-
45
-
46
-
 47
47 -
 48
48 -
 49
49 -
 50
50 -
 51
51 -
 52
52 -
 53
53 -
 54
54 -
 55
55 -
 56
56 -
 57
57 -
58
-
59
-
60
-
61
-
62
-
63
-
64
-
65
-
66
-
67
-
68
-
69
-
70
-
71
-
72
-
73
-
74
-
75
-
76
-
77
-
78
-
79
-
80
-
81
-
82
-
83
-
84
-
85
-
86
-
87
-
88
-
89
-
90
-
91
-
92
-
93
-
94
-
95
-
96
-
97
-
98
-
99
-
100
-
101
-
102
-
103
-
104
-
105
-
106
-
107
-
108
-
109
-
110
-
111
-
112
-
113
-
114
-
115
-
116
-
117
-
118
-
119
-
120
-
121
-
122
-
123
-
124
-
125
-
126
-
127
-
128
-
129
-
130
-
131
-
132
-
133
-
134
-
135
-
136
-
137
-
138
-
139
-
140
-
141
-
142
-
143
-
144
-
145
-
146
-
147
-
148
-
149
-
150
-
151
-
152
-
153
-
154
-
155
-
156
-
157
-
158
-
159
-
160
-
161
-
162
-
163
-
164
-
165
-
166
-
167
-
168
-
169
-
170
-
171
-
172
-
173
-
174
-
175
-
176
-
177
-
178
-
179
-
180
-
181
-
182
-
183
-
184
-
185
-
186
-
187
-
188
-
189
-
190
-
191
-
192
 |
 |
