Samsung PPM50H3 User Manual - Page 24
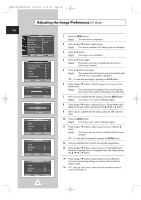
Adjusting the Image Preferences (PC Mode), PC Mode
 |
UPC - 770332800134
View all Samsung PPM50H3 manuals
Add to My Manuals
Save this manual to your list of manuals |
Page 24 highlights
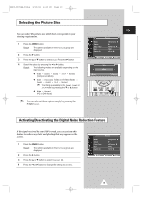
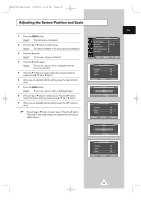
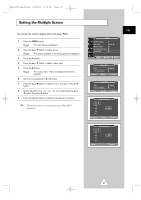
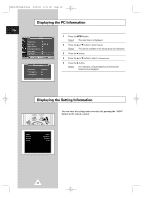
BN68-00654A-01Eng 4/19/04 4:13 PM Page 24 Adjusting the Image Preferences (PC Mode) ENG Setup Image Lock Key Lock Multi Control Burning Protection Video Wall Information √ œ Off Move Enter Return Image Lock Auto Adjustment Frequency Phase Position Zoom/Panning Move √ Enter Return Frequency 0 œ √ Adjust Return Position Adjust Store Zoom/Panning Zoom 1 Panning √ Reset √ Move œ √ Adjust Return Zoom/Panning Zoom 1 Panning √ Reset √ Move √ Enter Return Zoom/Panning Zoom 1 Panning √ Reset √ Move √ Enter Return 1 Press the MENU button. Result: The main menu is displayed. 2 Press the ▲ or ▼ button to select Setup. Result: The options available in the Setup group are displayed. 3 Press the √ button. Result: The Image Lock is selected. 4 Press the √ button again. Result: The Image Lock menu is displayed with the Auto Adjustment selected. 5 Press the √ button over again. Result: The screen size and frequency are automatically reset with the Auto Adjustment displayed. ➣ You can also do simply by pressing the AUTO button. 6 Press the ▲ or ▼ button to select Frequency (or Phase). Press the √ button. Result: The horizontal bar is displayed. Move the horizontal bar's cursor left or right by pressing the œ or √ button. 7 When you are satisfied with the settings, press the MENU button. Result: The Image Lock menu is displayed again. 8 Press the ▲ or ▼ button to select Position. Press the √ button. Adjust the screen position by pressing the or √ button. 9 When you are satisfied with the setting, press the store. button to 10 Press the MENU button. Result: The Image Lock menu is displayed again. 11 Press the ▲ or ▼ button to select Zoom/Panning. Press the √ button. Result: The Zoom/Panning menu is displayed with the Zoom selected. ➣ You can also do simpley by pressing the ZOOM button. 12 Press the œ or √ button to reach the required magnification. 13 Press the ▲ or ▼ button to select Panning. Press the √ button. Move the magnified picture to required position by using pressing the or √ button. ➢ Press the ▲ or ▼ button to select Reset. Press the √ button. The zoom and panning settings are replaced with the factory default values. ➢ The Panning and Reset menus can be used when value of Zoom is more than 0. 24
-
 1
1 -
2
-
3
-
4
-
5
-
6
-
7
-
8
-
9
-
10
-
11
-
12
-
13
-
14
-
15
-
16
-
17
-
18
-
 19
19 -
 20
20 -
 21
21 -
 22
22 -
 23
23 -
 24
24 -
 25
25 -
 26
26 -
 27
27 -
 28
28 -
 29
29 -
30
-
31
-
32
-
33
-
34
-
35
-
36
-
37
-
38
-
39
-
40
-
41
-
42
-
43
-
44
 |
 |
