Samsung PPM50H3 User Manual - Page 25
Locking the Control buttons, Setting the MDC (Multiple Display Control) - remote
 |
UPC - 770332800134
View all Samsung PPM50H3 manuals
Add to My Manuals
Save this manual to your list of manuals |
Page 25 highlights
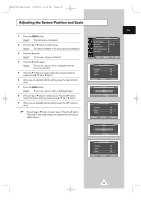
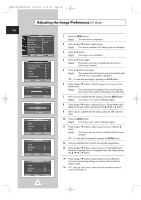
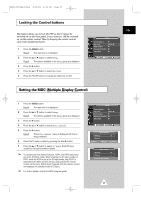
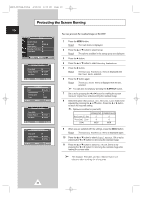
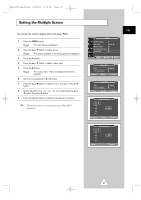
BN68-00654A-01Eng 4/19/04 4:13 PM Page 25 Locking the Control buttons This feature allows you to lock the PDP so that it cannot be switched on via the front panel. It can, however, still be switched on via the remote control. Thus, by keeping the remote control away from unauthorised users. 1 Press the MENU button. Result: The main menu is displayed. 2 Press the ▲ or ▼ button to select Setup. Result: The options available in the Setup group are displayed. 3 Press the √ button. 4 Press the ▲ or ▼ button to select Key Lock. 5 Press the œ or √ button to change the setting (On or Off). Setup Screen Adjust Key Lock Multi Control Burning Protection Video Wall √ œ Off Move Sel. Return ENG Setting the MDC (Multiple Display Control) 1 Press the MENU button. Result: The main menu is displayed. 2 Press the ▲ or ▼ button to select Setup. Result: The options available in the Setup group are displayed. 3 Press the √ button. 4 Press the ▲ or ▼ button to select Multi Control. 5 Press the √ button. Result: The Multi Control menu is displayed with the ID Setup selected. 6 Select the ID setup number by pressing the œ or √ button. 7 Press the ▲ or ▼ button to select ID Input. Enter ID input number by using the numeric buttons. ➢ To operate the multi control function, PDP1 and PDP2 should be set in the ID Setup mode. When entering the ID Input number of PDP1 while the PDP is set in the ID Input mode, only PDP1 is switched to the Menu screen and you can operate the remote control. At this time, PDP2 doesn't operate with the remote control and displays the standby mode of ID Input. ➢ For further details, refer to the MDC program guide. Setup Screen Adjust Key Lock Multi Control Burning Protection Video Wall √ œ Off Move Enter Return Multi Control ID Setup 01 ID Input -- Move œ √ Adjust Return Multi Control ID Setup 01 ID Input -- Enter ID Input Number 25
-
 1
1 -
2
-
3
-
4
-
5
-
6
-
7
-
8
-
9
-
10
-
11
-
12
-
13
-
14
-
15
-
16
-
17
-
18
-
19
-
 20
20 -
 21
21 -
 22
22 -
 23
23 -
 24
24 -
 25
25 -
 26
26 -
 27
27 -
 28
28 -
 29
29 -
 30
30 -
31
-
32
-
33
-
34
-
35
-
36
-
37
-
38
-
39
-
40
-
41
-
42
-
43
-
44
 |
 |