Samsung S630 User Manual - Page 31
Recording, How to use the menu
 |
UPC - 044701007418
View all Samsung S630 manuals
Add to My Manuals
Save this manual to your list of manuals |
Page 31 highlights
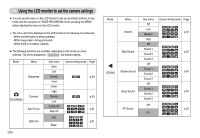
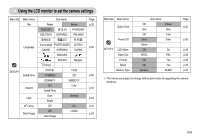
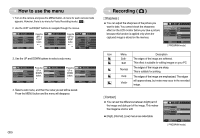
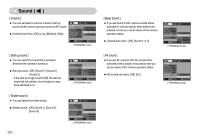
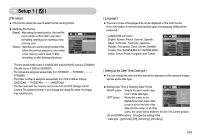
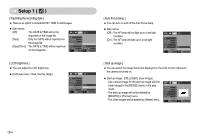
How to use the menu 1. Turn on the camera and press the MENU button. A menu for each camera mode appears. However, there is no menu for Voice Recording mode ( ). 2. Use the LEFT and RIGHT buttons to navigate through the menus. RECORDING Sharpness Contrast Auto Focus OSD Info Normal Normal Center AF Full MEMU Exit Move Press the LEFT or RIGHT button. SOUND Volume Start Shutter Beep AF Sound MEMU Exit Normal Off Sound1 Sound1 On Move Press the LEFT or RIGHT button. SETUP1 File Language Date&Time Imprint LCD AF Lamp MEMU Exit Series ENGLISH 07/01/01 Off Normal On Move 3. Use the UP and DOWN buttons to select a sub menu. RECORDING Sharpness Contrast Auto Focus OSD Info Normal Normal Center AF Full Move Change Press the UP or DOWN button. RECORDING Sharpness Contrast Auto Focus OSD Info Normal Normal Center AF Full Move Change Press the UP or DOWN button. RECORDING Sharpness Contrast Auto Focus OSD Info Normal Normal Center AF Full Move Change 4. Select a sub menu, and then the value you set will be saved. Press the MENU button and the menu will disappear. 《30》 Recording ( ) [ Sharpness ] ■ You can adjust the sharpness of the picture you want to take. You cannot check the sharpness effect on the LCD monitor before you take a picture, because this function is applied only when the captured image is stored on the memory. RECORDING Sharpness Contrast Auto Focus OSD Info Soft+ Soft Normal Vivid Vivid+ Back OK Set [ PROGRAM mode ] Icon Menu Description Soft+ Soft The edges of the image are softened. This effect is suitable for editing images on your PC. Normal The edges of the image are sharp. This is suitable for printing. Vivid Vivid+ The edges of the image are emphasized. The edges will appear sharp, but noise may occur in the recorded image. [ Contrast ] ■ You can set the difference between bright part of the image and dark part of the image. This makes the image be vivid or soft. ● [High], [Normal], [Low] menus are selectable. RECORDING Sharpness Contrast Auto Focus OSD Info High Normal Low Back OK Set [ PROGRAM mode ]
-
 1
1 -
2
-
3
-
4
-
5
-
6
-
7
-
8
-
9
-
10
-
11
-
12
-
13
-
14
-
15
-
16
-
17
-
18
-
19
-
20
-
21
-
22
-
23
-
24
-
25
-
 26
26 -
 27
27 -
 28
28 -
 29
29 -
 30
30 -
 31
31 -
 32
32 -
 33
33 -
 34
34 -
 35
35 -
 36
36 -
37
-
38
-
39
-
40
-
41
-
42
-
43
-
44
-
45
-
46
-
47
-
48
-
49
-
50
-
51
-
52
-
53
-
54
-
55
-
56
-
57
-
58
-
59
-
60
-
61
-
62
-
63
-
64
-
65
-
66
-
67
-
68
-
69
-
70
-
71
-
72
-
73
-
74
-
75
-
76
-
77
-
78
-
79
-
80
-
81
-
82
-
83
-
84
-
85
-
86
-
87
-
88
-
89
-
90
-
91
-
92
-
93
-
94
-
95
-
96
-
97
-
98
 |
 |
