Samsung S630 User Manual - Page 77
PictBridge : Picture Selection, PictBridge : Print Setting
 |
UPC - 044701007418
View all Samsung S630 manuals
Add to My Manuals
Save this manual to your list of manuals |
Page 77 highlights
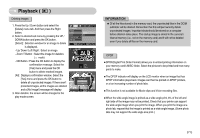
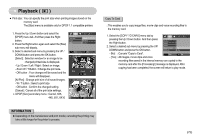
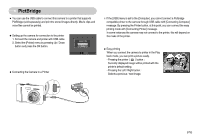
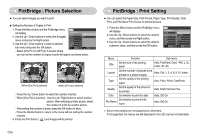
PictBridge : Picture Selection ■ You can select images you want to print ● Setting the Number of Copies to Print 1. Press the Menu button and the PictBridge menu will display. 2. Use the Up / Down buttons to select the [Images] menu and press the Right button. 3. Use the Up / Down buttons to select a desired sub menu and press the OK button. PICTBRIDGE Image Size Layout Type Quality Date Move One All Print - Select [One Pic] or [All Pics]. A screen where you can set the number of copies to print will appear as shown below. ⓪ Prev Next SH Et xit OK Set [When [One Pic] is selected] ⓪ SH Exit OK Set [When [All Pics] is selected] - Press the Up / Down button to select the number of prints. - When [One Pic] is selected : Use the Left / Right button to select another picture. After selecting another picture, select the number of prints for another picture. - After setting the number of prints, press the OK button to save. - Press the Shutter button to return to the menu without setting the number of prints. 4. Press the Print button ( ) and images will be printed. PictBridge : Print Setting ■ You can select the Paper Size, Print Format, Paper Type, Print Quality, Date Print, and File Name Print menus for printed pictures. 1. Press the Menu button and the PictBridge menu will display. 2. Use the Up / Down buttons to select the desired menu, and then press the Right button. 3. Use the Up / Down buttons to select the desired submenu value, and then press the OK button. PICTBRIDGE Image Size Layout Type Quality Date Move Auto PostCard Card 4×6 L 2L Print Menu Function Sub menu Size Set the size of the printing paper Auto, PostCard, Card, 4X6, L, 2L, Letter, A4, A3 Set the number of pictures to be Layout Auto, Full, 1, 2, 4, 8, 9, 16, Index printed on a sheet of paper Set the quality of the printing Type paper Auto, Plain, Photo, FastPhoto Quality Set the quality of the picture to Auto, Draft, Normal, Fine be printed Date Set whether to print the date Auto, Off, On Set whether to print the file File Name name Auto, Off, On ※ Some menu options are not supported on all printers. If not supported, the menus are still displayed in the LCD, but are not selectable. 《76》
-
 1
1 -
2
-
3
-
4
-
5
-
6
-
7
-
8
-
9
-
10
-
11
-
12
-
13
-
14
-
15
-
16
-
17
-
18
-
19
-
20
-
21
-
22
-
23
-
24
-
25
-
26
-
27
-
28
-
29
-
30
-
31
-
32
-
33
-
34
-
35
-
36
-
37
-
38
-
39
-
40
-
41
-
42
-
43
-
44
-
45
-
46
-
47
-
48
-
49
-
50
-
51
-
52
-
53
-
54
-
55
-
56
-
57
-
58
-
59
-
60
-
61
-
62
-
63
-
64
-
65
-
66
-
67
-
68
-
69
-
70
-
71
-
 72
72 -
 73
73 -
 74
74 -
 75
75 -
 76
76 -
 77
77 -
 78
78 -
 79
79 -
 80
80 -
 81
81 -
 82
82 -
83
-
84
-
85
-
86
-
87
-
88
-
89
-
90
-
91
-
92
-
93
-
94
-
95
-
96
-
97
-
98
 |
 |
