Samsung SCH-R900 User Manual (user Manual) (ver.f10) (English) - Page 38
Picture Message, Picture, Sound, Record New, Edit Send To, Preview, Sending Options, Picture Msg,
 |
View all Samsung SCH-R900 manuals
Add to My Manuals
Save this manual to your list of manuals |
Page 38 highlights
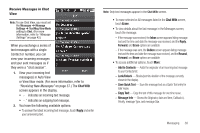
You are returned to the Picture Message screen which is populated with the selected photo in the Picture field. 9. If desired, you can add a sound file to accompany the picture by selecting the Sound field. • To record a sound file to add to this message, touch Record New. • To add an existing sound file, select a preferred file from a list of available sound files. You are returned to the Picture Message screen which is populated with the selected sound file in the Sound field. 10. To send your finished message, touch Send. • To change or add recipient(s), touch Edit Send To. • To preview your Picture message as the recipient(s) will see it, touch Preview. • Before sending your Picture message, you can set message send options by touch More ➔ Sending Options. • To make changes to your message, press . Send Picture Messages in Camera Mode Picture messages can be sent from your phone's camera to recipients with compatible phones or devices. You can even accompany a picture with a voice memo or preloaded sound file. Tip: You can send a Picture message to up to ten recipients. Enter each recipient's address or phone number in a separate To field of the Picture Msg screen. 35 1. From Standby mode, press the Camera key ( ). The camera viewfinder screen appears in the display. 2. Using the display as a viewfinder, when the image that you wish to send appears in the display, press the Camera key ( ) to take a picture. Note: For more information, refer to "Camera-Camcorder" on page 53. 3. Touch Send. If necessary, the phone resizes your picture for sending, then the Picture Msg screen appears in the display showing the To list. 4. Open the QWERTY keypad. 5. Address your message as you would a Text message (see "Creating and Sending Text Messages" on page 33). 6. When you are finished addressing your message, touch Next. The Picture Msg fields screen appears in the display with your new picture populating the Picture field. 7. To complete and send your message, refer to steps 4 - 9 of "Creating and Sending a Picture Message" on page 34. Creating and Sending a Video Message 1. Open the QWERTY keypad. 2. From Standby mode, touch Messages, then select Send Message ➔ Video Message. The Video Msg screen appears in the display showing the To list.
-
 1
1 -
2
-
3
-
4
-
5
-
6
-
7
-
8
-
9
-
10
-
11
-
12
-
13
-
14
-
15
-
16
-
17
-
18
-
19
-
20
-
21
-
22
-
23
-
24
-
25
-
26
-
27
-
28
-
29
-
30
-
31
-
32
-
 33
33 -
 34
34 -
 35
35 -
 36
36 -
 37
37 -
 38
38 -
 39
39 -
 40
40 -
 41
41 -
 42
42 -
 43
43 -
44
-
45
-
46
-
47
-
48
-
49
-
50
-
51
-
52
-
53
-
54
-
55
-
56
-
57
-
58
-
59
-
60
-
61
-
62
-
63
-
64
-
65
-
66
-
67
-
68
-
69
-
70
-
71
-
72
-
73
-
74
-
75
-
76
-
77
-
78
-
79
-
80
-
81
-
82
-
83
-
84
-
85
-
86
-
87
-
88
-
89
-
90
-
91
-
92
-
93
-
94
-
95
-
96
-
97
-
98
-
99
-
100
-
101
-
102
-
103
-
104
-
105
-
106
-
107
-
108
-
109
-
110
-
111
-
112
-
113
-
114
-
115
-
116
-
117
-
118
-
119
-
120
-
121
-
122
-
123
-
124
 |
 |