Samsung SCH-R900 User Manual (user Manual) (ver.f10) (English) - Page 76
Send via Bluetooth
 |
View all Samsung SCH-R900 manuals
Add to My Manuals
Save this manual to your list of manuals |
Page 76 highlights
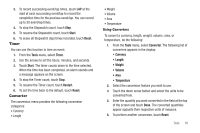
• Left/Right arrow buttons - Changes the Calendar one month per touch. • Calendar Dates - Touch a date to display its event list. • Add - Launches the New Event screen to add an event to the Calendar. • Go To - Select a particular date to appear in the Calendar. • Weekly - Changes the Calendar display from the selected month to the selected week. • More - Lets you access the additional options: Go To Today, Erase Old, Erase All, and Send via Bluetooth. Add a New Event 1. From the Calendar screen, touch the desired date, then touch Add. - or - From the Calendar screen, touch Add. The New Event screen appears in the display. 2. Enter the Appointment Name. (For more information, refer to "Entering Text" on page 12.) 3. Select each of the following options: • Start Date - Populated with highlighted Calendar date. Select the date this event begins. • Start Time - Populated with the current time (rounded to the nearest half-hour). Select the time this event begins. 73 • End Date - Populated with highlighted Calendar date. Select the date this event ends. • End Time - Populated with a time one half-hour later than the Start Time. Select the time this event ends. • Recurrence - Select None / Daily / Weekly / Monthly / Yearly. • Alert - Select Off / On Time / 5 Min. Before / 10 Min. Before / 15 Min. Before / 30 Min. Before / 1 Hour Before / 3 Hours Before / 5 Hours Before / 1 Day Before. • Alert Type - Select how your phone will alert you to the Event (Tone / Vibrate / Light Only). If you select Tone, you can also select a particular music file, sound file, or ringtone. • Reminder - Select how often to repeat the Alert (Once / Every 2 Minutes / Every 15 Minutes / Off). 4. Touch Save to save this event in your Calendar. View/Change an Event 1. From the Calendar, select a date. A list of all events scheduled for the selected date appears in the display. 2. Select an Event to view. The current settings for the selected Event appear in the display in a scrollable list. The following options are available: • To change the event details, touch Edit. • To view the events for another date, touch Go To. • To remove the event from the calendar, touch Erase. (You are prompted to confirm the erasure.)
-
 1
1 -
2
-
3
-
4
-
5
-
6
-
7
-
8
-
9
-
10
-
11
-
12
-
13
-
14
-
15
-
16
-
17
-
18
-
19
-
20
-
21
-
22
-
23
-
24
-
25
-
26
-
27
-
28
-
29
-
30
-
31
-
32
-
33
-
34
-
35
-
36
-
37
-
38
-
39
-
40
-
41
-
42
-
43
-
44
-
45
-
46
-
47
-
48
-
49
-
50
-
51
-
52
-
53
-
54
-
55
-
56
-
57
-
58
-
59
-
60
-
61
-
62
-
63
-
64
-
65
-
66
-
67
-
68
-
69
-
70
-
 71
71 -
 72
72 -
 73
73 -
 74
74 -
 75
75 -
 76
76 -
 77
77 -
 78
78 -
 79
79 -
 80
80 -
 81
81 -
82
-
83
-
84
-
85
-
86
-
87
-
88
-
89
-
90
-
91
-
92
-
93
-
94
-
95
-
96
-
97
-
98
-
99
-
100
-
101
-
102
-
103
-
104
-
105
-
106
-
107
-
108
-
109
-
110
-
111
-
112
-
113
-
114
-
115
-
116
-
117
-
118
-
119
-
120
-
121
-
122
-
123
-
124
 |
 |