Samsung SF-650 Quick Guide (easy Manual) (ver.1.0) (English) - Page 34
Faxing, Preparing to fax, Sending a fax
 |
UPC - 635753613803
View all Samsung SF-650 manuals
Add to My Manuals
Save this manual to your list of manuals |
Page 34 highlights
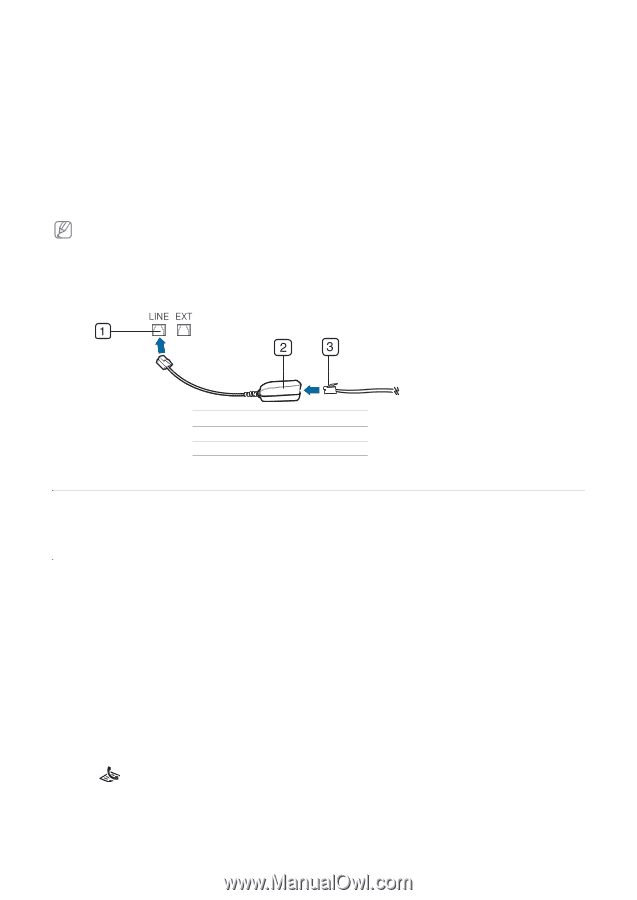
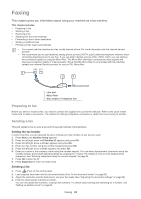
Faxing 5. This chapter gives you information about using your machine as a fax machine. This chapter includes: • Preparing to fax • Sending a fax • Receiving a fax • Adjusting the document settings • Forwarding a fax to other destination • Setting up address book • Printing sent fax report automatically • You cannot use this machine as a fax via the internet phone. For more information ask the internet service provider. • We recommend you to use traditional analog phone services (PSTN: public switched telephone network) when connecting telephone lines to use Fax. If you use other Internet services (DSL, ISDN, VolP), you can improve the connection quality by using the Micro-filter. The Micro-filter eliminates unnecessary noise signals and improves connection quality or Internet quality. Since the DSL Micro-filter is not provided with the machine, contact your Internet Service provider for use on DSL Micro-filter. 1 Line port 2 Micro filter 3 DSL modem / Telephone line Preparing to fax Before you send or receive a fax, you need to connect the supplied line cord to the wall jack. Refer to the Quick Install Guide how to make a connection. The method of making a telephone connection is varies from one country to another. Sending a fax This part explains how to send a fax and the special methods of transmission. Setting the fax header In some countries, you are required by law to indicate your fax number on any fax you send. 1. Press Menu until Machine Setup appears. 2. Press the left/right arrow until Machine ID appears and press OK. 3. Press the left/right arrow until Fax: appears and press OK. 4. Enter your fax number using the number keypad and press OK. 5. Press the left/right arrow until ID: appears and press OK. 6. Enter your name or the company name using the number keypad. You can enter alphanumeric characters using the number keypad, and include special symbols by pressing the 1 button. For details on how to enter alphanumeric characters, see "Entering characters using the number keypad" on page 24. 7. Press OK to save the ID. 8. Press Stop/Clear to return to ready mode. Sending a fax 1. Press (Fax) on the control panel. 2. Load originals face down into the document feeder (See "In the document feeder" on page26). 3. Adjust the resolution and the darkness to suit your fax needs (See "Adjusting the document settings" on page38). 4. Enter the receiving fax machine's number. You can use speed dial numbers, or group dial numbers. For details about storing and searching for a number, see "Setting up address book" on page 39. Faxing_ 33
-
 1
1 -
2
-
3
-
4
-
5
-
6
-
7
-
8
-
9
-
10
-
11
-
12
-
13
-
14
-
15
-
16
-
17
-
18
-
19
-
20
-
21
-
22
-
23
-
24
-
25
-
26
-
27
-
28
-
 29
29 -
 30
30 -
 31
31 -
 32
32 -
 33
33 -
 34
34 -
 35
35 -
 36
36 -
 37
37 -
 38
38 -
 39
39 -
40
-
41
-
42
-
43
-
44
-
45
-
46
-
47
-
48
-
49
-
50
-
51
-
52
-
53
-
54
-
55
-
56
-
57
-
58
-
59
-
60
-
61
-
62
-
63
-
64
-
65
-
66
-
67
-
68
-
69
-
70
-
71
-
72
-
73
-
74
-
75
-
76
-
77
-
78
-
79
-
80
-
81
-
82
-
83
-
84
 |
 |