Samsung SF531P User Manual (user Manual) (ver.1.00) (English) - Page 32
Setting Your Fax Number and Name, Setup, Start/Enter, Search/Delete
 |
View all Samsung SF531P manuals
Add to My Manuals
Save this manual to your list of manuals |
Page 32 highlights
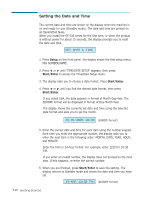
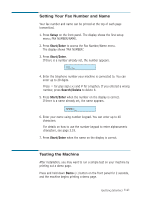
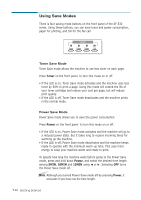
Setting Your Fax Number and Name Your fax number and name can be printed at the top of each page transmitted. 1. Press Setup on the front panel. The display shows the first setup menu; FAX NUMBER/NAME. 2. Press Start/Enter to access the Fax Number/Name menu. The display shows 'FAX NUMBER.' 3. Press Start/Enter. If there is a number already set, the number appears. TEL: 4. Enter the telephone number your machine is connected to. You can enter up to 20 digits. Press for plus sign (+) and # for a hyphen. If you entered a wrong number, press Search/Delete to delete it. 5. Press Start/Enter when the number on the display is correct. If there is a name already set, the name appears. NAME: 6. Enter your name using number keypad. You can enter up to 40 characters. For details on how to use the number keypad to enter alphanumeric characters, see page 3.19. 7. Press Start/Enter when the name on the display is correct. Testing the Machine After installation, you may want to run a simple test on your machine by printing out a demo page. Press and hold down Demo ( ) button on the front panel for 2 seconds, and the machine begins printing a demo page. Getting Started 1.21
-
 1
1 -
2
-
3
-
4
-
5
-
6
-
7
-
8
-
9
-
10
-
11
-
12
-
13
-
14
-
15
-
16
-
17
-
18
-
19
-
20
-
21
-
22
-
23
-
24
-
25
-
26
-
 27
27 -
 28
28 -
 29
29 -
 30
30 -
 31
31 -
 32
32 -
 33
33 -
 34
34 -
 35
35 -
 36
36 -
 37
37 -
38
-
39
-
40
-
41
-
42
-
43
-
44
-
45
-
46
-
47
-
48
-
49
-
50
-
51
-
52
-
53
-
54
-
55
-
56
-
57
-
58
-
59
-
60
-
61
-
62
-
63
-
64
-
65
-
66
-
67
-
68
-
69
-
70
-
71
-
72
-
73
-
74
-
75
-
76
-
77
-
78
-
79
-
80
-
81
-
82
-
83
-
84
-
85
-
86
-
87
-
88
-
89
-
90
-
91
-
92
-
93
-
94
-
95
-
96
-
97
-
98
-
99
-
100
-
101
-
102
-
103
-
104
-
105
-
106
-
107
-
108
-
109
-
110
-
111
-
112
-
113
-
114
-
115
-
116
-
117
-
118
-
119
-
120
-
121
-
122
-
123
-
124
-
125
-
126
-
127
-
128
-
129
-
130
-
131
-
132
-
133
-
134
-
135
-
136
-
137
-
138
-
139
-
140
-
141
-
142
-
143
-
144
-
145
-
146
-
147
-
148
-
149
-
150
-
151
-
152
-
153
-
154
-
155
-
156
-
157
-
158
-
159
-
160
-
161
-
162
-
163
-
164
-
165
-
166
-
167
 |
 |