Seagate Maxtor Fusion User Guide - Page 9
Maxtor Fusion, Using The Maxtor Fusion - admin
 |
View all Seagate Maxtor Fusion manuals
Add to My Manuals
Save this manual to your list of manuals |
Page 9 highlights
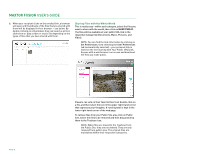
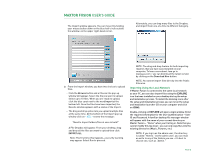
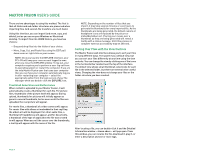
MAXTOR FUSION USER'S GUIDE USING THE MAXTOR FUSION Maxtor Fusion offers a new level of flexibility and control for storing, organizing, accessing, and sharing personal digital content. Maxtor Fusion offers a simple yet powerful way to help transform scattered video, pictures, music, and documents files into personalized digital experiences that can be shared to reflect an event, an occasion, a person, an activity, or even a mood. With the easy-to-use interface, shown below, you can import files and share them with others, and even create picture links to web sites such as MySpace and eBay. Maxtor Fusion is designed to share personal files. Please obey all applicable copyright laws. Login In as a User The admin user assigns Usernames and Passwords. If you have installed the Maxtor Fusion icons on your desktop, double-click the Launch icon to open a browser at the login screen. Or, type in the DNS Hostname or IP address of the Maxtor Fusion. Log in using your Username and Password. Importing Files One of the first things you'll want to do is import files onto your Maxtor Fusion. There are two ways to add files to your Maxtor Fusion: through the web browser interface or over your local network (LAN) using your PC's file manager (Windows Explorer or Mac Finder). If you have a large numbers of files to load onto Maxtor Fusion, it is recommended that you use the LAN interface. The files you import are copied - the original files on your computer are not changed or moved. If you've added a lot of files to your Maxtor Fusion and wonder if you have enough space to import more files, you can check the disk space gauge in the upper right-hand part of the interface. If you need more information than just the percentage of disk space that's available, click the icon for a detailed and categorized listing. Importing Using the Web Interface This option is best for uploading content to your Maxtor Fusion when you are accessing it from outside of your home network or working from someone else's computer. 1. Select the folder where you would like the imported files to be placed by clicking on the Category and then clicking on a desired folder and sub-folder. The categories are in the upper left hand side and are labeled: Pictures, Music, Video, and Documents. Folders are displayed in the left column of the interface when in the thumbnail views. Sub-folders are displayed along side the thumbnails in the main viewing area. To learn how to create a new folder, refer to "Creating Folders" on page 11. 2. Click on IMPORT in the upper right-hand corner. The rest of this section will assume your are logged in. PAGE 7
-
 1
1 -
2
-
3
-
 4
4 -
 5
5 -
 6
6 -
 7
7 -
 8
8 -
 9
9 -
 10
10 -
 11
11 -
 12
12 -
 13
13 -
 14
14 -
15
-
16
-
17
-
18
-
19
-
20
-
21
-
22
-
23
-
24
-
25
-
26
-
27
-
28
 |
 |