Sharp BD-MPC41U BD-MPC41U Operation Manual - Page 43
Basic Operations, Loading a Disc, Input Selection, Changing the input selection on the main unit
 |
UPC - 074000354999
View all Sharp BD-MPC41U manuals
Add to My Manuals
Save this manual to your list of manuals |
Page 43 highlights
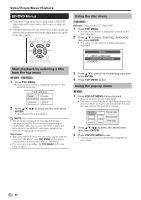
Basic Operations POWER VOLUME control OPEN/CLOSE SELECTOR Loading a Disc Changing the input selection with the remote control The operation buttons vary depending on the input mode. Pressing BD/AUX changes the input mode as follows. DISC DIGITAL 1 DIGITAL 2 ANALOG 1 Press POWER to turn on the power. 2 Press OPEN/CLOSE to open the disc tray. 3 Load a disc on the disc tray. • Insert the disc with the label face up. • In case of disc recorded on both sides, face down the side to play back. To change the FM input mode, press FM. FM (STEREO) FM (MONO) To select the iPod mode, press iPod/I. Volume Adjustment Preparations and Basic Operations 4 Press OPEN/CLOSE to close the disc tray. • Playback may begin automatically, depending on the disc. Input Selection Changing the input selection on the main unit You can change the input source using SELECTOR. Each time SELECTOR is pressed, the input source changes as follows: DISC DIGITAL 1 DIGITAL 2 Adjusting the volume Main unit operation: When the VOLUME control is turned clockwise, the volume will increase. When it is turned counterclockwise, the volume will decrease. Remote control operation: Press VOL+ to increase the volume and VOL- to decrease the volume. Muting the sound The sound is muted temporarily when pressing MUTE on the remote control. *1 ANALOG TUNER *2 iPod *1 flashes for 3 seconds, and then the "Function" (status display) appears. *2 The elapsed time is displayed during disc playback. • The mute function is canceled when you adjust the volume. 41
-
 1
1 -
2
-
3
-
4
-
5
-
6
-
7
-
8
-
9
-
10
-
11
-
12
-
13
-
14
-
15
-
16
-
17
-
18
-
19
-
20
-
21
-
22
-
23
-
24
-
25
-
26
-
27
-
28
-
29
-
30
-
31
-
32
-
33
-
34
-
35
-
36
-
37
-
 38
38 -
 39
39 -
 40
40 -
 41
41 -
 42
42 -
 43
43 -
 44
44 -
 45
45 -
 46
46 -
 47
47 -
 48
48 -
49
-
50
-
51
-
52
-
53
-
54
-
55
-
56
-
57
-
58
-
59
-
60
-
61
-
62
-
63
-
64
-
65
-
66
-
67
-
68
-
69
-
70
-
71
-
72
-
73
-
74
-
75
-
76
-
77
-
78
-
79
-
80
-
81
-
82
-
83
-
84
-
85
-
86
-
87
-
88
-
89
-
90
-
91
-
92
-
93
-
94
-
95
 |
 |
