Sharp PG-D210U PGD210U Operation Manual
Sharp PG-D210U Manual
 |
View all Sharp PG-D210U manuals
Add to My Manuals
Save this manual to your list of manuals |
Sharp PG-D210U manual content summary:
- Sharp PG-D210U | PGD210U Operation Manual - Page 1
LCD PROJECTOR PROJECTEUR LCD PROYECTOR LCD OPERATION MANUAL MODE D'EMPLOI MANUAL DE OPERACION ENGLISH E FRANÇAIS F ESPAÑOL ES PG-D210U Contents E • Important Information 1 • Important Safeguards 2 • Cautions Concerning the Laser Pointer 3 • Notes on Operation 4 • Outstanding Features - Sharp PG-D210U | PGD210U Operation Manual - Page 2
No.: PG-D210U Serial No.: Important Information There are two important reasons for prompt warranty registration of your new SHARP LCD Projector, using the REGISTRATION CARD packed with the projector. 1. WARRANTY This is to assure that you immediately receive the full benefit of the parts, service - Sharp PG-D210U | PGD210U Operation Manual - Page 3
servicing. For your own protection and reliable usage of your LCD Projector, please be sure to read these "Important Safeguards" carefully before use. 1. Read Instructions-All the safety and operating instructions grounding-type plug. 13. Power-Cord Protection-Power-supply cords should be routed so - Sharp PG-D210U | PGD210U Operation Manual - Page 4
to dangerous voltage or other hazards. Refer all servicing to qualified service personnel. 18. Damage Requiring Service-Unplug this product from the wall outlet and refer servicing to qualified service personnel under the following conditions: a. When the power-supply cord or plug is damaged. b. If - Sharp PG-D210U | PGD210U Operation Manual - Page 5
projector starts to overheat due to set-up problems or a dirty air filter, "TEMP." will flash in the upper-left corner of the picture. If the temperature continues to rise, then the lamp for any additional hardware. HIGH PICTURE QUALITY The three LCD panels contain 786,432 ןRGB pixels to achieve - Sharp PG-D210U | PGD210U Operation Manual - Page 6
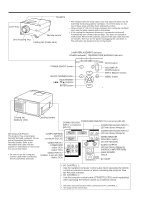
to its normal mode. OPERATION PANEL ON TOP OF PROJECTOR LAMP REPLACEMENT indicator POWER indicator TEMPERATURE WARNING indicator POWER ON/OFF button BLACK SCREEN button ADJUSTMENT buttons ENTER button POWER LAMP TEMP. ON/OFF BLACK SCREEN MUTE INPUT SELECT VOL MENU MUTE button VOLUME - Sharp PG-D210U | PGD210U Operation Manual - Page 7
off the MAIN POWER switch to avoid draining the batteries. LEFT-CLICK button RIGHT-CLICK/ENTER button INPUT SELECT buttons INPUT CHECK button MOUSE label MOUSE/ADJUSTMENT switch LIGHT button R-CLICK/ENTER INPUT SELECT DATA1 DATA2 VIDEO1 VIDEO2 CHECK MOUSE ADJ. LIGHT LCD PROJECTOR ADJ. label - Sharp PG-D210U | PGD210U Operation Manual - Page 8
SHARP U.S.A. ONLY REMOTE CONTROL MODEL NO. : G1414CESA DC6V (1.5VX4PCS.) MADE IN JAPAN FABRIQUÉ AU JAPON Using the optional cable with the remote control When the remote control cannot be used due to the range or positioning of the projector the shelf life of the supplied batteries, they may run - Sharp PG-D210U | PGD210U Operation Manual - Page 9
LCD PROJECTOR LASER POINTER button MOUSE buttons RIGHT-CLICK button R/C OFF MAIN POWER refer to your computer owners manual for details on setting-up/ supplied with your projector. For additional connection cables, contact your nearest Authorized Sharp Industrial LCD Products Dealer or Service - Sharp PG-D210U | PGD210U Operation Manual - Page 10
and Reversed/Inverted Image mode functions broaden your options for projector placement. • See pages 10, 11 and 12 for details on projector setup. SIDE VIEW Zoom Ceiling setting Invert Image 2 POWER LAMP TEMP. POWER indicator 3 → Zoom ring (Lens housed) 4 (Wide angle) Lens focusing ring - Sharp PG-D210U | PGD210U Operation Manual - Page 11
is an illustration of maximum and minimum projection distances for the PG-D210U with a picture size of 100 inches (254 cm). Move the projector forward or backward if the edges of the image are distorted. Height of Projector Adjust to match the setup configuration. Screen Lens center 90˚ H Rack - Sharp PG-D210U | PGD210U Operation Manual - Page 12
internally. As long as the projector is properly maintained in this manner, use in these environments will not reduce the overall operation life. Please note that all internal cleaning must be performed by an Authorized Sharp Industrial LCD Products Dealer or Service Center. • Do not expose to - Sharp PG-D210U | PGD210U Operation Manual - Page 13
the picture will be distorted, making viewing difficult. Example of a ceiling-mount setup Before mounting the projector, be sure to contact your nearest Authorized Sharp Industrial LCD Products Dealer to obtain the manufacturer recommended ceiling mount bracket (sold separately). (AN-XGCM40 Ceiling - Sharp PG-D210U | PGD210U Operation Manual - Page 14
of the picture. Minor adjustments can be made with the adjusters. Adjuster release Adjusters 1 2 3 Adjuster release 1. Press the adjuster release and lift the projector to the desired angle with both hands • The adjuster legs will extend to the surface of the table. 2. Remove your hand from the - Sharp PG-D210U | PGD210U Operation Manual - Page 15
a VCR, Laser Disc Player or external audio amplifier, make the following connections. • Always turn off the LCD Projector while connecting to video equipment, in order to protect both the projector and the equipment being connected. Used when the AV equipment to be connected has an S-VIDEO output - Sharp PG-D210U | PGD210U Operation Manual - Page 16
(cross type) and the supplied computer control cable, the personal computer can control the projector and the status of the projector can be checked. See pages port is not correctly set-up. Please refer to your computer owners manual for details on setting-up/installing the correct mouse driver. • Do - Sharp PG-D210U | PGD210U Operation Manual - Page 17
to and operated with the projector. 2 ! Macintosh Adaptor (Supplied) ON ↑ ↓ OFF @ Macintosh Macintosh Adaptor (Supplied) ANALOG RGB OUT RGB Signal Output Socket 2. Connecting to a Macintosh Series Computer 640 480, 832 624 or 1,024 768 resolution ! Set the proper switches on - Sharp PG-D210U | PGD210U Operation Manual - Page 18
with an external IBM-PC monitor, connect the monitor using the supplied cable. When using the projector with a Macintosh monitor, an optional adaptor cable is required. Before using any other type of monitor, carefully check the monitor's interface specifications and make sure that they match the - Sharp PG-D210U | PGD210U Operation Manual - Page 19
to the data-projector for display on an (800 ן600) LCD screen, the screen LCD) mode. If this occurs, turn off the LCD display on the notebook computer and output the display data in "CRT only" mode. Details on how to change display modes can be found in your notebook computer's operation manual - Sharp PG-D210U | PGD210U Operation Manual - Page 20
vertical stripes, etc.), interference may occur between the LCD pixels, causing flickering, vertical stripes, or contrast the following signals, set "MODE" to "ON" or "OFF" to select the projector's resolution mode to match the computer display mode properly. 720 dots ן400 lines, 720 - Sharp PG-D210U | PGD210U Operation Manual - Page 21
:SEL. ENTER : B A C K MENU : E N D MEMORY SELECT 0 1 2 3 4 RESOLUTION HOR FREQ VERT FREQ SETTING 5 6 7 1024×768 6 0 . 0 KHz 7 5 Hz :SEL R MENU : E N D Computer Mode Memory Adjustments • The projector has been preset with different modes for use with XGA and other memory as a user mode. See page - Sharp PG-D210U | PGD210U Operation Manual - Page 22
the AC cord Connect the supplied AC cord to the AC inlet on the back of the projector. 2 OFF ON POWER LAMP TEMP. When the MAIN POWER is on, the POWER indicator lights red. 2. Turn on the MAIN POWER Press the MAIN POWER switch on the back of the projector. The POWER indicator lights red and - Sharp PG-D210U | PGD210U Operation Manual - Page 23
4 On-Screen Display LANGUAGE ENGLISH DEUTSCH ESPAÑOL NEDERLANDS FRANÇAIS ITALIANO SVENSKA :SEL. ENTER : E N T E R MENU : E N D 5 IMAGE ADJ. BLUE SCREEN BLK SCRN DISP INPUT DISPLAY SYSTEM REVERSE INVERT [ON] [OFF] [OFF] [OFF] [OFF] :SEL. ENTER : N E X T MENU : E N D © SYSTEM AUTO PAL - Sharp PG-D210U | PGD210U Operation Manual - Page 24
display. • When selecting RGB mode, the resolution being displayed will be indicated under "RGB," power will turn off, and the projector will return to STANDBY mode. The power can be turned on again either from the projector or remote control. When the power is turned on, the POWER indicator and LAMP - Sharp PG-D210U | PGD210U Operation Manual - Page 25
can adjust it to suit your own preferences with the ADJUSTMENT buttons on the projector and the remote control. • The adjustments can be memorized in RGB 1, more color intensity Skin tones become greenish SHARPNESS RESET For less sharpness For more sharpness All RGB Video Adjustment items are - Sharp PG-D210U | PGD210U Operation Manual - Page 26
audio is factory preset to the standard setting. However, you can adjust it to suit your own preference with the ADJUSTMENT buttons on the projector or the remote control. • You can adjust the "BALANCE", "TREBLE" and "BASS". • To return to the factory preset mode, press the ADJUSTMENT ƒ/∂ buttons to - Sharp PG-D210U | PGD210U Operation Manual - Page 27
Functions on the Projector On-Screen Display SYSTEM SETUP RESOLUTION HOR FREQ VERT FREQ LAMP USAGE REMOTE MOUSE 800@600 3 7 . 9 KHz 6 0 Hz 1234H [AT] :SEL. :ADJ. MENU : E N D SYSTEM SETUP RESOLUTION HOR FREQ VERT FREQ LAMP USAGE REMOTE MOUSE 800@600 3 7 . 9 KHz 6 0 Hz 1234H [AT] :SEL. :ADJ. - Sharp PG-D210U | PGD210U Operation Manual - Page 28
LCD Projector Using the Black Screen Function This projector is equipped with a Black Screen Function. This function can be used to black out the presentation image. • Press the BLACK SCREEN button on the projector or the remote control to display the black screen. Press the BLACK SCREEN button - Sharp PG-D210U | PGD210U Operation Manual - Page 29
:SEL. :ADJ. MENU : E N D Using the Blue Screen Function This projector is equipped with a Blue Screen function that will turn the screen blue when the RGB mode. • When the power is turned off, the POWER indicator will light red. • To turn the power on again, press the POWER button to set it to OFF - Sharp PG-D210U | PGD210U Operation Manual - Page 30
when the projector is used in a dusty or smoky location. • Have your nearest Authorized Sharp Industrial LCD Products Dealer or Service Center exchange your fingers and lift it out of the filter cover. POWER indicator goes off. Unplug the power cord. Tab Press Open 4 Clean the AIR FILTER. Clean - Sharp PG-D210U | PGD210U Operation Manual - Page 31
to the nearest Authorized Sharp Industrial LCD Products Dealer or Service Center for repair. • Intense light hazard. Do not attempt to look into the aperture and lens while the projector is operating. Maintenance Indicators POWER LAMP TEMP. LAMP REPLACEMENT TEMPERATURE indicator indicator - Sharp PG-D210U | PGD210U Operation Manual - Page 32
the instructions below. If you wish, you may bring the projector to your nearest Authorized Sharp Industrial LCD Products Dealer. IMPORTANT NOTE TO U.S. CUSTOMERS: The lamp included with this projector is backed by a 90-day parts and labor limited warranty. All service of this projector under - Sharp PG-D210U | PGD210U Operation Manual - Page 33
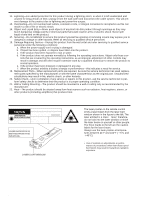
compartment, and that the holes on the top of the lamp cage (k) are aligned with the screw holes on the projector. 2. Tighten screws (e), (f), (g) and (d), then perform the above instructions in the reverse order. Caution: • Because some parts may not be sufficiently cooled, be sure to remove the - Sharp PG-D210U | PGD210U Operation Manual - Page 34
Connection Pin Assignments Analog RGB 1 and 2 Signal Input and Analog RGB Output Terminal: 15-pin mini D-sub female connector Computer Input Analog 1. Video input (red) 2. Video input (green/sync on 8. Earth (blue) 9. Not connected 5 1 green) 10. GND 10 6 3. Video input (blue) 11. GND - Sharp PG-D210U | PGD210U Operation Manual - Page 35
Specifications 1. PC control A personal computer can be used to control the projector by connecting the supplied computer control cable to the PC CONTROL 1 terminal on the projector and an RS-232C cable (cross type) (not supplied Problem POWER (30 - 30) _ _ _ * SHARPNESS (30 - 30) _ _ _ 0 - Sharp PG-D210U | PGD210U Operation Manual - Page 36
CONTROL ITEM VOLUME ADJUSTMENT AUDIO ADJUSTMENT RGB 1 ADJUSTMENT RGB 2 ADJUSTMENT RGB INPUT ADJUSTMENT SCREEN SETTING VIDEO CONFIRMATION ON-SCREEN DISPLAY SETTING MOUSE ADJUSTMENT SCREEN MODE MEMORY COMMAND C1 C2 C3 C4 VO L A MU T E MU T E AABL AATE AABA AARE AARE RAP I RABR RARD RABE RARE RARE RBP - Sharp PG-D210U | PGD210U Operation Manual - Page 37
Specifications 1. Specifications of wired remote control input • 3.5ø minijack • External: ם5 V (1 A) • Internal: GND 2. Function and transmission codes No. Control Item (Function) 1 VOLUME UP 2 VOLUME DOWN 3 POWER ON 4 POWER wired remote control (supplied) terminal on the pro 3. Sharp remote - Sharp PG-D210U | PGD210U Operation Manual - Page 38
Specifications Product Type Model Video system Display method LCD panel Lens Projection lamp Contrast ratio Video input signal S-video input signal Horizontal resolution Audio output Computer RGB input signal LCD Projector PG-D210U PAL/SECAM/NTSC 3.58/NTSC 4.43 LCD panel ן3, RGB optical shutter - Sharp PG-D210U | PGD210U Operation Manual - Page 39
0.8 (21) 1.9 (47) 10.5 (267) Dimensions Rear View Top View 13.0 (329) 4.0 (101)(Max.) 1.9 (49) Side View 5.4 (137) (Lens housed) (Lens extended) 10.3 (261) 1.1 (29) 0.2 (5) 2.8 (71) Front View 8.0 (204) 0.7 (18) Bottom View [Units: inches (mm)] E-38 - Sharp PG-D210U | PGD210U Operation Manual - Page 40
SHARP CORPORATION OSAKA, JAPAN Printed in Japan Imprimé au Japon Impreso en Japón TINS-6785CEZZ T2184-A 9P06-JWG
-
 1
1 -
 2
2 -
 3
3 -
 4
4 -
 5
5 -
 6
6 -
 7
7 -
8
-
9
-
10
-
11
-
12
-
13
-
14
-
15
-
16
-
17
-
18
-
19
-
20
-
21
-
22
-
23
-
24
-
25
-
26
-
27
-
28
-
29
-
30
-
31
-
32
-
33
-
34
-
35
-
36
-
37
-
38
-
39
-
40
 |
 |
PG-D210U
LCD PROJECTOR
PROJECTEUR LCD
PROYECTOR LCD
OPERATION MANUAL
MODE D’EMPLOI
MANUAL DE OPERACION
ENGLISH
E
FRANÇAIS
F
ESPAÑOL
ES
Contents
E
•
Important Information
...................................................................
1
•
Important Safeguards
...................................................................
2
•
Cautions Concerning the Laser Pointer
........................................
3
•
Notes on Operation
......................................................................
4
•
Outstanding Features
...................................................................
4
•
Location of Controls
.....................................................................
5
•
Operating the Wireless Mouse Remote Control
..........................
6
•
Wireless Mouse Functions
...........................................................
8
•
Setting Up the Projector
...............................................................
9
•
Using the Image Invert/Reverse Function
..................................
11
•
Connecting the Projector (VIDEO 1, VIDEO 2)
.........................
14
•
Connecting the Projector (RGB 1, 2: Computer)
.......................
15
•
Input Signals (Recommended Timing)
.......................................
18
•
RGB Adjustment Controls
..........................................................
19
•
Basic Operation of the Projector
................................................
21
•
Adjusting the Picture
..................................................................
24
•
Adjusting the Audio
....................................................................
25
•
Functions on the Projector
.........................................................
26
•
Air Filter Maintenance
................................................................
29
•
Lamp/Maintenance Indicators
....................................................
30
•
Before Calling for Service
...........................................................
30
•
Lamp Replacement
....................................................................
31
•
Connection Pin Assignments
.....................................................
33
•
RS-232C Terminal Specifications
...............................................
34
•
Wired Remote Control Terminal Specifications
.........................
36
•
Specifications
.............................................................................
37
•
Dimensions
................................................................................
38
Table des matières
F
•
Informations importantes
..............................................................
1
•
Mises en garde importantes
.........................................................
2
•
Précautions touchant le pointeur laser
.........................................
3
•
Remarques sur le fonctionnement
................................................
4
•
Caractéristiques spéciales
...........................................................
4
•
Emplacement des commandes
....................................................
5
•
Utilisation de la télécommande/souris sans fil
..............................
6
•
Fonctions de la souris sans fil
......................................................
8
•
Installation du projecteur
..............................................................
9
•
Utilisation de la fonction d’inversement/renversement
...............
11
•
Branchement du projecteur (VIDEO 1, VIDEO 2)
......................
14
•
Branchement du projecteur (RVB 1, 2: Ordinateur)
...................
15
•
Signaux d’entrée (synchronisation recommandée)
...................
18
•
Commandes de réglage RVB
.....................................................
19
•
Fonctionnement de base du projecteur
......................................
21
•
Réglage de l’image
....................................................................
24
•
Réglage du son
..........................................................................
25
•
Fonctions du projecteur
..............................................................
26
•
Entretien du filtre à air
................................................................
29
•
Lampe/Témoins d’entretien
........................................................
30
•
Avant d’appeler un réparateur
....................................................
30
•
Changement de l’unité de lampe (lampe/boîtier)
.......................
31
•
Fonctions des broches du connecteur
........................................
33
•
Fiche technique de la prise RS-232C
.........................................
34
•
Fiche technique de la prise de la télécommande à fil
................
36
•
Fiche technique
..........................................................................
37
•
Dimensions
................................................................................
38
Indice
ES
•
Información importante
................................................................
1
•
Medidas de seguridad importantes
..............................................
2
•
Precauciones respecto al puntero láser
.......................................
3
•
Notas acerca de la operación
.......................................................
4
•
Características más sobresalientes
.............................................
4
•
Ubicación de los controles
...........................................................
5
•
Utilización del control remoto inalámbrico tipo ratón
...................
6
•
Funciones del ratón inalámbrico
..................................................
8
•
Instalación del proyector
..............................................................
9
•
Utilización de la función de imagen invertida/de espejo
............
11
•
Conexión del proyector (VÍDEO 1, VÍDEO 2)
.............................
14
•
Conexión del proyector (RGB 1, 2: Ordenador)
........................
15
•
Señales de entrada (tiempos recomendados)
............................
18
•
Controles de ajuste de RGB
.......................................................
19
•
Funcionamiento básico del proyector
.........................................
21
•
Ajuste de la imagen
....................................................................
24
•
Ajuste del sonido
........................................................................
25
•
Funciones del proyector
.............................................................
26
•
Mantenimiento del filtro de aire
..................................................
29
•
Lámpara/indicadores de mantenimiento
....................................
30
•
Antes de solicitar el servicio de reparación
................................
30
•
Reemplazo de la lámpara
..........................................................
31
•
Asignaciones de las conexiones de clavijas
...............................
33
•
Especificaciones del terminal RS-232C
.....................................
34
•
Especificaciones del terminal del control remoto con cable
..........
36
•
Especificaciones
........................................................................
37
•
Diagramas acotados
..................................................................
38