Sharp PN-L702B PN-L702B Professional LCD Monitor Operation Manual - Page 16
Turning Power On/Off, Turning on the main power, Turning power on/off - remote
 |
View all Sharp PN-L702B manuals
Add to My Manuals
Save this manual to your list of manuals |
Page 16 highlights
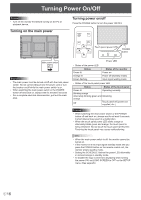
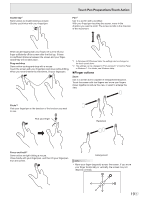
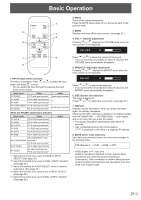
Turning Power On/Off Caution • Turn on the monitor first before turning on the PC or playback device. Turning on the main power Turning power on/off Press the POWER button to turn the power ON/OFF. Touch panel power LED POWER button Main power switch Caution • The main power must be turned on/off with the main power switch. Do not connect/disconnect the power cord or turn the breaker on/off while the main power switch is on. • When switching the main power switch or the POWER button off and back on, always wait for at least 5 seconds. • For a complete electrical disconnection, pull out the main plug. Power LED • Status of the power LED Status Green lit Orange lit Green flashing Status of the monitor Power on Power off (Standby mode) Input signal waiting mode • Status of the touch panel power LED Status Status of the touch panel Green lit Operating normally Blinking orange Alternately blinking green and Initializing orange Off Touch panel off (power not supplied, etc.) Caution • When switching the main power switch or the POWER button off and back on, always wait for at least 5 seconds. A short interval may result in a malfunction. • When the touch panel power LED blinks orange or alternately blinks green and orange, the touch panel is being initialized. Do not touch the touch panel at this time. Touching the touch panel may cause malfunctioning. TIPS • When the main power switch is off, the monitor cannot be turned on. • If the monitor is in the input signal standby mode and you press the POWER button on the remote control unit, the monitor enters standby mode. • Setting the SCHEDULE flashes the power LED alternately in red and orange in standby mode. • To disable the logo screen from displaying when turning the power ON, set LOGO SCREEN to OFF on the SETUP menu. (See page 26.) E 16
-
 1
1 -
2
-
3
-
4
-
5
-
6
-
7
-
8
-
9
-
10
-
 11
11 -
 12
12 -
 13
13 -
 14
14 -
 15
15 -
 16
16 -
 17
17 -
 18
18 -
 19
19 -
 20
20 -
 21
21 -
22
-
23
-
24
-
25
-
26
-
27
-
28
-
29
-
30
-
31
-
32
-
33
-
34
-
35
-
36
-
37
-
38
-
39
-
40
-
41
-
42
-
43
-
44
-
45
-
46
-
47
-
48
-
49
-
50
-
51
-
52
-
53
-
54
-
55
-
56
-
57
-
58
 |
 |