Sharp XL-DV60 XL-DV60 Operation Manual - Page 17
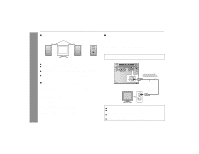
To S-video, input jack, Video signal, S-video cable, commercially available, To component, video - remote
 |
UPC - 074000366084
View all Sharp XL-DV60 manuals
Add to My Manuals
Save this manual to your list of manuals |
Page 17 highlights
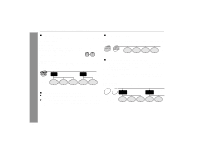
Connecting to a TV with an S-video input jack: If your TV is equipped with an S-video input jack, you can enjoy higher quality images by connecting it with an S-video cable (not supplied). Set the video mode to "Interlace" (default setting). For the procedure, refer to "Changing the video mode". Connecting to a TV with component video input jacks: If your TV is equipped with component video input jacks, purchase a component video cable to enjoy higher quality images. For a progressive scan TV, set the video mode to "Progressive". Select "Interlace" for a non-progressive scan TV. XL-DV60 Preparation for Use Video signal S-video cable TV (commercially available) To S-video input jack To component video input jacks TV Video signal Note: When the video and S-video cables are both connected, the images from the S-video input jack appears on your TV. Component video cable (commercially available) Changing the video mode: 1 Insert a DVD disc (steps 1 - 6, pages 22 - 23). 2 While in the stop mode, press the SHIFT button and DIRECT/ Notes: ! If your TV has different indications for the component video inputs VIDEO MODE button on the remote control. Each time these buttons are pressed, the mode will change in the following order: (Y, B-Y and P-Y), connect jacks with its matching color. ! Some component video jacks designed for the high-vision sys- tem are not compatible with DVD. Do not connect this unit to those component video input jacks. (Images may appear dis- Interlace Select this for a non-progressive scan TV torted or may not appear due to the system difference.) (use a video cable, S-video cable, or component video cable). Progressive Select this for a progressive scan TV What is progressive scanning? The conventional TV system displays 30 frames of still images per second to perform a series of movements (interlaced scanning). (use a component video cable). Whereas, progressive scanning displays one frame every 1/60th of Caution: To enjoy images on a TV, make sure to select the right items a second (60 frames per second) to ensure less flickers and highdensity images. for the following four: video cable, TV's video input jack, and this unit's video output jack and video mode. Otherwise, im- ages do not appear properly. 17
-
 1
1 -
2
-
3
-
4
-
5
-
6
-
7
-
8
-
9
-
10
-
11
-
 12
12 -
 13
13 -
 14
14 -
 15
15 -
 16
16 -
 17
17 -
 18
18 -
 19
19 -
 20
20 -
 21
21 -
 22
22 -
23
-
24
-
25
-
26
-
27
-
28
-
29
-
30
-
31
-
32
-
33
-
34
-
35
-
36
-
37
-
38
-
39
-
40
-
41
-
42
-
43
-
44
-
45
-
46
-
47
-
48
-
49
-
50
-
51
-
52
-
53
-
54
-
55
-
56
 |
 |
