Sharp XL-DV60 XL-DV60 Operation Manual - Page 37
Audio CD Operation
 |
UPC - 074000366084
View all Sharp XL-DV60 manuals
Add to My Manuals
Save this manual to your list of manuals |
Page 37 highlights
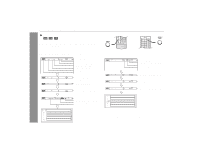
" To play in the desired order (programmed playback) You can play back the desired tracks in the sequence you want. Maximum of 40 tracks can be programmed. 1 In the stop mode, press the MEMORY/SET button. Information on all loaded discs is read, and then the programming screen appears. 2 Press the cursor ( or ) button to select "Add" and press the ENTER button. PROGRAM LIST No. DISC No. INDEX Add Insert Modify Delete Clear All Exit 3 Press the cursor ( or ) button to select a disc number and press the ENTER button. 4 Press the cursor ( or ) button to select a track number and press the ENTER button. 5 Repeat steps 3 - 4 for other tracks. Up to 40 tracks can be programmed. If you make a mistake, the programmed tracks can be cleared by pressing the CLEAR button. PROGRAM LIST No. DISC No. INDEX 1 Disc-1 Disc-2 Disc-3 Disc-4 Disc-5 PROGRAM LIST No. DISC No. INDEX 1 Disc-2 Track1 Track2 Track3 Track4 Track5 Track6 PROGRAM LIST No. DISC No. INDEX 1 Disc-2 Track2 2 Disc-3 Track12 3 Disc-4 Track8 4 Disc-1 Disc-2 Disc-3 Disc-4 Disc-5 6 Press the cursor ( ) button to finish programming. PROGRAM LIST No. DISC No. INDEX 1 Disc-2 Track2 2 Disc-3 Track12 3 Disc-4 Track8 7 Use the cursor ( or ) button to select a track to start with, and press the (play) button. ! Playback starts from the selected track and ends after the last track in the program. ! "MEMORY" lights up on the main unit during programmed play. PROGRAM LIST No. DISC No. INDEX 1 Disc-2 Track2 2 Disc-3 Track12 3 Disc-4 Track8 XL-DV60 Audio CD Operation ! Programmed tracks are stored until a disc is removed or you turn the power off. To change the programmed contents: 1 While stopped, press the MEMORY/SET button to show the pro- gramming screen. 2 Use the cursor ( or ) button to select an item and then press the cursor ( ) button. 3 Use the cursor ( or ) button to select the desired command and then press the ENTER button. "Add" Adds a track to the program. "Insert" Inserts a track between programmed tracks. The track is inserted above (before) the selected track. "Modify" Modifies the track. "Delete" Deletes the selected track. "Clear All" Deletes the program. "Exit" Turn off the programming screen. Note: On some discs, programmed play does not work. 37
-
 1
1 -
2
-
3
-
4
-
5
-
6
-
7
-
8
-
9
-
10
-
11
-
12
-
13
-
14
-
15
-
16
-
17
-
18
-
19
-
20
-
21
-
22
-
23
-
24
-
25
-
26
-
27
-
28
-
29
-
30
-
31
-
 32
32 -
 33
33 -
 34
34 -
 35
35 -
 36
36 -
 37
37 -
 38
38 -
 39
39 -
 40
40 -
 41
41 -
 42
42 -
43
-
44
-
45
-
46
-
47
-
48
-
49
-
50
-
51
-
52
-
53
-
54
-
55
-
56
 |
 |
