Sony DCR-TRV22 Operating Instructions (primary manual) - Page 24
Operation buttons on each display, Step 3 Using the touch panel, DIG EFFT*, SELFTIMER, LCD BRT - support
 |
View all Sony DCR-TRV22 manuals
Add to My Manuals
Save this manual to your list of manuals |
Page 24 highlights
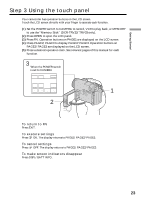
Step 3 Using the touch panel Operation buttons on each display When the POWER switch is set to CAMERA PAGE1 PAGE2 SPOT FOCUS, MENU, FOCUS, FADER, END SCH, SPOT METER, EXPOSURE DIG EFFT*, SELFTIMER, LCD BRT, SUPER NS*, VOL, COLOR SLW S*, MEM MIX* * DCR-TRV22/TRV33 only When the POWER switch is set to VCR PAGE1 PAGE2 PAGE3 MENU, LCD BRT, VOL, END SCH DATA CODE, DIG EFFT*, PB ZOOM* V SPD PLAY, A DUB CTRL, REC CTRL * DCR-TRV22/TRV33 only When the POWER switch is set to MEMORY (DCR-TRV22/TRV33 only) During memory camera PAGE1 PAGE2 PAGE3 SPOT FOCUS, MENU, FOCUS, PLAY, PB FOLDR, SPOT METER, EXPOSURE SELFTIMER, PLAY, MEM MIX LCD BRT, PLAY, VOL During memory playback PAGE1 PAGE2 PAGE3 MENU, CAM, PB FOLDR, DEL PB ZOOM, CAM, RESIZE*, DATA CODE LCD BRT, CAM, VOL * DCR-TRV33 only Notes •When using the touch panel, press operation buttons lightly with your finger supporting the LCD panel from the back side of it. •Do not press the LCD screen with sharp objects such as a pen. •Do not press the LCD screen too hard. •Do not touch the LCD screen with wet hands. •If FN is not on the LCD screen, touch the LCD screen lightly to make it appear. You can control the display with DSPL/BATT INFO on your camcorder. When executing each item The green bar appears above the item. If the items are not available The color of the items changes to gray. When using the viewfinder You can also operate with the touch panel (p. 70). 24
-
 1
1 -
2
-
3
-
4
-
5
-
6
-
7
-
8
-
9
-
10
-
11
-
12
-
13
-
14
-
15
-
16
-
17
-
18
-
 19
19 -
 20
20 -
 21
21 -
 22
22 -
 23
23 -
 24
24 -
 25
25 -
 26
26 -
 27
27 -
 28
28 -
 29
29 -
30
-
31
-
32
-
33
-
34
-
35
-
36
-
37
-
38
-
39
-
40
-
41
-
42
-
43
-
44
-
45
-
46
-
47
-
48
-
49
-
50
-
51
-
52
-
53
-
54
-
55
-
56
-
57
-
58
-
59
-
60
-
61
-
62
-
63
-
64
-
65
-
66
-
67
-
68
-
69
-
70
-
71
-
72
-
73
-
74
-
75
-
76
-
77
-
78
-
79
-
80
-
81
-
82
-
83
-
84
-
85
-
86
-
87
-
88
-
89
-
90
-
91
-
92
-
93
-
94
-
95
-
96
-
97
-
98
-
99
-
100
-
101
-
102
-
103
-
104
-
105
-
106
-
107
-
108
-
109
-
110
-
111
-
112
-
113
-
114
-
115
-
116
-
117
-
118
-
119
-
120
-
121
-
122
-
123
-
124
-
125
-
126
-
127
-
128
-
129
-
130
-
131
-
132
-
133
-
134
-
135
-
136
-
137
-
138
-
139
-
140
-
141
-
142
-
143
-
144
-
145
-
146
-
147
-
148
-
149
-
150
-
151
-
152
-
153
-
154
-
155
-
156
-
157
-
158
-
159
-
160
-
161
-
162
-
163
-
164
-
165
-
166
-
167
-
168
-
169
-
170
-
171
-
172
-
173
-
174
-
175
-
176
-
177
-
178
-
179
-
180
-
181
-
182
-
183
-
184
-
185
-
186
-
187
-
188
-
189
-
190
-
191
-
192
-
193
-
194
-
195
-
196
-
197
-
198
-
199
-
200
-
201
-
202
-
203
-
204
-
205
-
206
-
207
-
208
-
209
-
210
-
211
-
212
-
213
-
214
-
215
-
216
-
217
-
218
-
219
-
220
 |
 |
