Sony DCR-TRV22 Operating Instructions (primary manual) - Page 8
Quick Start Guide, Connecting the power cord, Inserting the cassette - windows 7
 |
View all Sony DCR-TRV22 manuals
Add to My Manuals
Save this manual to your list of manuals |
Page 8 highlights
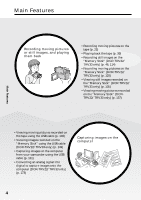
Quick Start Guide - Recording on tape Connecting the power cord (p. 17) Use the battery pack when using your camcorder outdoors (p. 16). Open the DC IN jack cover. AC Adaptor (supplied) 2 3 1 Connect the plug with its v mark facing the battery. Inserting the cassette 1 Slide OPEN/ZEJECT in the direction of the arrow and open the lid. 2 Push the center of the cassette back to insert the cassette. Insert the cassette straight as far as possible into the cassette compartment with the window facing up. 3 Close the cassette compartment by pressing on the cassette compartment. After the cassette compartment goes down completely, close the lid until it clicks. Quick Start Guide To eject the cassette Follow the procedures above, and take out the cassette after the cassette compartment opens completely in step 2. Note Do not press the cassette compartment down forcibly. Doing so may cause a malfunction. How to hold your camcorder Fastening the grip belt Fasten the grip belt firmly. 2 1 8 43
-
 1
1 -
2
-
 3
3 -
 4
4 -
 5
5 -
 6
6 -
 7
7 -
 8
8 -
 9
9 -
 10
10 -
 11
11 -
 12
12 -
 13
13 -
14
-
15
-
16
-
17
-
18
-
19
-
20
-
21
-
22
-
23
-
24
-
25
-
26
-
27
-
28
-
29
-
30
-
31
-
32
-
33
-
34
-
35
-
36
-
37
-
38
-
39
-
40
-
41
-
42
-
43
-
44
-
45
-
46
-
47
-
48
-
49
-
50
-
51
-
52
-
53
-
54
-
55
-
56
-
57
-
58
-
59
-
60
-
61
-
62
-
63
-
64
-
65
-
66
-
67
-
68
-
69
-
70
-
71
-
72
-
73
-
74
-
75
-
76
-
77
-
78
-
79
-
80
-
81
-
82
-
83
-
84
-
85
-
86
-
87
-
88
-
89
-
90
-
91
-
92
-
93
-
94
-
95
-
96
-
97
-
98
-
99
-
100
-
101
-
102
-
103
-
104
-
105
-
106
-
107
-
108
-
109
-
110
-
111
-
112
-
113
-
114
-
115
-
116
-
117
-
118
-
119
-
120
-
121
-
122
-
123
-
124
-
125
-
126
-
127
-
128
-
129
-
130
-
131
-
132
-
133
-
134
-
135
-
136
-
137
-
138
-
139
-
140
-
141
-
142
-
143
-
144
-
145
-
146
-
147
-
148
-
149
-
150
-
151
-
152
-
153
-
154
-
155
-
156
-
157
-
158
-
159
-
160
-
161
-
162
-
163
-
164
-
165
-
166
-
167
-
168
-
169
-
170
-
171
-
172
-
173
-
174
-
175
-
176
-
177
-
178
-
179
-
180
-
181
-
182
-
183
-
184
-
185
-
186
-
187
-
188
-
189
-
190
-
191
-
192
-
193
-
194
-
195
-
196
-
197
-
198
-
199
-
200
-
201
-
202
-
203
-
204
-
205
-
206
-
207
-
208
-
209
-
210
-
211
-
212
-
213
-
214
-
215
-
216
-
217
-
218
-
219
-
220
 |
 |
