Sony DCRTRV900 Operating Instructions - Page 139
Remote Commander, To prepare the Remote Commander
 |
UPC - 027242547025
View all Sony DCRTRV900 manuals
Add to My Manuals
Save this manual to your list of manuals |
Page 139 highlights
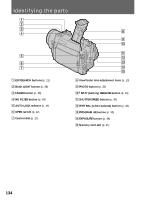
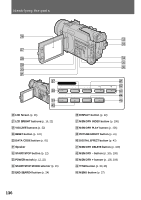
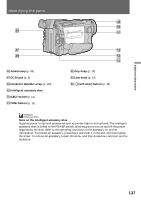
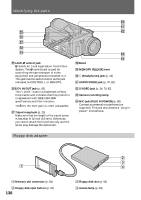
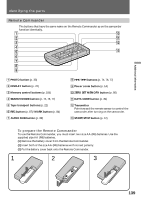
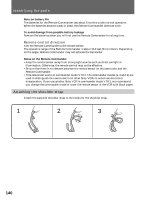
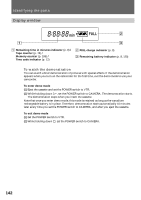
Additional information Identifying the parts Remote Commander The buttons that have the same name on the Remote Commander as on the camcorder function identically. 1 !º 2 !¡ 3 !™ 4 5 !£ 6 7 8 9 1 PHOTO button (p. 33) 2 DISPLAY button (p. 22) 3 Memory control buttons (p. 105) 4 SEARCH MODE button (p. 74, 76, 77) 5 Tape transport buttons (p. 22) 6 REC button (p. 87)/MARK button (p. 84) 7 AUDIO DUB button (p. 89) 8 =/+ buttons (p. 74, 76, 77) 9 Power zoom button (p. 14) !º ZERO SET MEMORY button (p. 80) !¡ DATA CODE button (p. 81) !™ Transmitter Point toward the remote sensor to control the camcorder after turning on the camcorder. !£ START/STOP button (p. 12) To prepare the Remote Commander To use the Remote Commander, you must insert two size AA (R6) batteries. Use the supplied size AA (R6) batteries. (1) Remove the battery cover from the Remote Commander. (2) Insert both of the size AA (R6) batteries with correct polarity. (3) Put the battery cover back onto the Remote Commander. 1 2 3 139
-
 1
1 -
2
-
3
-
4
-
5
-
6
-
7
-
8
-
9
-
10
-
11
-
12
-
13
-
14
-
15
-
16
-
17
-
18
-
19
-
20
-
21
-
22
-
23
-
24
-
25
-
26
-
27
-
28
-
29
-
30
-
31
-
32
-
33
-
34
-
35
-
36
-
37
-
38
-
39
-
40
-
41
-
42
-
43
-
44
-
45
-
46
-
47
-
48
-
49
-
50
-
51
-
52
-
53
-
54
-
55
-
56
-
57
-
58
-
59
-
60
-
61
-
62
-
63
-
64
-
65
-
66
-
67
-
68
-
69
-
70
-
71
-
72
-
73
-
74
-
75
-
76
-
77
-
78
-
79
-
80
-
81
-
82
-
83
-
84
-
85
-
86
-
87
-
88
-
89
-
90
-
91
-
92
-
93
-
94
-
95
-
96
-
97
-
98
-
99
-
100
-
101
-
102
-
103
-
104
-
105
-
106
-
107
-
108
-
109
-
110
-
111
-
112
-
113
-
114
-
115
-
116
-
117
-
118
-
119
-
120
-
121
-
122
-
123
-
124
-
125
-
126
-
127
-
128
-
129
-
130
-
131
-
132
-
133
-
 134
134 -
 135
135 -
 136
136 -
 137
137 -
 138
138 -
 139
139 -
 140
140 -
 141
141 -
 142
142 -
 143
143 -
 144
144 -
145
-
146
-
147
-
148
 |
 |
