Sony DCRTRV900 Operating Instructions - Page 44
Shooting with manual adjustment, Adjusting exposure
 |
UPC - 027242547025
View all Sony DCRTRV900 manuals
Add to My Manuals
Save this manual to your list of manuals |
Page 44 highlights
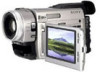
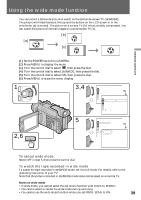
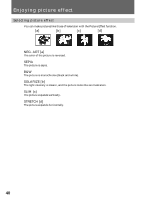
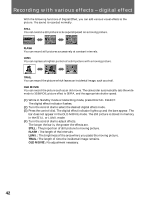
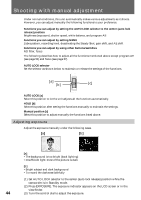
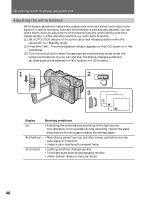
Shooting with manual adjustment Under normal conditions, this unit automatically makes various adjustments as it shoots. However, you can adjust manually the following functions to your preference. Functions you can adjust by setting the AUTO LOCK selector to the center (auto lock release) position Brightness (exposure), shutter speed, white balance, and program AE Functions you can adjust by setting MENU Zebra pattern, recording level, deactivating the Steady Shot, gain shift, and AE shift Functions you can adjust by using other buttons/switches ND filter, focus The following describes how to adjust all the functions mentioned above except program AE (see page 54) and focus (see page 57). AUTO LOCK selector Set the selector as shown below to maintain or release the settings of the functions. AUTO LOCK [a] [b] [c] HOLD AUTO LOCK [a] Select this position to let the unit adjusts all the functions automatically. HOLD [b] Select this position after setting the functions manually to maintain the settings. Manual position [c] Select this position to adjust manually the functions listed above. Adjusting exposure Adjust the exposure manually under the following cases. [a] [b] [a] •The background is too bright (back lighting) •Insufficient light: most of the picture is dark [b] •Bright subject and dark background •To record the darkness faithfully (1) Set AUTO LOCK selector to the center (auto lock release) position while the camcorder is in Standby mode. (2) Press EXPOSURE. The exposure indicator appears on the LCD screen or in the viewfinder. 44 (3) Turn the control dial to adjust the exposure.
-
 1
1 -
2
-
3
-
4
-
5
-
6
-
7
-
8
-
9
-
10
-
11
-
12
-
13
-
14
-
15
-
16
-
17
-
18
-
19
-
20
-
21
-
22
-
23
-
24
-
25
-
26
-
27
-
28
-
29
-
30
-
31
-
32
-
33
-
34
-
35
-
36
-
37
-
38
-
 39
39 -
 40
40 -
 41
41 -
 42
42 -
 43
43 -
 44
44 -
 45
45 -
 46
46 -
 47
47 -
 48
48 -
 49
49 -
50
-
51
-
52
-
53
-
54
-
55
-
56
-
57
-
58
-
59
-
60
-
61
-
62
-
63
-
64
-
65
-
66
-
67
-
68
-
69
-
70
-
71
-
72
-
73
-
74
-
75
-
76
-
77
-
78
-
79
-
80
-
81
-
82
-
83
-
84
-
85
-
86
-
87
-
88
-
89
-
90
-
91
-
92
-
93
-
94
-
95
-
96
-
97
-
98
-
99
-
100
-
101
-
102
-
103
-
104
-
105
-
106
-
107
-
108
-
109
-
110
-
111
-
112
-
113
-
114
-
115
-
116
-
117
-
118
-
119
-
120
-
121
-
122
-
123
-
124
-
125
-
126
-
127
-
128
-
129
-
130
-
131
-
132
-
133
-
134
-
135
-
136
-
137
-
138
-
139
-
140
-
141
-
142
-
143
-
144
-
145
-
146
-
147
-
148
 |
 |