Sony DCRTRV900 Operating Instructions - Page 96
Formatting initializing a PC card or a floppy disk, The difference in image quality mode
 |
UPC - 027242547025
View all Sony DCRTRV900 manuals
Add to My Manuals
Save this manual to your list of manuals |
Page 96 highlights
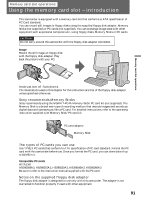
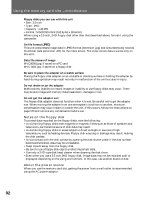
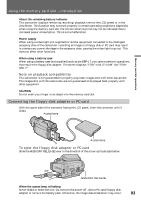
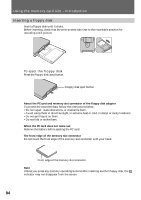
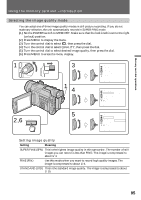
Using the memory card slot - introduction The difference in image quality mode A recorded image is compressed in JPEG format before stored into memory. The memory capacity allotted to each image varies depending on the selected quality mode. Details are shown in the table below. (The number of pixel is 640 x 480, regardless of image quality mode. Data volume before compression is about 600 KB.) Image quality mode SUPER FINE FINE STANDARD Memory capacity About 150 KB About 100 KB About 60 KB Approximate numbers of images you can record on a floppy disk The number of images you can record is different depending on which image quality mode you select and the complexity of the subject. SUPER FINE (SFN) about 7 to 8 images FINE (FIN) about 14 to 16 images STANDARD (STD) about 23 to 27 images Note In some cases, changing image quality mode may not affect the image quality, depending on the types of images you are shooting. Formatting (initializing) a PC card or a floppy disk (1) When you format a floppy disk, insert a disk into the floppy disk adapter. When you format a PC card, insert the card into the memory card slot. (2) Set the POWER switch to MEMORY. Make sure that the lock knob is set to the right (unlock) position. (3) Press MENU to display the menu. (4) Turn the control dial to select , then press the dial. (5) Turn the control dial to select FORMAT, then press the dial. (6) Turn the control dial again to select OK, then press the dial. The display shows "EXECUTE." (7) Press the control dial again. The display shows "FORMATTING," and formatting procedure begins. When formatting is finished, the display shows "COMPLETE." 96
-
 1
1 -
2
-
3
-
4
-
5
-
6
-
7
-
8
-
9
-
10
-
11
-
12
-
13
-
14
-
15
-
16
-
17
-
18
-
19
-
20
-
21
-
22
-
23
-
24
-
25
-
26
-
27
-
28
-
29
-
30
-
31
-
32
-
33
-
34
-
35
-
36
-
37
-
38
-
39
-
40
-
41
-
42
-
43
-
44
-
45
-
46
-
47
-
48
-
49
-
50
-
51
-
52
-
53
-
54
-
55
-
56
-
57
-
58
-
59
-
60
-
61
-
62
-
63
-
64
-
65
-
66
-
67
-
68
-
69
-
70
-
71
-
72
-
73
-
74
-
75
-
76
-
77
-
78
-
79
-
80
-
81
-
82
-
83
-
84
-
85
-
86
-
87
-
88
-
89
-
90
-
 91
91 -
 92
92 -
 93
93 -
 94
94 -
 95
95 -
 96
96 -
 97
97 -
 98
98 -
 99
99 -
 100
100 -
 101
101 -
102
-
103
-
104
-
105
-
106
-
107
-
108
-
109
-
110
-
111
-
112
-
113
-
114
-
115
-
116
-
117
-
118
-
119
-
120
-
121
-
122
-
123
-
124
-
125
-
126
-
127
-
128
-
129
-
130
-
131
-
132
-
133
-
134
-
135
-
136
-
137
-
138
-
139
-
140
-
141
-
142
-
143
-
144
-
145
-
146
-
147
-
148
 |
 |
