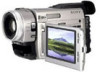
Sony DCRTRV900 Operating Instructions - Page 50
Shooting with the zebra pattern, To erase the zebra pattern
 |
UPC - 027242547025
View all Sony DCRTRV900 manuals
Add to My Manuals
Save this manual to your list of manuals |
Page 50 highlights
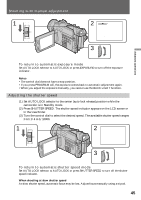
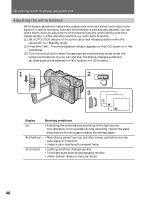
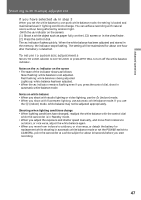
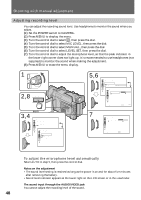
Shooting with manual adjustment Shooting with the zebra pattern You can set the camcorder to display a zebra pattern (diagonal stripes) in the portion of the picture on the LCD screen or in the viewfinder with a subject whose brightness exceeds a certain level. The portion of the picture where zebra pattern appears is an area of high brightness and overexposure. You can check the picture level of a subject by displaying the zebra pattern. Use the zebra pattern as a guide for adjusting the exposure and shutter speed so that you can get the desired picture. (1) Set the POWER switch to CAMERA. (2) Press MENU to display the menu. (3) Turn the control dial to select , then press the dial. (4) Turn the control dial to select ZEBRA, then press the dial. (5) Turn the control dial to select ON, then press the dial. (6) Press MENU to erase the menu display. 1 MEMORY OFF CAMERA POWER VTR 3,4 LCD / VF SET LCD B . L . LCD COLOR VF BR I GHT ZEBRA LCD / VF SET LCD B . L . LCD COLOR [ M E N U ] V: FE N BDR I G H T ZEBRA RETURN OFF [ MENU ] : END 2,6 MENU 5 LCD / VF SET LCD B . L . LCD COLOR VF BR I GHT ZEBRA RETURN OFF ON LCD / VF SET LCD B . L . LCD COLOR [ M E N U ] V: FE N BDR I G H T ZEBRA ON RETURN [ MENU ] : END To erase the zebra pattern Select OFF in step 5, then press the control dial. Notes on shooting with the zebra pattern •A zebra pattern appears at more than 100 IRE. •Even though you see the zebra pattern on the LCD screen or in the viewfinder, the zebra pattern is not recorded. 50
-
 1
1 -
2
-
3
-
4
-
5
-
6
-
7
-
8
-
9
-
10
-
11
-
12
-
13
-
14
-
15
-
16
-
17
-
18
-
19
-
20
-
21
-
22
-
23
-
24
-
25
-
26
-
27
-
28
-
29
-
30
-
31
-
32
-
33
-
34
-
35
-
36
-
37
-
38
-
39
-
40
-
41
-
42
-
43
-
44
-
 45
45 -
 46
46 -
 47
47 -
 48
48 -
 49
49 -
 50
50 -
 51
51 -
 52
52 -
 53
53 -
 54
54 -
 55
55 -
56
-
57
-
58
-
59
-
60
-
61
-
62
-
63
-
64
-
65
-
66
-
67
-
68
-
69
-
70
-
71
-
72
-
73
-
74
-
75
-
76
-
77
-
78
-
79
-
80
-
81
-
82
-
83
-
84
-
85
-
86
-
87
-
88
-
89
-
90
-
91
-
92
-
93
-
94
-
95
-
96
-
97
-
98
-
99
-
100
-
101
-
102
-
103
-
104
-
105
-
106
-
107
-
108
-
109
-
110
-
111
-
112
-
113
-
114
-
115
-
116
-
117
-
118
-
119
-
120
-
121
-
122
-
123
-
124
-
125
-
126
-
127
-
128
-
129
-
130
-
131
-
132
-
133
-
134
-
135
-
136
-
137
-
138
-
139
-
140
-
141
-
142
-
143
-
144
-
145
-
146
-
147
-
148
 |
 |
