Sony DPF D72N Operating Instructions - Page 11
Identifying the parts, Front - cable
 |
UPC - 027242778108
View all Sony DPF D72N manuals
Add to My Manuals
Save this manual to your list of manuals |
Page 11 highlights
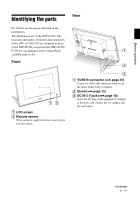
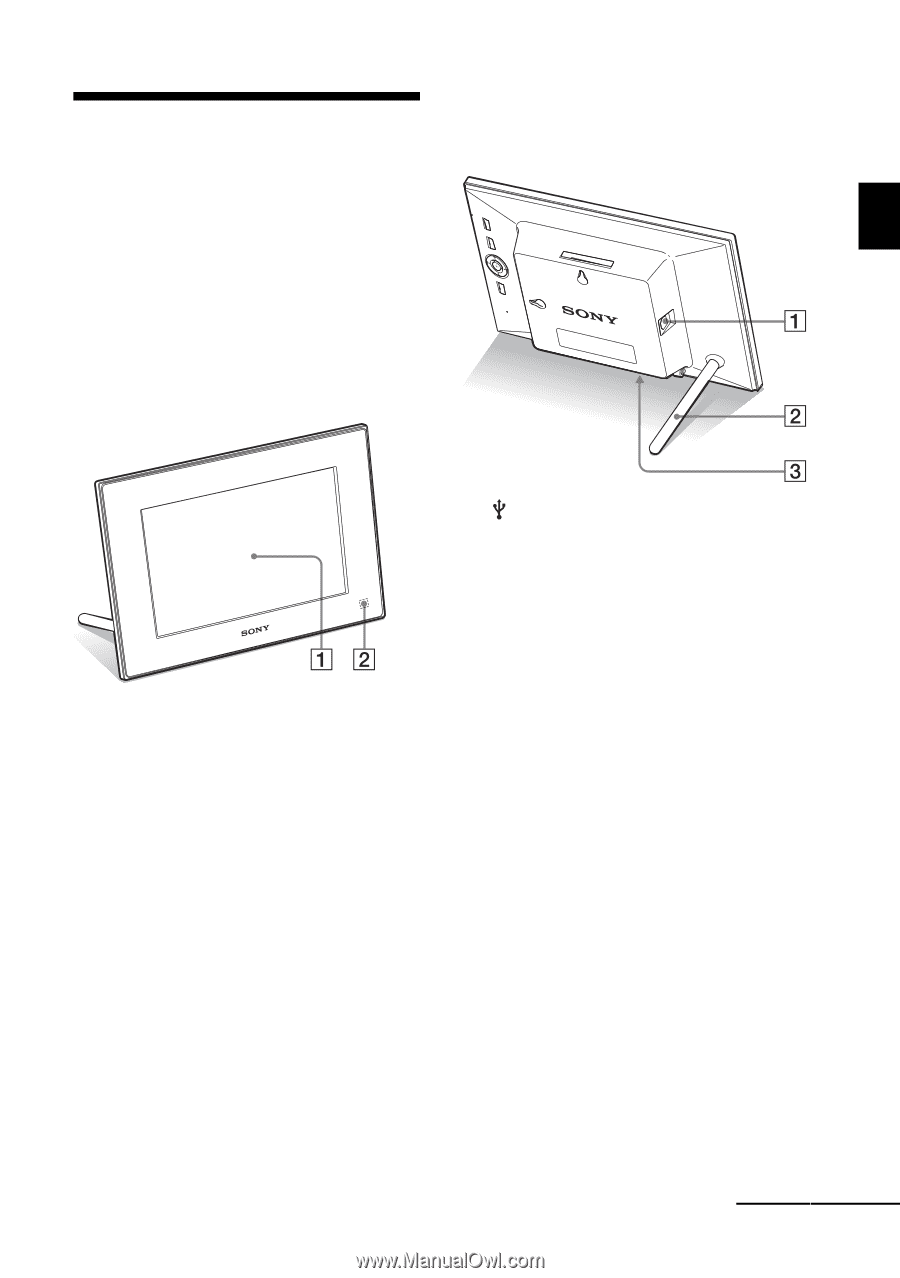
Before operation Identifying the parts For details, see the pages indicated in the parentheses. The illustrations are of the DPF-D72N. The locations and names of buttons and connectors of the DPF-A72N/E72N are identical to those of the DPF-D72N, except that the DPF-A72N/ E72N are not equipped with CompactFlash card/Microdrive slot. Front Rear A LCD screen B Remote sensor When using the supplied remote control, point it at this sensor. A USB B connector (.page 47) Connect a USB cable when you want to use the photo frame with a computer. B Stand (.page 15) C DC IN 5 V jack (.page 18) Insert the DC plug of the supplied AC adaptor to this jack, and connect the AC adaptor and the wall outlet. Continued 11 GB
-
 1
1 -
2
-
3
-
4
-
5
-
 6
6 -
 7
7 -
 8
8 -
 9
9 -
 10
10 -
 11
11 -
 12
12 -
 13
13 -
 14
14 -
 15
15 -
 16
16 -
17
-
18
-
19
-
20
-
21
-
22
-
23
-
24
-
25
-
26
-
27
-
28
-
29
-
30
-
31
-
32
-
33
-
34
-
35
-
36
-
37
-
38
-
39
-
40
-
41
-
42
-
43
-
44
-
45
-
46
-
47
-
48
-
49
-
50
-
51
-
52
-
53
-
54
-
55
-
56
-
57
-
58
-
59
-
60
-
61
-
62
-
63
-
64
 |
 |
11
GB
Before operation
Identifying the parts
For details, see the pages indicated in the
parentheses.
The illustrations are of the DPF-D72N. The
locations and names of buttons and connectors
of the DPF-A72N/E72N are identical to those
of the DPF-D72N, except that the DPF-A72N/
E72N are not equipped with CompactFlash
card/Microdrive slot.
Front
A
LCD screen
B
Remote sensor
When using the supplied remote control, point
it at this sensor.
Rear
A
USB B connector (
.
page 47)
Connect a USB cable when you want to use
the photo frame with a computer.
B
Stand (
.
page 15)
C
DC IN 5 V jack (
.
page 18)
Insert the DC plug of the supplied AC adaptor
to this jack, and connect the AC adaptor and
the wall outlet.
Continued