Sony DPF D72N Operating Instructions - Page 37
Registering a mark (DPF-D72N only
 |
UPC - 027242778108
View all Sony DPF D72N manuals
Add to My Manuals
Save this manual to your list of manuals |
Page 37 highlights
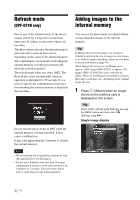
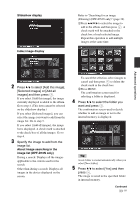
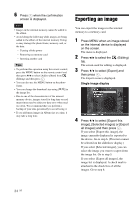
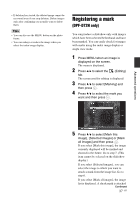
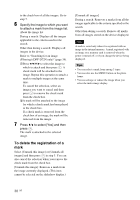
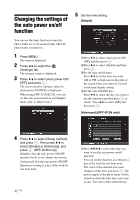
• If deletion has started, the deleted image cannot be recovered even if you stop deletion. Delete images only after confirming you actually want to delete them. Tips • You can also use the MENU button on the photo frame. • You can enlarge or reduce the image when you select the index image display. Registering a mark (DPF-D72N only) You can produce a slideshow only with images which have been selected beforehand and have been marked. You can easily check for images with marks using the index image display or single view mode. 1 Press MENU when an image is displayed on the screen. The menu is displayed. 2 Press B/b to select the tab. (Editing) The screen used for editing is displayed. 3 Press v/V to select [Marking] and then press . 4 Press v/V to select the mark you want and then press . Advanced operations 5 Press v/V to select [Mark this image], [Selected images] or [Mark all images] and then press . If you select [Mark this image], the image currently displayed will be marked and showed in the future. Go to step 7. (This item cannot be selected on the slideshow display.) If you select [Selected images], you can select the image to which you want to attach a mark from the image list. Go to step 6. If you select [Mark all images], the image list is displayed. A check mark is attached Continued 37 GB
-
 1
1 -
2
-
3
-
4
-
5
-
6
-
7
-
8
-
9
-
10
-
11
-
12
-
13
-
14
-
15
-
16
-
17
-
18
-
19
-
20
-
21
-
22
-
23
-
24
-
25
-
26
-
27
-
28
-
29
-
30
-
31
-
 32
32 -
 33
33 -
 34
34 -
 35
35 -
 36
36 -
 37
37 -
 38
38 -
 39
39 -
 40
40 -
 41
41 -
 42
42 -
43
-
44
-
45
-
46
-
47
-
48
-
49
-
50
-
51
-
52
-
53
-
54
-
55
-
56
-
57
-
58
-
59
-
60
-
61
-
62
-
63
-
64
 |
 |
