Sony DPP-FP95 Operating Instructions - Page 23
Fish-eye, Cross Filter, Painting, Single Color, Direct printing, Press ENTER. - window 7
 |
UPC - 027242735002
View all Sony DPP-FP95 manuals
Add to My Manuals
Save this manual to your list of manuals |
Page 23 highlights
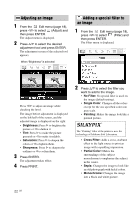
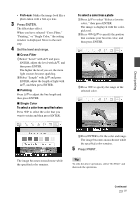
• Fish-eye: Makes the image look like a photo taken with a fish-eye lens. 3 Press ENTER. The filter takes effect. When you have selected "Cross Filter," "Painting," or "Single Color," the setting window is displayed. Move to the next step. 4 Set the level and range. x Cross Filter 1Select "Level" with f/F and press ENTER, adjust the level with f/F, and then press ENTER. The higher the level you set, the more light sources become sparkling. 2Select "Length" with f/F and press ENTER, adjust the length of light with f/F, and then press ENTER. x Painting Press f/F to adjust the line length and then press ENTER. x Single Color To select a color from specified colors Press g/G to select the color that you want to retain and then press ENTER. To select a color from a photo 1Press f/F to select "Select a favorite color.," then press ENTER. The image is displayed with the colorpick tool. 2Press g/G/f/F to specify the portion that contains your favorite color, and then press ENTER. 3Press g/G to specify the range of the selected color. Direct printing The image becomes monochrome while the specified color remains. 4Press ENTER to fix the color and range. The image becomes monochrome while the specified color remains. 5 Press PRINT. Tip To redo the above operations, select "No Filter" and then redo the operations. Continued 23 GB
-
 1
1 -
2
-
3
-
4
-
5
-
6
-
7
-
8
-
9
-
10
-
11
-
12
-
13
-
14
-
15
-
16
-
17
-
 18
18 -
 19
19 -
 20
20 -
 21
21 -
 22
22 -
 23
23 -
 24
24 -
 25
25 -
 26
26 -
 27
27 -
 28
28 -
29
-
30
-
31
-
32
-
33
-
34
-
35
-
36
-
37
-
38
-
39
-
40
-
41
-
42
-
43
-
44
-
45
-
46
-
47
-
48
-
49
-
50
-
51
-
52
-
53
-
54
-
55
-
56
-
57
-
58
-
59
-
60
-
61
-
62
-
63
-
64
-
65
-
66
-
67
-
68
-
69
-
70
-
71
-
72
-
73
-
74
-
75
-
76
-
77
-
78
-
79
-
80
-
81
-
82
-
83
-
84
-
85
-
86
-
87
-
88
-
89
-
90
-
91
-
92
 |
 |
