Sony DPP-FP95 Operating Instructions - Page 73
Others, Connecting with a digital camera or other external device, Is Connecting displayed
 |
UPC - 027242735002
View all Sony DPP-FP95 manuals
Add to My Manuals
Save this manual to your list of manuals |
Page 73 highlights
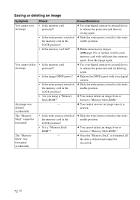
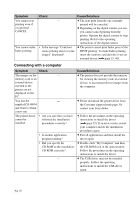
Others Symptom Check You cannot insert - the ink ribbon smoothly. Cause/Solutions c If the ink ribbon does not click into place, remove it and then re-insert it. Only when the ink ribbon is too slack to be loaded, wind the ink ribbon in the direction of the arrow to remove the slack. (.page 9) The ink ribbon cannot be removed. - c Turn off the printer using the 1 (on/ standby) button and then turn it on again. After the motor sound stops, try to remove the ink ribbon. If this does not solve the problem, contact Sony service facilities or your Sony dealer. Connecting with a digital camera or other external device Symptom Check Cause/Solutions The PictBridge mark does not appear on the LCD screen of the digital camera. • Is the digital camera connected correctly? • Is the 1 (on/standby) button turned on? • Does your digital camera support PictBridge? c Connect the cable correctly. c Turn on the printer using the 1 (on/ standby) button. c See the manual supplied with your camera, or consult the manufacturer. • Is "Connecting" displayed on the printer LCD screen? c The message is not displayed while the printer is in the Edit, CreativePrint, or other menu modes. Exit the menu and then connect the cable again. c Disconnect the digital camera and the printer and then connect them again. Or turn off and then on the printer and the digital camera. • Is the USB setting of your c Set the USB setting of your camera to the camera in PictBridge mode? PictBridge mode. You connect and disconnect the USB cable, but nothing happens. - c The printer has developed an over-current error. Unplug the AC power cord of the printer, plug it in again, and then press the 1 (on/standby) button to recover from the error. Continued 73 GB Troubleshooting
-
 1
1 -
2
-
3
-
4
-
5
-
6
-
7
-
8
-
9
-
10
-
11
-
12
-
13
-
14
-
15
-
16
-
17
-
18
-
19
-
20
-
21
-
22
-
23
-
24
-
25
-
26
-
27
-
28
-
29
-
30
-
31
-
32
-
33
-
34
-
35
-
36
-
37
-
38
-
39
-
40
-
41
-
42
-
43
-
44
-
45
-
46
-
47
-
48
-
49
-
50
-
51
-
52
-
53
-
54
-
55
-
56
-
57
-
58
-
59
-
60
-
61
-
62
-
63
-
64
-
65
-
66
-
67
-
 68
68 -
 69
69 -
 70
70 -
 71
71 -
 72
72 -
 73
73 -
 74
74 -
 75
75 -
 76
76 -
 77
77 -
 78
78 -
79
-
80
-
81
-
82
-
83
-
84
-
85
-
86
-
87
-
88
-
89
-
90
-
91
-
92
 |
 |
