Sony DPP-FP95 Operating Instructions - Page 53
that Sony DPP-FP85 or Sony, When the Sony DPP-FP95/FP85 - dpp fp85
 |
UPC - 027242735002
View all Sony DPP-FP95 manuals
Add to My Manuals
Save this manual to your list of manuals |
Page 53 highlights
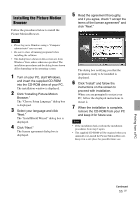
3 Click "Next." The license agreement dialog box is displayed. 4 Read the agreement thoroughly, and if you agree, check "I accept the terms of the license agreement" and click "Next." To USB connector 5 Click "Install." Installation starts. 6 When the "Sony DPP-FP95/FP85 printer driver has been successfully installed." dialog is displayed, click "Finish." 7 Press the 1 (on/standby) button to turn on the printer. 8 Connect the USB connectors of the printer and your PC with a USB cable (not supplied). Printer driver installation starts automatically. Windows PC To USB connector Note Use a B-type USB cable shorter than 3m in length. 9 Wait for a while, then check to see that "Sony DPP-FP85" or "Sony DPP-FP95" has been added to the "Printers" or "Printers and Faxes." 10 When the installation is complete, remove the CD-ROM from your PC and keep it for future use. To continue the process and install the Picture Motion Browser software, follow the procedures from step 2 on page 55. Printing from a PC Continued 53 GB
-
 1
1 -
2
-
3
-
4
-
5
-
6
-
7
-
8
-
9
-
10
-
11
-
12
-
13
-
14
-
15
-
16
-
17
-
18
-
19
-
20
-
21
-
22
-
23
-
24
-
25
-
26
-
27
-
28
-
29
-
30
-
31
-
32
-
33
-
34
-
35
-
36
-
37
-
38
-
39
-
40
-
41
-
42
-
43
-
44
-
45
-
46
-
47
-
 48
48 -
 49
49 -
 50
50 -
 51
51 -
 52
52 -
 53
53 -
 54
54 -
 55
55 -
 56
56 -
 57
57 -
 58
58 -
59
-
60
-
61
-
62
-
63
-
64
-
65
-
66
-
67
-
68
-
69
-
70
-
71
-
72
-
73
-
74
-
75
-
76
-
77
-
78
-
79
-
80
-
81
-
82
-
83
-
84
-
85
-
86
-
87
-
88
-
89
-
90
-
91
-
92
 |
 |
