Sony DPP-FP95 Operating Instructions - Page 57
select Sony DPP-FP85 or Sony, Click Start.
 |
UPC - 027242735002
View all Sony DPP-FP95 manuals
Add to My Manuals
Save this manual to your list of manuals |
Page 57 highlights
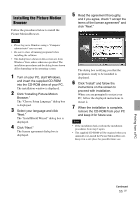
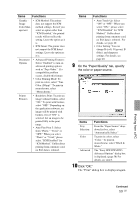
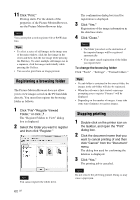
How to access the "Pictures" folder • In Windows 2000: Click "My Documents" - "Pictures" on the desktop. • In Windows Vista/XP: Click "Start" - "Pictures" from the taskbar. 2 Click "Start." The main window of the Picture Motion Browser is displayed 3 Click the folder containing the photos you want to print. As an example, the "sample" folder is selected in the following explanation. 4 Select the photos that you want to print and click (print). The Print dialog box is displayed. 5 In the "Printer" drop-down list box, select "Sony DPP-FP85" or "Sony DPP-FP95." To set the paper orientation or other print options, go to step 6. To print, skip to step 11. In main window, there are the following two different views. To switch the view, click the "Folders" or "Calendar" tab in the right frame. • "Folders" view The images will be classified in each registered folder and are displayed as thumbnails. • "Calendar" view The images will be classified according to the shot date and are displayed as thumbnails on each date of the calendar. In "Calendar" view, you can switch the display by year, by month, or by hour. In this section, "Folders" view windows are used as examples. Items Functions Printer Select the printer you are using: "Sony DPP-FP85" or "Sony DPP-FP95." Paper size To change the size, click "Properties." Note: In some regions, L size print paper is not sold. Properties Specifies paper size, orientation, picture quality and other details. Printing from a PC Continued 57 GB
-
 1
1 -
2
-
3
-
4
-
5
-
6
-
7
-
8
-
9
-
10
-
11
-
12
-
13
-
14
-
15
-
16
-
17
-
18
-
19
-
20
-
21
-
22
-
23
-
24
-
25
-
26
-
27
-
28
-
29
-
30
-
31
-
32
-
33
-
34
-
35
-
36
-
37
-
38
-
39
-
40
-
41
-
42
-
43
-
44
-
45
-
46
-
47
-
48
-
49
-
50
-
51
-
 52
52 -
 53
53 -
 54
54 -
 55
55 -
 56
56 -
 57
57 -
 58
58 -
 59
59 -
 60
60 -
 61
61 -
 62
62 -
63
-
64
-
65
-
66
-
67
-
68
-
69
-
70
-
71
-
72
-
73
-
74
-
75
-
76
-
77
-
78
-
79
-
80
-
81
-
82
-
83
-
84
-
85
-
86
-
87
-
88
-
89
-
90
-
91
-
92
 |
 |
