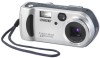
Sony DSCP51 Operating Instructions - Page 22
Setting the date and time continued, Choose [OK] using
 |
UPC - 027242606500
View all Sony DSCP51 manuals
Add to My Manuals
Save this manual to your list of manuals |
Page 22 highlights
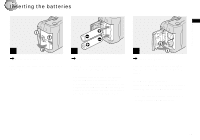
Setting the date and time (continued) CLOCK SET Y/M/D M/D/Y D/M/Y 2002 / 1 / 1 12 : 00 OK AM CANCEL OK CLOCK SET Y/M/D M/D/Y D/M/Y 2002 / 7 / 1 OK 12 : 00 OK AM CANCEL CLOCK SET Y/M/D M/D/Y D/M/Y 2002 / 7 / 4 10 : 30 OK PM CANCEL OK 4 , Choose the year, month, day, hour, and minute items using b/B. A v will be shown above, and a V will be shown below the item currently selected to be set. 5 , Set the desired numerical value using v/V on the control button, then press the center z. After setting the current numerical value, move to the next item. Repeat the above process until all of the items have been set. • If you choose [D/M/Y] in Step 3, use the 24 hour clock display. 6 , Choose [OK] using the B on the control button, and then press the center z. After the date and time are set, the clock will start to keep time. • To cancel the setting process, choose [CANCEL], and press the center z. 22
-
 1
1 -
2
-
3
-
4
-
5
-
6
-
7
-
8
-
9
-
10
-
11
-
12
-
13
-
14
-
15
-
16
-
 17
17 -
 18
18 -
 19
19 -
 20
20 -
 21
21 -
 22
22 -
 23
23 -
 24
24 -
 25
25 -
 26
26 -
 27
27 -
28
-
29
-
30
-
31
-
32
-
33
-
34
-
35
-
36
-
37
-
38
-
39
-
40
-
41
-
42
-
43
-
44
-
45
-
46
-
47
-
48
-
49
-
50
-
51
-
52
-
53
-
54
-
55
-
56
-
57
-
58
-
59
-
60
-
61
-
62
-
63
-
64
-
65
-
66
-
67
-
68
-
69
-
70
-
71
-
72
-
73
-
74
-
75
-
76
-
77
-
78
-
79
-
80
-
81
-
82
-
83
-
84
-
85
-
86
-
87
-
88
-
89
-
90
-
91
-
92
-
93
-
94
-
95
-
96
-
97
-
98
-
99
-
100
-
101
-
102
-
103
-
104
-
105
-
106
-
107
-
108
 |
 |
