Sony DSCP51 Operating Instructions - Page 54
For Macintosh users, Installing the USB driver, Preparing your camera, Connecting your camera - instructions
 |
UPC - 027242606500
View all Sony DSCP51 manuals
Add to My Manuals
Save this manual to your list of manuals |
Page 54 highlights
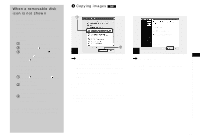
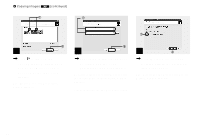
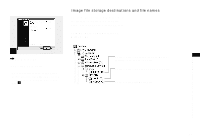
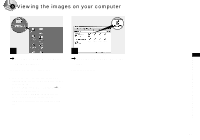
For Macintosh users Follow the steps below, according to your OS. OS Steps Mac OS 8.5.1/8.6/9.0 Steps 1 to 5 Mac OS 9.1/9.2/ Mac OS X(v10.0/v10.1) Steps 2 to 5 1 Installing the USB driver (For Mac OS 8.5.1, 8.6, or 9.0 users only) 1 Turn on your computer, and set the supplied CD-ROM to the CD-ROM drive. The "PIXELA ImageMixer" window appears. 2 Double-click (Setup Menu). 3 Click (USB Driver). The "USB Driver" window appears. 4 Double-click the icon of the hard disk containing the OS to open the window. 5 Drag and drop the following two files from the window opened in step 3 to the System Folder icon in the window opened in step 4. • Sony USB Driver • Sony USB Shim 54 6 When the message "Do you want to put these items into Extension Folder?" is shown, click [OK]. 7 Restart your computer. 2 Preparing your camera For details, see page 46. 3 Connecting your camera to your computer For details, see page 47. Removing the USB cable from your computer or the "Memory Stick" from your camera during a USB connection. Drag and drop the drive icon of the "Memory Stick" to the "Trash" icon, then remove the USB cable or "Memory Stick." * If you are using Mac OS X, remove the USB cable, etc., after you have turned your computer off. 4 Copying images 1 Double-click the newly recognized icon on the desktop. The contents of the "Memory Stick" inserted in your camera appear. 2 Double-click [DCIM]. 3 Double-click [100MSDCF]. 4 Drag and drop the image files to the hard disk icon. The image files are copied to your hard disk. 5 Viewing the images on your computer 1 Double-click the hard disk icon. 2 Double-click the desired image file in the folder containing the copied files. The image file opens. • You can use the "PIXELA ImageMixer for Sony" software to copy images to your computer and view the images on your computer. To install the software, insert the supplied CD-ROM drive, then click the installer icon to select the desired language under "PIXELA ImageMixer" on the opening window and follow the instructions on each window. For details, see the software's help files.
-
 1
1 -
2
-
3
-
4
-
5
-
6
-
7
-
8
-
9
-
10
-
11
-
12
-
13
-
14
-
15
-
16
-
17
-
18
-
19
-
20
-
21
-
22
-
23
-
24
-
25
-
26
-
27
-
28
-
29
-
30
-
31
-
32
-
33
-
34
-
35
-
36
-
37
-
38
-
39
-
40
-
41
-
42
-
43
-
44
-
45
-
46
-
47
-
48
-
 49
49 -
 50
50 -
 51
51 -
 52
52 -
 53
53 -
 54
54 -
 55
55 -
 56
56 -
 57
57 -
 58
58 -
 59
59 -
60
-
61
-
62
-
63
-
64
-
65
-
66
-
67
-
68
-
69
-
70
-
71
-
72
-
73
-
74
-
75
-
76
-
77
-
78
-
79
-
80
-
81
-
82
-
83
-
84
-
85
-
86
-
87
-
88
-
89
-
90
-
91
-
92
-
93
-
94
-
95
-
96
-
97
-
98
-
99
-
100
-
101
-
102
-
103
-
104
-
105
-
106
-
107
-
108
 |
 |
