Sony HDCU-4300 Operation Guide - Page 8
CABLE ALARM indicators, When the second lamp from the right green is lit
 |
View all Sony HDCU-4300 manuals
Add to My Manuals
Save this manual to your list of manuals |
Page 8 highlights
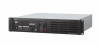
g INTERCOM audio input/output and control block MIC/PGM (microphone/program) switch INTERCOM (intercom select) switch INTERCOM (intercom adjustment) knob INTERCOM connector When the two lamps on the right (green) are lit: Reception status is excellent. When the second lamp from the right (green) is lit: Reception status is good. When the second lamp from the left (yellow) is lit: Reception status is low. When the lamp on the left (red) is lit: Reception status is at the lowest level. k MENU control block DISP/MENU lever and indicator CANCEL/ENTER lever • MIC/PGM (microphone/program) switch ON: Turns the headset microphone on. OFF: Turns the headset microphone off. PGM: Selects program audio output. In this mode, the INTERCOM knob adjusts the headset program audio level. • INTERCOM (intercom select) switch Selects the intercom signal input/output connection source for the INTERCOM connector on the front panel. PROD: Connects the producer line. PRIV: Blocks the connection to the producer line or engineer line, allowing private intercom talk between the CCU and the camera. ENG: Connects the engineer line. • PRIV (private) indicator Lights when the intercom is in private mode. • INTERCOM (intercom adjustment) knob Adjusts the receiver audio level of the intercom. • INTERCOM connector (XLR 5-pin) Connects the intercom headset. To use a headset with a plug other than an XLR 5-pin plug, consult a Sony service or sales representative. h MAIN POWER switch and indicator Turns the entire camera system on and off, including this unit, the video camera, and the RCP-3000/1000 series Remote Control Panel connected to the REMOTE connector of this unit. Switch to "?" to turn the power on, and switch to "a" to turn the power off. The MAIN indicator lights when the power switch of the unit is turned on. The CAM indicator lights when power is supplied to the video camera. i CABLE ALARM indicators SHORT (red): Lights in red when the power supply cord of an optical fiber cable is shorted to the outer sheath, or two power supply cords are shorted. Power is not input to the camera when this indicator lights. OPEN (red): Lights in red when a camera is not connected to the CAMERA connector on the rear panel of this unit via an optical fiber cable. j Optical signal reception status indicator Indicates the communication status of the camera and CCU. CONTROL knob • DISP/MENU lever and indicator Selects the status display or setup menu display. In setup menu mode, the indicator turns on. • CANCEL/ENTER lever In setup menu mode, used to cancel and enter settings. • CONTROL knob (rotary encoder) In status screen mode, used to change the displayed page. In setup menu mode, used to move the cursor on a page and to change menu settings. Pushing the control knob has the same function as setting the CANCEL/ENTER lever to ENTER. l Assignable button You can set a function for this button via the CCU menu. m Menu lock switch This locks out operation of the front panel menu operation area. n Call button When pressed, this outputs a call signal to the camera or external control device (the RCP-3000/1000 series, etc.) that are connected to this unit. Use this when you want to call and speak with the camera operator or external control device operator via intercom. This button lights in red when it is pressed or the call button of other equipment is pressed. 8
-
 1
1 -
2
-
 3
3 -
 4
4 -
 5
5 -
 6
6 -
 7
7 -
 8
8 -
 9
9 -
 10
10 -
 11
11 -
 12
12 -
 13
13 -
14
-
15
-
16
-
17
-
18
-
19
-
20
-
21
-
22
-
23
-
24
-
25
-
26
-
27
-
28
-
29
-
30
-
31
-
32
-
33
-
34
-
35
-
36
-
37
-
38
-
39
-
40
-
41
-
42
-
43
-
44
-
45
-
46
-
47
-
48
-
49
-
50
-
51
-
52
-
53
-
54
-
55
-
56
-
57
-
58
-
59
-
60
-
61
-
62
-
63
-
64
-
65
-
66
-
67
 |
 |
