Sony HDR CX12 Operating Guide - Page 12
Step 2: Setting the date and time, Changing the language setting - memory
 |
UPC - 027242732438
View all Sony HDR CX12 manuals
Add to My Manuals
Save this manual to your list of manuals |
Page 12 highlights
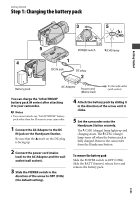
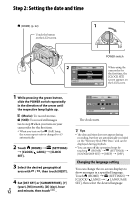
Step 2: Setting the date and time (HOME) (p. 22) Touch the button on the LCD screen. POWER switch When using the camcorder for the first time, the [CLOCK SET] screen appears on the LCD screen. 1 While pressing the green button, slide the POWER switch repeatedly in the direction of the arrow until the respective lamp lights up. (Movie): To record movies (Still): To record still images Go to step 3 when you turn on your camcorder for the first time. When you turn on the (Still) lamp, the screen aspect ratio is changed to 4:3 automatically. 2 Touch (HOME) (SETTINGS) [CLOCK/ LANG] [CLOCK SET]. 3 Select the desired geographical area with / , then touch [NEXT]. 4 Set [DST SET] or [SUMMERTIME], [Y] (year), [M] (month), [D] (day), hour US 12 and minute, then touch . The clock starts. Tips The date and time does not appear during recording, but they are automatically recorded on the "Memory Stick PRO Duo," and can be displayed during playback. You can turn off the operation beeps by touching (HOME) (SETTINGS) [SOUND/DISP SET] [BEEP] [OFF]. Changing the language setting You can change the on-screen displays to show messages in a specified language. Touch (HOME) (SETTINGS) [CLOCK/ LANG] [ LANGUAGE SET], then select the desired language.
-
 1
1 -
2
-
3
-
4
-
5
-
6
-
 7
7 -
 8
8 -
 9
9 -
 10
10 -
 11
11 -
 12
12 -
 13
13 -
 14
14 -
 15
15 -
 16
16 -
 17
17 -
18
-
19
-
20
-
21
-
22
-
23
-
24
-
25
-
26
-
27
-
28
-
29
-
30
-
31
-
32
-
33
-
34
-
35
-
36
-
37
-
38
-
39
-
40
-
41
-
42
-
43
-
44
-
45
-
46
-
47
-
48
-
49
-
50
-
51
-
52
-
53
-
54
-
55
-
56
-
57
-
58
-
59
-
60
-
61
-
62
-
63
-
64
-
65
-
66
-
67
-
68
-
69
-
70
-
71
-
72
 |
 |
